Sprinter Stereo Upgrade (Part 2 of 3): Speaker Replacement
In order to make this topic a more manageable size – I have broken it up into three separate parts:
- Introduction (Part 1 of 3)
- Sprinter Speaker Replacement (Part 2 of 3) (this post)
- Aftermarket Amp and Subwoofer Install (Part 3 of 3)
- Bonus – Bluetooth ‘House’ Stereo System (bypassing head unit)
Summary (TL:DR):
We replaced the speakers in the front doors and added rear 6×9 speakers. This requires removing the door panels to replace the front door speakers. Combined with installation of an aftermarket amp and subwoofer and the stock sprinter head unit / radio now sounds really good.
Tools:
- soldering iron
- plastic trim removal tools
- Star drive (Torx) of various sizes (T-20 & T30 I think)
- Wire strippers, wire cutters, and the usual electrical gear
Materials:
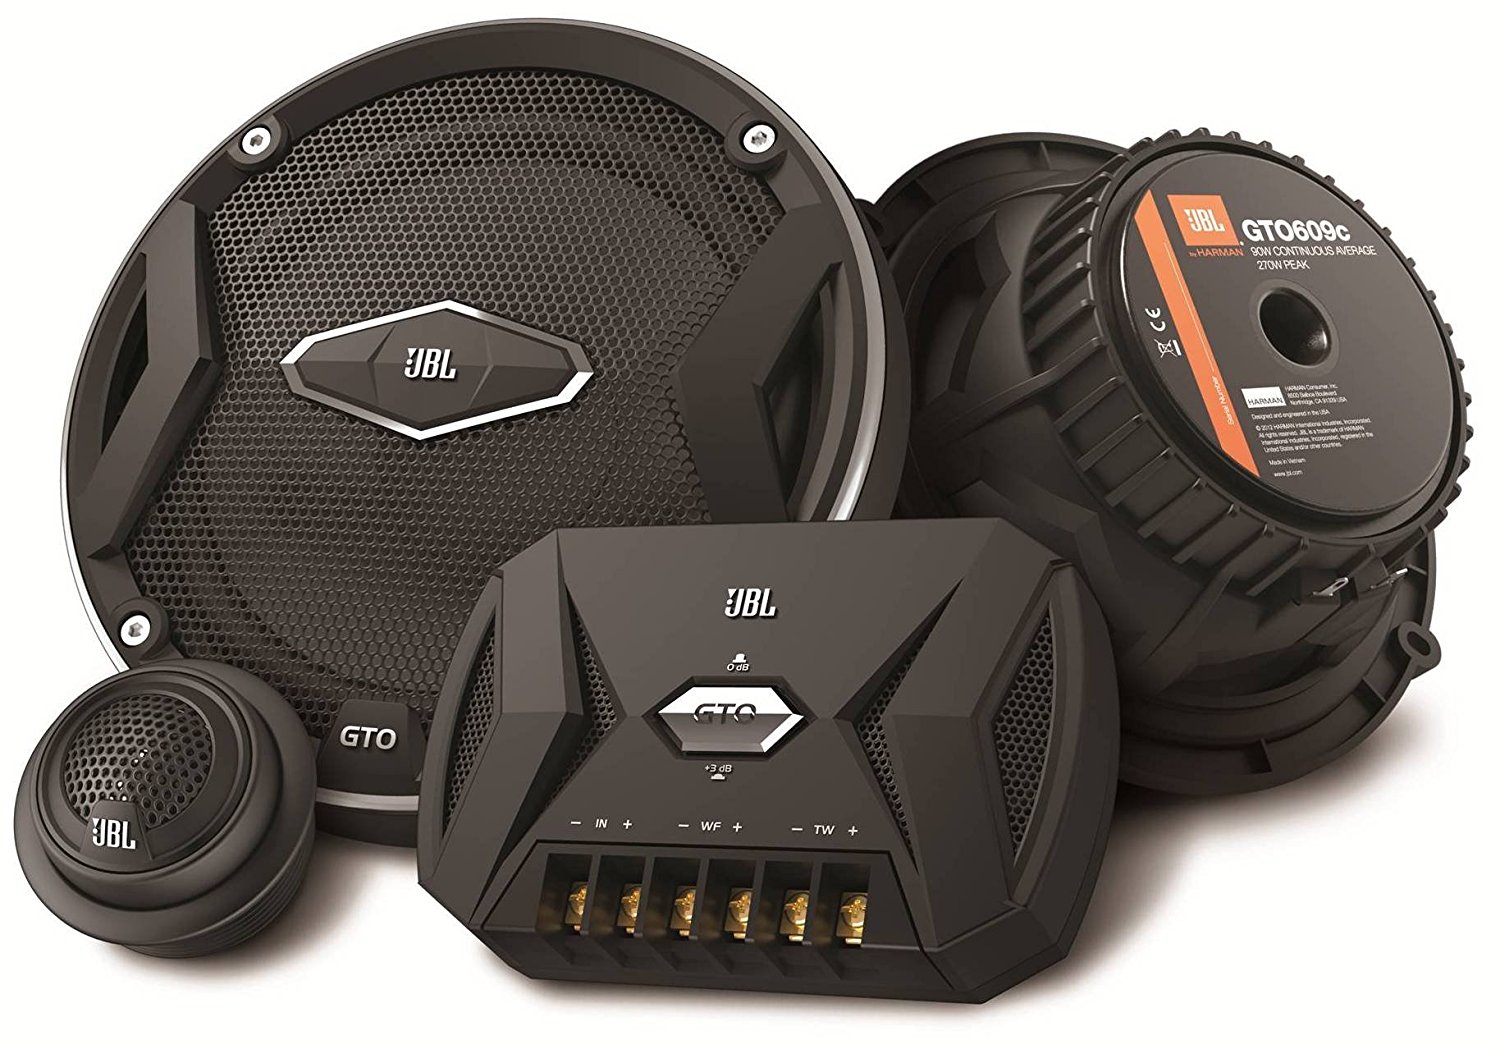
- Front Speakers: JBL GTO609C Premium 6.5-Inch Component Speaker System
- Rear Speakers: JBL GTO938 6×9″ Coaxial Speakers
- Front door speaker adapters, from Impact3D
- 18 gauge stereo wire
- Pre-fab speaker boxes for 6×9 speakers (optional)
Installing the Door and Dash Speakers
Removing the door panels

Below are some tips for removing the door panels. This is covered in greater detail in this post by spintervanusa. And has they say – always start any project involving the van electrical by disconnecting the main van power supply in the driver side foot area, next to the pedals.
- use a torx driver (T20 & T30, I think, for most of them) to remove the screws holding the interior door panel on to the door frame.
- There are four (4) screws holding the door panel on each door. One on the top behind a little circular plastic cover (i removed these with a knife), one behind the door handle black plastic cover (remove the cover with a trim tool and find the T30 screw deeply recessed), and two more behind the lower storage bins at the bottom of the door (remove the storage bins, they pop right off once open).
- Once you undo all the screws, you need to pry up the little plastic cap surrounding the door lock – again a little knife works well for this.
- Then start prying off the door. Like so many other wonderful things on the van this is held in by the little plastic pop rivets. You will likely lose or break many of these as you pull the panel off, regardless of how careful you are. I inched my way around the door with the trim removal tools trying carefully not to break any of the green rivets, but a couple of them didn’t play nice anyway. The door seems to stay just fine even without them, upon reassembly.
- Once the door panel is free from the door frame there are some wires to disconnect for the window controls and lock controls (depending on which door) and also a cable to disconnect the door latch.
- The door latch assembly is actually kinda tricky to remove – first you need to rotate the yellow cylinder out of its holder (which it was really stubborn about for me – but I persisted!) then pull the l-shaped cable end out from the slot. The easiest way I found is to hold onto the cable portion (just ‘down-cable’ from the yellow cylinder) and pull out (away from the door frame). I pulled pretty hard and managed not to break it, so maybe that’s the recommended method.
Removing the dash panels to get to the tweeters
Removing the tweeters in the dash is pretty easy too – just use a trim removal tool to pop the black plastic covers off and then remove the one screw that holds them in. Once you see what these speakers really are, you wont be surprised at how crappy it sounds.
Installing the new speakers

Once all the panels and covers are off rip those stock crappy speakers out! Or carefully unscrew them from their respective locations and remove them, politely. In order to avoid having to take the dash completely apart (like they did in the DirtDevil build) I maintained the wiring to the door speakers (woofers) and only replaced the wiring running from the crossovers to the tweeters. This was necessary in order to be able to utilize the new crossovers and really wasn’t so bad. Just run the wires from the door / woofer location through the rubber sleeve where the door connects to the body and then up into the dash. I used a guitar string as a more rigid fish wire to route the wire through, but I can imagine a number of household items could be used. So ultimately I used the existing speaker wires to run to the crossovers and then used new speaker wiring to run from the crossover to the woofer and tweeter.

For the front speakers, I chose the JBL GTO609C Premium 6.5-Inch Component Speaker System. Mostly because they got good reviews, were in my price range and were the right size. The key is the 6.5″ woofer and the 1″ tweeter. Of course you can spend as much or as little as you like on your speakers. This was right for me and they have worked very well, no complaints from me.
Install of the tweeters was easy. They press fit nicely into the existing plastic casing and I soldered the new speaker wires to the speaker terminals. You could use quick connects on these terminals, but I am a fan of permanence, when it comes to things I never want to have to deal with again (and if I do have to deal with it, its not big deal to clip the wires).
Install of the woofers requires installing Hein’s (Impact3D) speaker adapters. The adapters themselves screw into the existing holes in the door panel. Then your new speakers screw into the adapters. I also velcroed the crossovers to the inner door frame, but in a space I am hopeful they wont get dripped on from rain or condensation.
If you haven’t already, it’s a great time to insulate the doors with thinsulate while the door panels are off. The thinsulate should be glued to the plastic door panel NOT the metal door frame. Be very careful not to get the insulation in the way of the window movement.
Test everything out with the stock head unit and once satisfied put it all back together.
Installing the Rear Speakers

The factory head unit can support rear speakers, but this is not enabled by default (unless you had rear speakers installed at the factory – which I did not). Apparently you can pay the dealership to enable the rear speaker outputs, but since I was installing an aftermarket amp anyway, we didn’t go this route. Instead we just wired the rear speakers directly to the new amp. Because of that, there is nothing particularly interesting about installation of the rear speakers.
I built the mounts for the rear speakers into my wheel well boxes so they don’t take up any additional room (that wasn’t already being used) in the van (note: I later put the speakers in pre-fab speaker boxes). Then it was just a matter of running wire through the walls and across (under) the floor to the speaker locations. I suppose I could have gone overhead, but going under the floor boards seemed pretty straightforward anyway (I had a slight gap between the laminate flooring up front and the rubber flooring in the back that served as a perfect wire channel).
Wiring the rear speakers was straightforward, as these were all new and just came directly from the new amp (see part 2).
For speakers, I matched my JBL front speakers with JBL GTO938 6×9″ Coaxial Speakers. These were the right size and had the correct power handling for my amp. They sound good.
That covers the speakers. Next for the amp install!
Continue reading: Aftermarket Amp and Subwoofer Install (Part 3 of 3)


I bought the same JBL speakers to upgrade my Sprinter. For others that buy these same speakers an adapter from Impact3D with a 5” ID cutout is required. The ones I ordered were 5.06” as that was the closest available.
Thanks for following up and letting folks know!