Sprinter Stereo Upgrade (Part 3 of 3): Aftermarket Amp and Subwoofer Install
In order to make this topic a more manageable size – I have broken it up into three separate parts:
- Introduction (Part 1 of 3)
- Sprinter Speaker Replacement (Part 2 of 3)
- Aftermarket Amp and Subwoofer Install (Part 3 of 3) (this post)
- Bonus – Bluetooth ‘House’ Stereo System (bypassing head unit)
Summary (TL:DR):
We kept the stock stereo (cost, practicality, stock look) but added a 300W amp to power the new speakers. It requires removing the stock stereo (though not removing the entire front dashboard) to get at the speaker wiring. But overall the install process was pretty straightforward and only took about 4 to 6 hours (including a lot of fidgeting, thinking, and theorizing).
Tools:
- soldering iron
- plastic trim removal tools
- Star drive (Torx) of various sizes (T-20 & T30 I think)
- Wire strippers, wire cutters, and the usual electrical gear
Materials:
- Amplifier: Rockford R300X4 Prime 4-Channel Amplifier
- Subwoofer: BOSS Audio BASS1400 1400 Watt Low Profile Amplified 10 Inch Subwoofer
- Amp wiring kit: BOSS Audio KIT2 8 Gauge x 2
The Procedure
Intercept the speaker outputs from the stock head unit and run the wiring

The stock head unit delivers practically no power to the speakers and with nice new speakers that have decent power handling, that is no good. But to minimize disassembly and also maintain the stock head unit I “intercepted” the speaker wires from the stock head unit, rather than replaced them.

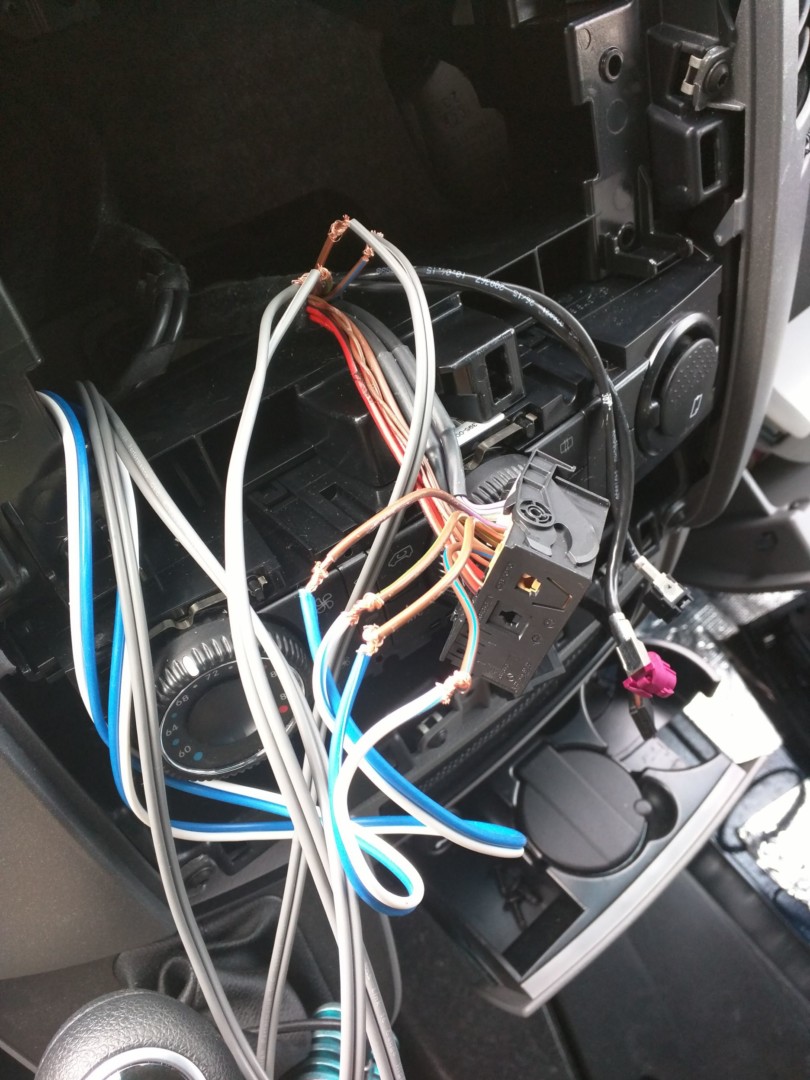
First thing you need to do is remove the stock head unit, to get at the wiring in the back. Again, any time your messing with electrical, disconnect the van power from the driver side foot well. Removal of the dash surround in the head unit area is easy with trim tools. This short 2-minute video shows the basics of removing the radio. It is showing a little bit different than the stereo on my 2016 Sprinter, but the basics are the same. Remove the black cover surrounding the stereo by prying it up (starting from the top or sides) with a trim tool. It pops right out pretty easily. There is a wire attaching to the lower control module that you can leave attached and just have the whole thing dangle, or unplug. Then its four (4) T-20 screws to remove the head unit.


Once you pull the head unit out you can disconnect it from its various connectors. The big black one is the one you want. Peal back the tape holding the wires into the black connector/harness so that you can more easily separate the wires it contains. You are looking for those same wires you connected the speakers to in step 1. That is, brown/blue, brown/orange, brown/purple and brown/green. All these wires terminate in the yellow portion of the harness (see photos). To simplify wiring everything up, what I did was clip these 4 wires and run new wires back to my amp, then run the output wires from my amp pack to this area to power the new front speakers. So that basically requires eight (8) new wires running to/from the new amp and stock head unit (or 4 sets of 2). I used different color wires where possible, to designate the wires “coming from the stock radio/head unit” versus the amplified wires “coming from the amp”. And also probably a good idea to keep track of left and right and plus and minus too.


I decided to locate my amp in the same little box behind the driver seat that all of my other electronics reside in, but under the drivers seat, passenger seat, or anywhere there is space and adequate ventilation is probably fine. So all the new speaker wires were routed down through the dash and under the front flooring back to behind the drivers seat. Fishing the wires through to minimize the amount of stuff I had to take apart was pretty straightforward (though I did pull up the van floor in the area around the drivers seat to make this easier.
Once all the wires had been run with the appropriate lengths to reach their destinations I made the eight (8) solder connections to the existing wiring in the dash. Since I felt confident in my solder work, I went ahead and put everything back together in the dash – though you may want to test your connections with a multi-meter before reassembly.
Install the amp and supporting accessories

Once all the wires are run back to the amp location, its just a matte of getting power to the amp and connecting everything up. However there are a few nuances. Amps are designed for low level inputs, like those from RCA cables. However, since I was using the stock radio/head unit all I had was high level / speaker-level outputs. That requires conversion back to low level for use with an amp. Some amps come with high level converters built right in. The Rockford R300X4 Prime 4-Channel Amplifier that I purchased did not have this functionality built in, so I needed a separate speaker-level converter. I chose the AudioControl LC2i. This unit is pretty cool as it has 2 channels which can be used to control my mid and high range speakers separately from my sub. Of course, you don’t have to go all fancy like this one, but there are some benefits to individual volume and boost control on each channel, which I appreciated and enjoy now.
The wires from the stock head unit come into the speaker-level converter as “speaker inputs”. Then RCA cables connect the “main output” to the new amp and the “bass output” to the powered subwoofer.

I put together a diagram showing the basic wiring connecting the stock radio / head unit to the new speaker-level converter and then the various connections from the amp back to the existing speaker wiring and also the connections to the new subwoofer (discussed later).
Wiring of the speaker inputs and RCA input/output to their various locations is pretty straightforward – if you can call the diagram above straightforward. But really, as long as you can keep the wires going to and coming from the head unit area, there is not much to worry about. Just get it done.

Things get a little more complicated with running the power. Each unit in the audio system unsurprisingly requires its own power (high level converter, amp, subwoofer) but also requires a signal to automatically turn itself on. It would be annoying to have to manually turn the amp on every time I started up the van and wanted to listen to music, so this system of device power switching needs to be automated. Fortunately, there is an existing system in place for that. Under the driver’s seat is the famous X145 terminal. A diagram from the Sprinter EK1 manual is included (left) showing the location under the drivers seat and also an explanation of each terminal on the connector. I chose to connect to the “Power with engine running” terminal, as I decided I only needed my amp and subs turned on when the van was running (and thus the alternator running too). You may choose the ignition power to have it turn on when a key is inserted into the ignition (but may draw down your batteries fast, depending on the size of your installed system). I haven’t had a problem with my setup as I don’t tend to sit around in the van with the key in it but the engine not running very often.
To be clear, each audio device (converter, amp, subwoofer) is powered directly from my main fuse panel (where my van lights, usb outlets, 12v ports, etc are also wired) with 8 gauge wires from the BOSS Audio KIT (more on that in a second). But the signal to turn the units on comes from the D+ (terminal 1) terminal under the drivers seat. This just requires a small wire to ‘send’ the signal. I have this main “turn on” signal coming into the LC2 speaker-level converter’s “remote in” port. And then two wires coming out of the LC2’s “remote out” port, one to the amp and the other to the subwoofer. This provides the “turn on” signal to these two additional devices. The LC2 has a system called “GTO” or ‘Great Turn On’ that automatically senses when it receives a signal from the speaker-level input and is supposed to turn it on automagically. This may be true – but I have heard bad stories about these systems popping or turning off intermittently or other bad things – not specifically for the LC2, but once you have read enough bad reviews about automatic turn on systems, going with a failsafe direct turn on connection (especially when Sprinter makes it so easy!) seems like a good idea. So to that end, I have the GTO function turned off. But I’d be curious to hear if others have had good experience with it.
Below is a wiring diagram for the power to each unit and the “remote turn on” wire (shown in pink).

For the large gauge wiring that is needed to power an amp I chose the BOSS Audio KIT. I used two of these, on for my subwoofer and one for my amp. This gave me all the wiring parts I needed for both systems, plus a few extras (I didn’t use the fuses it came with because I just went direct to my main fuse box). The cables and wires in this system are okay. I don’t actually believe that it is 8 gauge, but it gets the job done and I have felt the wires when the system is running pretty hard and they don’t appear to be heating up in any detrimental way – so that is promising. I am sure you could spend more money on a better wiring kit, but for me, this worked pretty well.

I spent quite some time choosing an amp. There are just so many options and things to choose from. In the end I went with the Rockford R300X4 Prime 4-Channel Amplifier. It had all the functionality I wanted/needed and has been fantastic. It was easy to install and sounds really good. The biggest feature I wanted (in addition to wanting something around 300 watts) was the ability to take 1-channel stereo input (the left and right signal from the LC2’s main output) and direct it to the 4 amplifier mono channels. The R300x4 has a switch that does just that. You can provide it 2 or 4 mono channels and either distribute or combine them. So i have mine set to 2-channel mode and it works just how I want. Other amps might also have this functionality, but it was difficult to determine that from my research. Ultimately, I am quite happy with my purchase.
Install the Subwoofer
Lastly, installing the subwoofer. I went with the BOSS Audio BASS1400 1400 Watt Low Profile Amplified 10 Inch Subwoofer. Again fairly straightforward install. Run the RCA cables from the LC2 to the subwoofer and connect it to power and the turn on signal and away you go. I know everything in this post has been sunshine and roses about the products I have purchased – well that can stop now. I think the subwoofer I bought is not very good. On some music it sounds fantastic, but on others it sounds terrible – rattling and crackling and in general being no good. But it was cheap! Lesson learned, you cannot get “1400 watts” (yeah right) for $120. I think something from Rockford, Alpine, Kenwood, or Pioneer with much less (claimed) power and a little bit higher cost would have been much better. But that is something to dream about for the future. If folks have suggestions, I am all ears.
This concludes this multi-part module on upgrading the stereo / radio in a sprinter.
For more Sprinter / Van audio improvements, check out: Bluetooth ‘House’ Stereo System (bypassing head unit)


Stock head unit delivers practically no power to the speakers and with nice new speakers that have decent power handling, that is no good. But to minimize disassembly and also maintain the stock head unit I “intercepted” the speaker wires from the stock head unit, rather than replaced them.