Motorcycle Top Case Review and Install on 2016 Suzuki V-Strom DL-1000
Summary (TL:DR):
Utilizing the factory threaded inserts on the V-Strom frame and some drilling on the top case mounting plate as well as some creative use of oversized nuts as spacers, I was able to install a top case on the Suzuki V-Strom DL-1000 without having to do any permanent damage to the bike’s factory rack. I detail my procedure below for the Bestem top case on a 2016 V-Strom, but this would probably be applicable to many top cases on the 2014 – 2016 model year V-Strom, possibly more.
Introduction

I am excited to report that I have rejoined the ranks of adventure bike owners. Sure, I really liked cruising around on the streets and on the trails with the capable Kawasaki KLX 250, but deep down inside, I missed highway speeds and ‘more street’ oriented handling. So I bit the bullet and purchased a new (2016) Suzuki V-Strom DL-1000 ABS Adventure bike. I can provide more review and impressions later (as well as various how-to’s that I am sure I will get to), but first things first – new bike has to get set up… like the old bike. And that starts with a top case.
The V-Strom ‘Adventure’ model comes with factory side cases, so I didn’t need to worry about adding those right away. Though that may be in the cards in the future as the factory cases are (cool looking, but) extremely small. Not really enough room to pack for an adventure. But a top case was an accessory necessity, at the very least to provide simple storage for the typical helmet and jacket (which certainly wouldn’t fit in the factory side cases). So off to the internet I went to do some shopping.
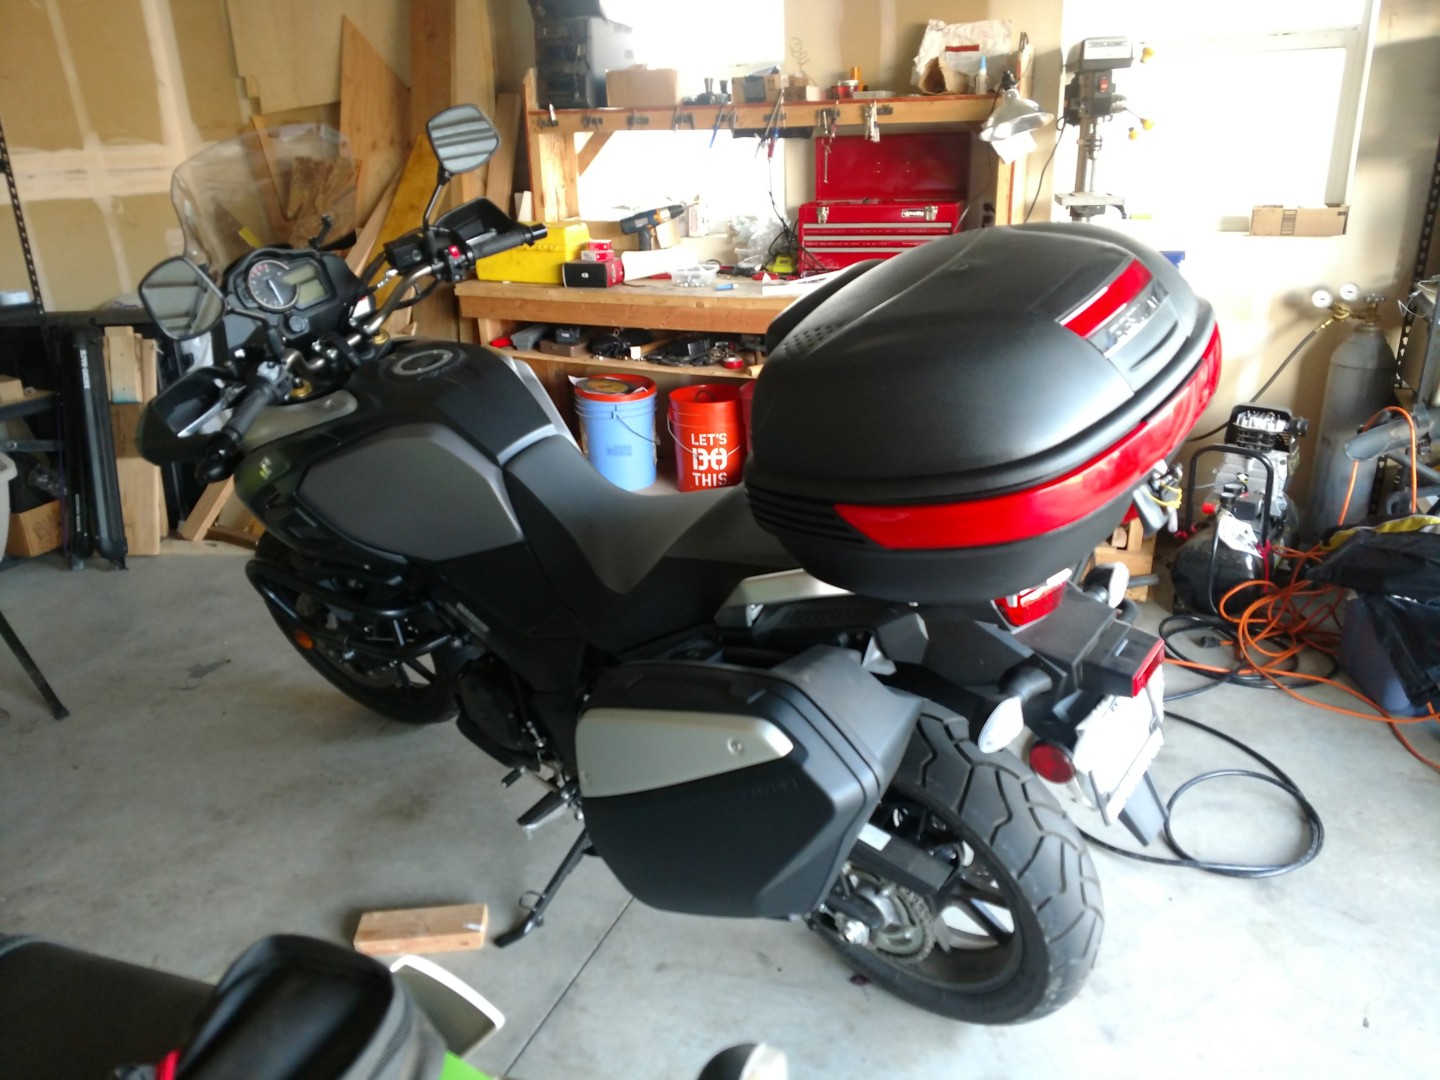
 Of course there are quite a number of top cases on the market, that range all over in price and quality. Certainly, I looked at some of the ‘name brand’ top cases, but I couldn’t really justify spending 4 or 5 times on a plastic box. Now, something aluminum was enticing and maybe worth a higher price point, but ultimately that’s not what I went with. After about an hour of scouring the available options and reading a bunch of online reviews I pulled the trigger on the Bestem T-Box TBOX-929-BLK Black 12″ X 22″ X 16″ Motorcycle/Scooter Flat Top Box. The price was right and the reviews looked good. Plus it met my minimum requirement of allegedly being able to hold two helmets. Two days later it was on my front porch.
Install
I had read that install on the V-Strom was tricky and might require drilling some extra holes in the factory V-Strom rack or the factory tail/mud flap plastics. I really didn’t want to do that on my brand new bike and so was hoping that I could figure out a better way. Fortunately! that way was found.
Tools Required:
- Wrenches and sockets of various sizes
- Drill or Drill Press and metal bits (7/16″)
Materials:
- Bestem T-Box TBOX-929-BLK Black 12″ X 22″ X 16″ Motorcycle/Scooter Flat Top Box. (though this could prolly be done with most any top box mounting system)
- 2 x M8 x 60 stainless bolts
- 2 x M8 x 50 stainless bolts
- 4 x M8 nuts
- 4 x 3/8″ stainless washers
- 6 x 3/8″ nuts
- Locktite (blue) or lock washers or both
Procedure

 Step One; unbox everything. I ended up not using any of the provided universal mountain hardware. It just didn’t fit my needs. But its nice that they provided it. I also didn’t wire up the tail light. I might do that in the future, but not now.
Next I pulled off the seat and unbolted the rear rack/carrier (I think in the OEM parts fische its called a “carrier”). Its pretty simple to do, just remove the four M8 bolts and bushings. This allowed me to measure up the spacing between the two captive nuts the furthest to the back of the motorcycle. I confirmed that, unfortunately, the existing holes on the Bestem mounting plate do not fit the spacing of the V-Strom’s rear rack. So some drilling is required.

Easy enough, the metal isn’t too thick and the drilling goes pretty fast. Check the spacing a couple times and then go for it. I drilled oversized holes so as to be able to adjust the positioning a little bit before tightening it down. As usual I recommend using some spray lubricant on your drill area to keep things from binding up or getting too hot. That takes care of the ‘front’ mounting holes – now for the rear mounting bracket holes.
Fortunately, the mounting plate had existing holes that lined up with the spaces in the OEM rack/carrier. Sure, they aren’t quite straight on, but I was able to wiggle the bolts in without too much fuss, so I called that good. But before putting it all together, I needed to get it spaced right!
I didn’t want the rack mounting plate to be siting flush to the OEM rack/carrier and it also didn’t appear I could rely on the rubber bumpers that came mounted on the Bestem mounting plate – they just didn’t look very robust. So I improvised my own spacers using oversized nuts (3/8″) and washers. These nuts slide over the bolts and provide spacing between the mounting plate and the OEM rack. Here are the order of the hardware I used (from bottom to top):


For the front bolts:
(1)OEM captive nuts
(2)OEM rack/carrier
(3)OEM bushing
(4)washer
(5&6)3/8″ nut x 2
(7)Bestem mounting plate
(8)washer
(9)M8x60 bolt.
For the rear bolts:


 (1)8mm nut
(2)lock washer
(3)regular washer
(4)oversized washer (3/8″)
(5)OEM rack/carrier
(6)3/8″ washer
(7)3/8″ nut
(8)3/8″ washer
(9)Bestem mounting plate
(10)washer
(11)M8x50 bolt.
If all is drilled and measured right the 8mm bolts will thread perfectly into the factory rack captive nuts. After that its pretty straightforward – put it all together and tighten it up. Project complete.
Initial Thoughts and Product Review
Overall I think the case is going to be great for my needs holding my jacket and helmet when I am off the bike as well as holding other gear on short adventures. So from an overall, basic functionality point of view, I think the Bestem case is going to work out just fine. The age old adage, you get what you pay for is certainly true, but I also believe that this is a quality budget product. The two aren’t mutually exclusive, but I also understand that some corners have to be cut to keep the price low. I haven’t had the Bestem case installed for long but here are a few quick review notes/criticisms:
- The Bestem top case itself is sturdy and seems tough enough, but the locking mechanism seems pretty flimsy and the locking bracket rattles around bit where it attaches – not confidence inspiring.
- The case itself seems to rattle around a little on the mounting bracket. I haven’t really noticed it make noise or anything while riding, but just grabbing it and shaking it indicates a little more movement than I would normally prefer. Time will tell if the rattle becomes a problem. I have never owned $350 case, so don’t know if they rattle too – but maybe that’s what you get for the extra $250. If that’s the case, it still wouldn’t be worth it.
- It does fit two size large full face helmets, but just barely and it’s a squeeze to make it work.
- There are these little screws all over the place inside that I would be concerned are going to scratch up my helmet, or anything else in there. Especially if I have two full face helmets shoved in there tightly. To prevent this, I put some duct tape over the screws (see photo) but I am unconvinced this is a viable long term solution.
That’s all there is to complain about, which is not much in the scheme of things. Like I said above, I think the Bestem case is going to work out just fine for my needs.


Hi, can you fit a full face helmet in the left side panier(bigger one)?
Thanks
You cannot fit a full face in the suzuki factory panniers. they are really not very big. That’s why I had to get a top case.
Thanks for the feedback.
Cheers