2016 Suzuki V-Strom DL1000 – First Oil Change, Filter Replacement, and Maintenance Guide
It didn’t take me long to get up to (or at least near) the 600-mile mark on my new Suzuki VStrom DL1000 Adventure motorcycle. And so, per the scheduled maintenance table, it was time for the first oil change and general all around bolt tightening. Suzuki’s DL1000A service manual lists the following items to be serviced at the 600-mile mark:
- Tighten exhaust pipe and muffler bolts
- Inspect exhaust control valve
- Replace engine oil
- Replace engine oil filter
- Inspect idle speed
- Inspect throttle cable play
- For “California Only” it says to sync the throttle valves
- Inspect the drive chain
- Inspect the brakes
- Inspect the Steering
- Tighten the chassis bolts and nuts
- And of course, lubricate the chain and pivots
Most of the above items are repeated in subsequent maintenance intervals as well. So without further ado – let’s get started…
Tools Required

- 17mm socket or wrench for oil drain plug (some specifics indicated below, where relevant)
- Oil filter removal tool
- Hex wrenches if removing the faring of the “Adventure bike” to get access to the oil filter
Materials Required
- Oil (3,100ml for the oil and filter change, 2,700 for just an oil change) – more discussion on oil type below
- Filter (more discussion on filter type, below)
- Gasket washer for drain plug (I don’t usually replace this, but the manual says so)
The Procedure
In order to do all of this properly, I highly recommend either A) Pay your dealer the exorbitant amount of money for them to do it. Or B) buy the service manual from Suzuki (part number 99500-39503-03E). The manual is very well written and super helpful. As usual, this blog just indicates what I did – it is not ‘expert advice’. You are responsible for your own safety and the well being of your person and your bike.
Oil and Filter Change
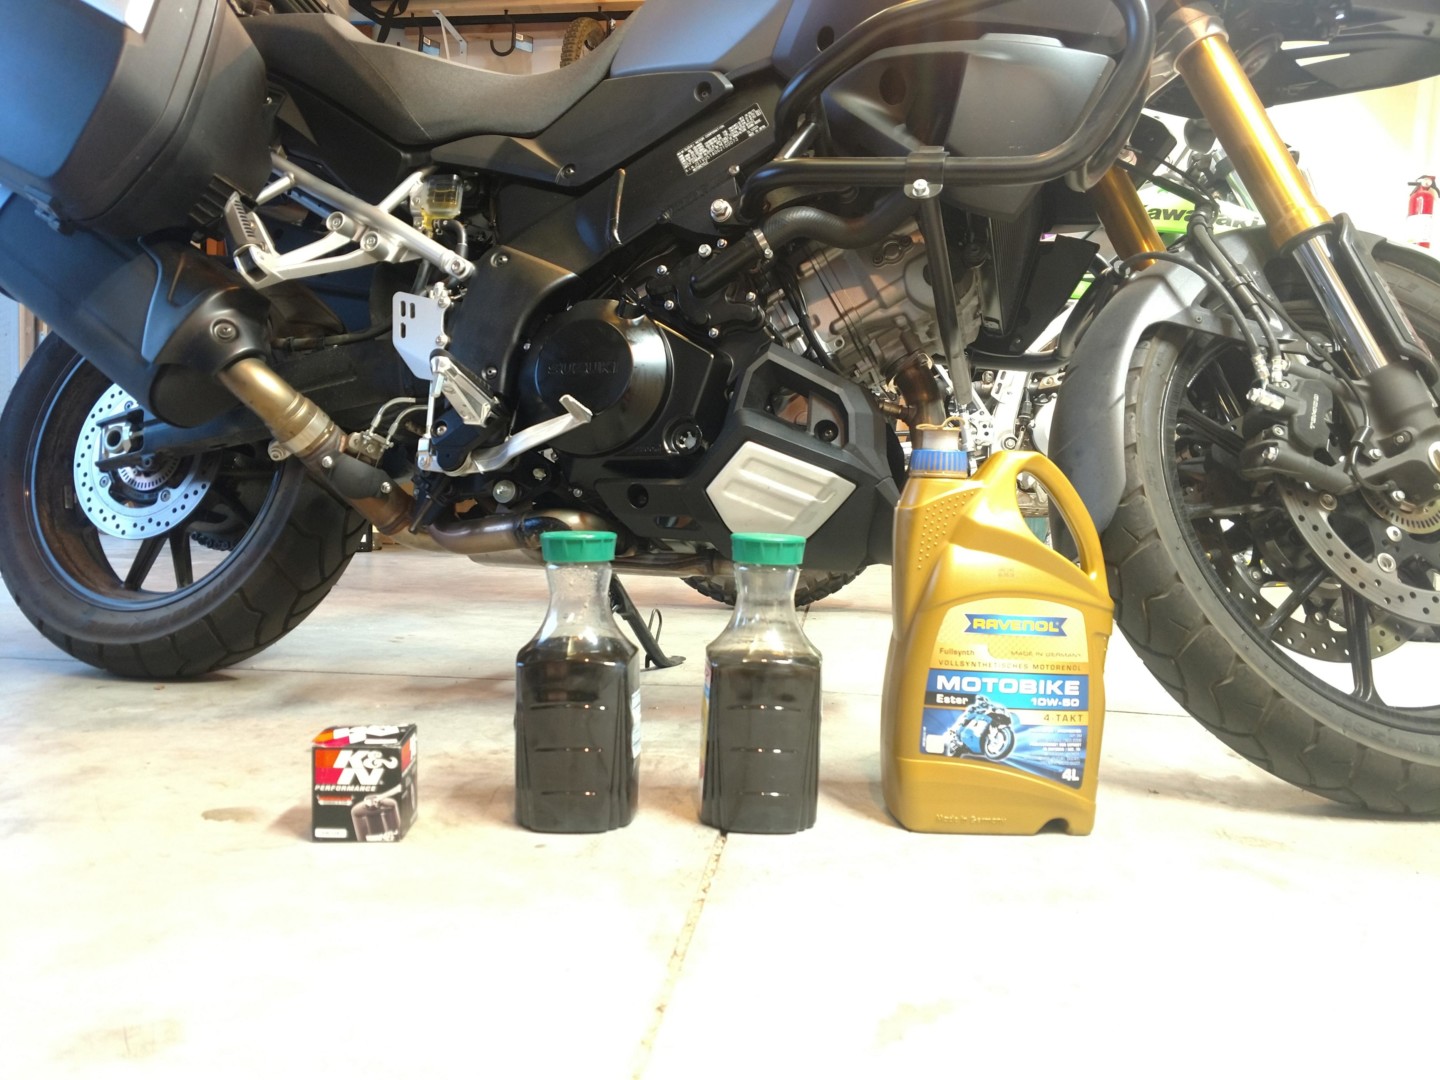
Changing the oil on the new Suzuki is a lot like changing it on the old Suzuki. Which is awesome. Still so much easier than the BMW 650gs.To start with, I re-did some of my old research on what type of oil to use and what type of oil filter. The new V-Strom uses the same type of oil filter as the old one. There is a lot of research on the internet that you can look up about these oil filters. One of my favorite write-ups is this one, which, after cutting open a dozen or more filters, states: “I get a lot of emails from Suzuki owners asking me what the secret best filter is. They’re all trash. All of them. You are forced by Suzuki’s brain-damaged specification to buy and use trash oil filters.” So, with that inspiring information, I went with the same K&N KN-138 Powersports High Performance Oil Filter I always do. I like this one because it has a nut on the end of it which makes it easy to take off. Yeah, I have an oil filter removal tool, but it never seems to work the way I like it. And having that nut on the end to grab onto just makes everything so much easier. (as a side note, the service manual actually shows the Suzuki OEM oil filter with a nut on it in the manual’s picture, but my factory filter did not include it – so I was back to using the strap wrench).
 For oil, I did a bit of new research. There are all kinds of opinions on what type of oil you can/should use in your V-strom. In fact, there’s a Big Oil Thread on stromtrooper.com that details most of this crazy discussion. Also, the same guy that cut open oil filters has a great article on oil, where they come from, what the various ratings mean, etc. Good reading if you are into that kind of thing. The gist I get from reading all this stuff is a lot of people swear by Shell ROTELLA® T6 full synthetic heavy duty engine oil. And they are all probably right. However, I got a little bit nervous with using ‘diesel engine oil’ in my motorcycle and so paid double (yeah, silly) for motorcycle oil that meets all the specifications indicated in the owners manual.
The owners manual states the following for oil type to be used: SAE 10W-40; API SG, SH, SJ, or SL; JASO MA. It also cautions against using ‘Energy Conserving’ oils, because these have additives that can hurt engine life and clutch performance. At the time of my oil research, I only found that the Rotella T6 was API CJ compliant (which is a diesel standard). I only just now, researching this blog, found that on the detailed spec sheet for the Rotella T6 oil it does also list API SL and SH (don’t I feel foolish now). So going forward that would probably be my recommendation and what I will use for the next oil change. But based on what I knew then, I went for a fully compliant motorcycle specific oil from Ravenol: RAVENOL J1V1011-004 SAE 10W-50 4-Stroke Motorcycle Oil. Yes, it was expensive, but it met the API and JASO standards required by the manual (just like the less expensive Rotella T6). So it goes. Moving on…
I don’t have a center stand, so I did the oil change on the kick-stand, picking the bike up and rocking it from side to side with the drain plug out to get all the oil out. This appeared to be a prety effective method (and yes, a centerstand is on the wishlist). Here are the steps:
- For the DL650 oil change blog, I recommended turning the oil filter one turn while the bike is cold, to make it easier to get off. I didn’t do that this time, but its worth considering. You don’t loosen the oil filter enough to make it leak, just a little bit so it’s easier to get off when the bike is warm.
- Run the bike for a minute or two to get the oil stirred up and moving, but not too much that the oil gets really hot and burns you (it’s a fine line – be careful!)
- Place an oil pan below the engine
- Remove the oil filler cap (black cap on the top of the engine, left side)
- Remove the oil drain plug (17mm socket or wrench), BE CAREFUL – the oil that comes out is hot!!
- While everything is draining, remove the oil filter with a strap wrench or other brute force method.
- Let oil drain out of the drain plug and oil filter area for a while. I got on my bike and rocked it a bit to get all the oil out.
- Apply a light coating of new oil to the o ring on the new oil filter, so it slides on easy and doesn’t bind up when tightening
- For installing the new oil filter, the manual says “Tighten by hand until you feel the oil filter O-ring contact the oil filter mounting surface. Then tighten the oil filter two full turns (or to the specified torque) with a special tool (you are not supposed to use the nut on the end of K&N filters for install). The specified torque is 20Nm (14.5lbf-ft)
- With the oil filter back on, replace the drain plug with a new crush washer (see additional notes on the crush washer below). Torque for the oil drain plug is 23 Nm (17 lbf-ft). This seems like a very little bit of force – but I guess that is all it takes.
- Finally, refill the engine oil. 2700 ml for oil change only; 3100 ml for oil and filter change.
- Replace the oil filler cap
- Start the engine and let it run at idle for a few minutes
- turn off the engine and wait for a few minutes. Then check to make sure that the oil level is right at the “F” mark in the oil inspection window.
- If you’re a little low, add oil. Otherwise, happy riding!


Note on the crush washer: There is a lot of debate online about if you need to replace the crush washer or not. Yes its cheap, yes if it leaks that sucks. Yes its another part you have to buy and that can be annoying. I didn’t replace the crush washer this round, but it’s a 14 mm washer (on the DL1000, 12mm on the DL650). It should be either aluminum, brass, steel, copper or nylon/fiber. An aluminum, copper, or steel crush washer on your oil drain plug will likely not need to be replaced for some time (unless you over-torque and deform them). Copper can be annealed by heating to red then quenching in water (which would harden steel). Nylon or fiber gaskets will more quickly become deformed and no longer seal.
The Rest of the Inspection
I’ll be brief with most of these, but for the sake of completeness, I’ll try and run through the whole list of items:
Exhaust Pipe and Muffler Bolts: Check bolts around the exhaust system, from where it attaches to the engine, through the frame mounts, and sleeved connections between exhaust pipe sections.
Exhaust Control Valve: Make sure the EXCV pulley (that’s apparently the pulley that controls the exhaust valve on the exhaust system, near the rear wheel) is operating properly. It should cycle fully open and then close when the ignition is turned on.
Idle Speed: Should be 1200 +/- 100 rpm. If it’s not, it’s electronically controlled. So it’s beyond me on how to fix it.
Throttle Cable Play: Play on the throttle cable should be 2 – 4mm. To adjust, loosen the lock nut on the adjuster a few inches down the throttle cable (under the rubber boot), and turn the adjuster till the desired amount of play is achieved. Make sure to tighten the lock nut while holding the adjuster, once the right play is established, to keep it from vibrating around in the future.
Drive Chain Adjustment: Drive chain 20-link length should be less than or equal to 319.4mm. Drive chain slack should be 20 – 30mm. I will write-up something specific when it comes time for drive chain adjustment.
Brakes and Steering: Inspect brake pads and brake discs for excessive wear. Make sure brakes feel good. Check that there is no play in the steering system, front fork, handlebar, or axles.
Tighten the Chassis Bolts: Tighten the handlebar clamp bolts, steering stem head nut, bolts on the front fork stanchion clamps (upper and lower). Tighten the clamps for everything mounted on the handlebars. Tighten the brake hose banjo bolts. Tighten the swingarm pivot nut and the footrest bracket bolts.
That’s all! Next oil change is at 4,000 miles.
Thanks for a very helpful article.
Out of all the forums on oil, nobody ever mentions the Suzuki oil Ecstar R5000. Just as inexpensive as the Walmart Rotella and factory recommended. I have been using the Ecstar for years, changed at every 5,000 but never see any mention or love for the product. Hummmm.
Very helpful post. I’ll probably check back occasionally to see what you’re up to. I just got a 2014 DL1000 this August and I’m getting ready to do the 6,000 mile oil change. I don’t ride tons but I’m the third owner and I’ve doubled the mileage since 08/30/19.
Not sure if I’m the first to comment or not but even if I am, I already have a service manual that came with my bike. Very nice of you to do that other folks though !
Hi! I would take that manual if you still have it!
I have 2019 Vstrom xt1000, and dealer just told me it’s a 3 hour service, at 600 miles.
I was ok let’s doit, so I go check and it’s only oil change and inspection? So I called back to ask what is it that he has to do for 3 hours, he said he made a mistake it’s only 1.5 hours.
Stealer already trying to rob me!
Sent you an email for contact info.
Good post I have a vstrom 650 2016 just pick her up
An going to use Shell T4 I her I use this in my vstar 1100.o have had no problems so far. An I have looked all over the valley in wAsilla AK an very little good Choice s for oil they don’t cost an arm and a leg.
CW