Sprinter Adventure Van Build – Sound Deadening & Insulation
Highlights (TL:DR):
- 400 square feet of Reflectix (too much) single or double sided
- 200 square feet of Thinsulate (40 linear feet, just right)
- 86 square feet of Noico sound deadener (too much)
- 2 cans of 3M Hi-Strength 90 Spray Adhesive
- 6 rolls of foil tape
- Van body –> Noico –> Thinsulate –> Reflectix –> Inside Wall
There are literally a billion different ways to do sound deadening and insulation. Having combed the forums for hours my head was filled with all kinds of nonsense. Like everything in life you can do as much or as little as your desire and budget allows. And there are plenty of people with lots of time and money that have very strong opinions on how you should insulate your van. In the end I must admit that I was a little susceptible to that coaxing and probably did some things I didnt really need to do, but it all turned out just fine anyway.
Here are some links to a few threads I bookmarked regarding insulation because I thought they were useful. You can find a billion of these is you search:

- Wall Insulation Questions
- Wanderweg Van – Insulation
- Lou Shields – Sprinter Covnersion
- Thinsulate post
The van was really very loud when we first got it – like so loud it was hard to have a conversation in it while driving down the freeway. And every time you hit a bump it would make this big booming sound like banging on a drum. Thankfully we have been able to mitigate most if not all of that.
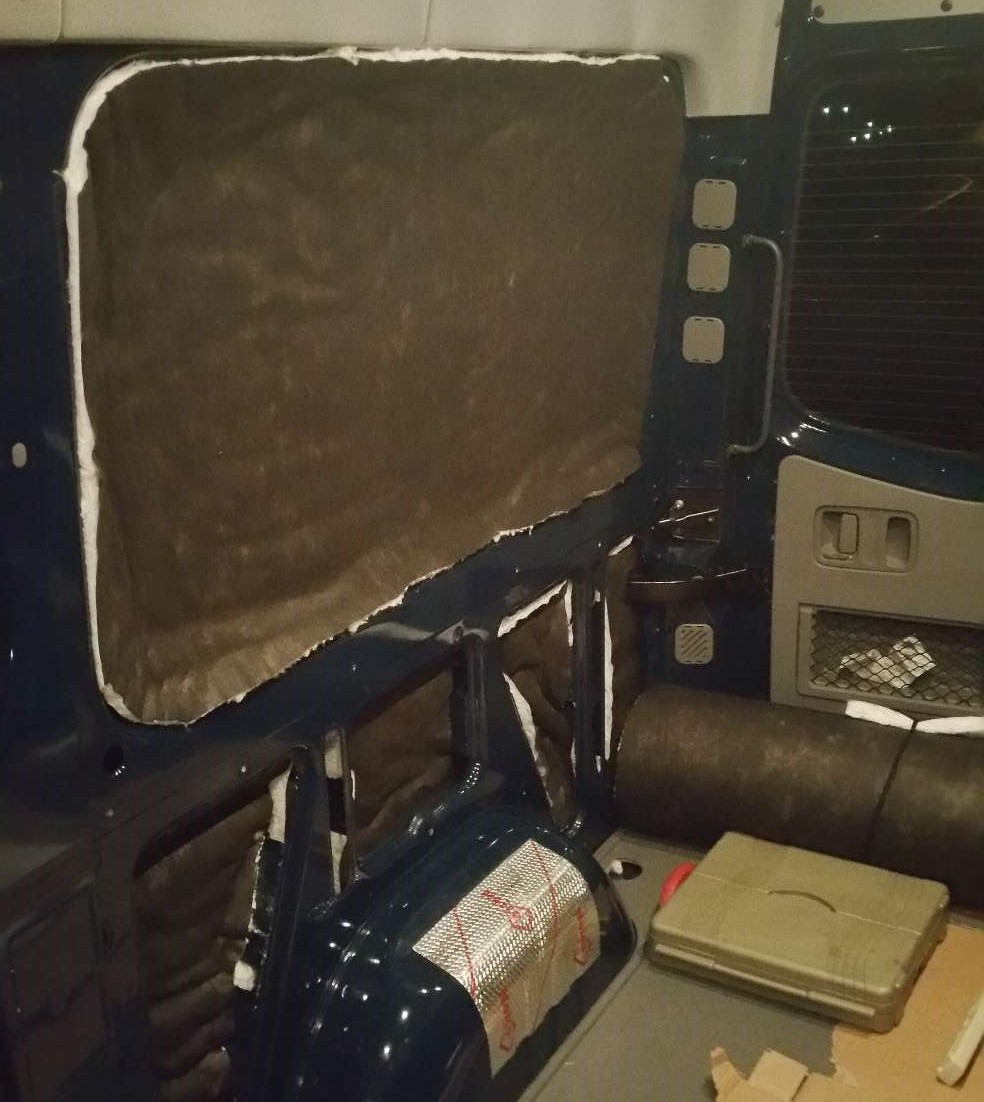
We used the, now standard/defacto, thinsulate and reflectrix combo for insulation. With some rubbery sound deadening panels thrown in for good measure. The layup went like this (from outside to inside):
- Van skin/metal
- Noico sound deadening panels (20-30% coverage)
- Thinsulate
- Reflectix
- Wall/Ceiling finish covering
Many people have used this exact method and it seemed to work out great for them. Indeed it also worked out great for us.
Self-Adhesive Butyl Sound Dampening Automotive Insulation

In hindsight I am not sure what the sound deadening panels did though, and they were very expensive. You hear about people covering the entire van with Fatmat or similar foil backed butyl sound deadener – truthfully I am not sure what that does. You read the manufacturers lit for “fatmat/dynamat/whatever” style sound deadening and they say you only need 20% coverage. Of course, you would think if it was better to have 100% coverage they would say that and sell more of the stuff. So clearly (at least to me) you dont need 100%. But I jumped on the bandwagon a little but and said hey, i should get as much of this stuff as I can afford! The Noico stuff is priced really well on Amazon and has what appears to be the same if not better specs than some of the other name brand stuff. The fact that it didn’t have any smell (which I had heard that fatmat smelled awful) was appealing – and I can confirm this Noico stuff does not smell at all.

So we ended up purchasing 36 square feet of the 80 mil Noico Butyl Mat and another 50 sq ft of the 50 mil mat. Which I can tell you now was too much. Half that would have been fine. Heck, I am fairly convinced that none of it would have been fine, the thinsulate alone is awesome (more on that later). But your ears might be better tuned than mine (likely, too much rock music) – so don’t take my word for it. I have a lot left over and will be using it to cover 50-ish percent of the floor at some later date, maybe that will make me a believer, stay tuned.
The sound deadener is very easy to cut using a utility knife and we cut various shapes to fit in the larger panels. I used the knock test, if when I knocked on it it made a booming sound, we put some Noico panels on it. Because we were applying the Noico in the middle of a cold November we used a heat gun to heat it up before applying it to the walls. We also ran an electric heater in the van to bring the van temperature up to something in the comfortable 50+ degree range.
Thinsulate Insulation
 We selected SM600L Thinsulate insulation above the myriad of other insulation options and I am so glad we did. This stuff is really great! Lots of folks use spray in foam, fiberglass batts, cotton batts, rigid foam, all kinds of stuff. I am sure these are all great. But the thinsulate was so easy to work with and install I am really happy we chose it. We purchased 40 linear feet from Hein at Impact3D which turned out to be the perfect amount.
I cant really say enough good things about Thinsulate. It was easy to cut with scissors. Didn’t smell bad. Didn’t have to be installed wearing a mask or gloves. Didn’t make me itchy after installation. Really was just a joy to work with and worked so well. I was amazed at how well it sound deadened the van. So amazed I wondered why I installed the Noico product at all. And it made an instant difference to the warmth of the van. Suddenly our little electric heater that we were using to make it bearable inside was keeping up just fine. I could now work in the van in a t-shirt instead of a down jacket!
To install we used the recommended 3M Hi-Strength 90 Adhesive spray. Just sprayed a bit on the back (non fabric’d) side of the Thinsulate and sprayed some more on the van skin itself. Then pressed the Thinsulate against the van skin and patted down around the outsides and middle. After a few seconds (really hardly any time) it was stuck and we could move on to the next section.

I would be remiss here if I failed to mention that my wife is the queen of insulation. She basically insulated the entire van while I did… other stuff (mostly supervised and made announcements about what is next).
Reflectix Insulation
For our final insulation layer we used Reflectix. I bought a big roll online with 400 square feet of material from home depot and had it delivered to our door. This was probably overkill but I was concerned that we would not have enough with only 200 square feet and because of bulk pricing you basically get 100′ for free if you order the big roll. So that’s what I did. And as a bonus we had plenty of Reflectix left over to build magnetic window coverings (more on that in a later post).
I’ve seen postings of people using the reflectix has a vapor barrier. I knew regardless of how hard we tried we were not going to get a true vapor barrier, so instead we used it similar to how we did the Thinsulate. It was fairly easy to install, though that reflective tape is really hard to peal away from the backing (at least for me).


Thanks for sharing excellent details for van insulation. Insulating the van is less exciting process, but good insulation is paramount for living a long and happy van life.
Hi there and thanks very much for the great website and info. Just about to start a promaster conversion and of course insulation is the most discussed and controversial topic of DIY conversions. Just wondering your thoughts on the whole vapour barrier question. Given that thinsulate has no VB characteristics, is there not a concern for condensation forming on the interior of the van’s metal wall leading to eventual corrosion issues? Cheers!
This is a good question which, as you said, is much debated on the forums. Agreed the Thinsulate does not provide any vapor barrier. However, the reflectix, if installed with enough metal tape, probably could. Vapor was not something I worried about too much from a wall materials perspective, I’ve put so many holes in the walls mounting various items I don’t imagine I would have any kind of seal, even if I had tried. Instead, I opted for good ventilation – running the vent fan and cracking the windows up front,which seems to work well. I don’t really have any science or data to affirm or deny that claim, just how I feel.
I did have the walls off a couple weeks ago and didn’t notice any rust or anything else of concern. But that’s just a passive observation.
why cant you use roll rubber roofing as a first layer on the floor? its a great insulator plus sound deadner
That sounds like it could work well. In homes they like they underlayment because it allows the floor to thermally expand and contract. Not so much an issue in the van, with the spans we’re taking about.
I like the idea. Let me know how it goes!
Thanks so much! Do you hear a difference in the 50 and 80 mil? I got some 80 but need more and wonder if you feel the 50 works well enough?
I do not really notice a difference between the areas where I put 50 mil and the areas where I put 80. But my ears aren’t tuned that well to that kind of thing, so I don’t really know enough to place a real value judgement on either.
Hi. Very nice write up with very objective information. Thanks.
I’m about to order just thinsulate for my 2005 Sprinter. Our van is loud as well. Tough to have a conversation when driving 70! It is a 144 passenger with glassall around. Hein mentioned 40’ feet of thinsulate but you mentioned 40’ was perfect
For you. The stuff is expensive so I want to make sure I don’t order too much. Did you put any in the front doors or firewall of the cab?
And how many cans of adhesive did you end up using for the 40’? Was it just 2?
Do you think using only thinsulate is best?
Lastly, it seems too good to be true (thinsulate gets rid of 95% of the noise). Is it that good? Can you easily carry on a conversation at 70 now?
Thanks again!
Tommy – direct to your questions…
1) Yes 40 linear feet / 200 square feet of thinsulate was just right for us. We did not insulate the firewall, but we did insulate the doors, walls, headliner, etc. Had a little bit left over in the end, probably could have done the firewall, but didn’t need to (and not sure where, exactly, you would put it).
2) 2 cans of spray adhesive was all we used. Still had a little left over.
3) I used thinsulate and noico for sound deadening. Though I can’t be sure (because I didn’t do it) I believe the thinsulate by itself would probably have been fine. Maybe someone will do just that and report back – likely if you search the forums, they already have.
4) 95% reduction? I haven’t seen that claim – but it is very effective. I can definitely hold a conversation in the van just fine now when going highway speeds. For additional noise reduction, you could consider hanging a curtain behind the seats (blocking off the back of the van). We have an insulating curtain that essentially blocks off the area underneath our bed (back half of the van) and I notice when its pulled up by the extra noise when underway. Not a big deal, but if quiet is your ultimate goal that’s an option as well.
Hi Austin, what an awesome thread! I have a question on insulating the floor. Did you also use ThinSulate on the floor if not what was the application you used before putting actual flooring down?
Thanks! I did not insulate the floor with thinsulate. There isn’t really a lot of room down there, even between the small ribs. Instead, I just used two layers of the 3mm blue thin foamy underlayment stuff they recommend under laminate flooring. Its not the greatest insulation ever, but we did notice this past winter that the floor wasn’t near as cold as it had been the previous winter. The flooring is documented in this post. So there is something to that. For better insulation I have heard of folks using horse stall pads – thick rubber mats that I am betting would insulate quite well. Something like this one, that is 3/4″ thick would likely do the trick. A friend of mine has this kind of thing in his van and loves it – though its not as pretty as the wood.
Hope this helps.
Why did you put the Reflectix over the Thinsulate instead of the other way around? Thanks for the info, your website has been very helpful
From the research I did, I believe that is the best way to use the reflectix. But I am not a contractor or hvac tech, so take that under advisement. As I understand it, you need an “air gap” between the metal body and the reflectix. If the reflectix is right up against the van body, it just conducts the heat or cold of outside. If you set it inside the thinsulate, the thinsulate provides the gap (and also insulates, itself) and so the reflectix can reflect the heat inside to keep you warm or reflect the heat from outside to keep you cool. Hope that makes sense. Some discussion here and lots more in other forums.
I am trying to build my Sprinter out and was wondering if anyone had thoughts on using vinyl plank flooring for the walls, like Lifeproof Rigid Core. Maybe put it over a plywood base with glue compound of some kind.
Hey like the others I am researching insulation for my van. Ive been debating sound proofing and if it is really necessary. You said you don’t exactly feel it was a necessary layer in the insulation. Are you happy with the sound of the van now? Has most of the noise been cancelled out by those three layers? Also, did you use any foam to fill in empty spaces like I’ve seen many people do?
Dustin – Not having any experience with the insulation system, without the Noico mats, its hard for me to tell how much work they are doing. The 3 part system definitely works very well and the difference in noise while underway (especially at highway speeds) is huge. I can’t put any real science behind that statement (I didn’t take noise measurements before and after) but I can say that listening to music become much more enjoyable once insulation was done. Direct to your question, yes, I am happy with the sound of the van now. The noise level is at a very comfortable level, for my taste. I don’t anticipate adding or replacing any of the insulation. I am still a big believer in thinsulate.
There was a downside to sound deadening and decreasing road noise. Once I could actually hear my music over the road noise I could hear just how bad the Sprinter’s stock sound system was. So then I *had* to invest in a amp and speaker upgrade. So it goes. 🙂
Well I’m a n00b who is just up to her eyes in figuring out insulation, so this is super helpful (and I love seeing another blue van get the conversion treatment!). Am wondering though, did you only cover the thinsulate panels with reflectix, or do you cover the other exposed metal parts, as well?
Hi Kristin – Thanks for reading and commenting. We are all in this together. I did not put any insulation on the exposed metal parts, just in the recessed sections where I put thinsulate. Where possible, I did try and pull thinsulate through the metal frame members. To do this, I cut fairly thin strips of thinsulate and tied a string to one end. Then, using a shop vac I sucked the string across the frame, through some of the smaller openings, then pulled the insulation through. This could probably also be accomplished with a coat hanger or similar – but I had string and the shop vac nearby at the time, so this did the trick.
I have been very happy with the performance of our insulation. We’ve been through some super hot days and super cold nights over the last year and a half and the van seems to temperature regulate pretty well. This winter we spent several nights below 0F and our Espar D2 heater easily kept us cozy and warm. In the summer, even sitting in the full sun, the van stays pretty cool inside (for a while) – as long as we also put in the window shades to keep the sun out.
So, long story longer, my personal recommendation would be to not worry about the exposed metal framing.
Thanks so much! I feel like I am losing it with all of the insulation options. Your site is fantastic – you’ll be seeing lots more of me!
Thanks for your reply to my previous comment re: fan install. This site rocks!
I see from your link and pictures that you bought single foil sided Reflectix with the foil facing inward toward the van (so the white side must be facing back toward the van skin).
I just ordered my Thinsulate from Hein but before I order the Reflectix I was hoping you could share your thoughts on adding furring strips between the Thinsulate and using double sided Reflectix? The air barrier would then keep the radiant heat from the van skin out. We bought the van for summer travel so I’m more concerned about keeping it cool.
Michael – I did end up going with the double sided reflectix also, because my local home depot didn’t have the single sided stuff. My thought at the time was that having the white interior surface might be nice for various aesthetic reasons (and I had seen it used in aluminum roofing applications previously, so it seemed similar to the van application). But the double sided seems to be working very well and the van does manage to stay cool even in the bright sun for quite some time before giving in to the heat. Its definitely better than other vehicles I have owned.
Also, I think I say in the post, but can’t remember – you can use the reflectix to create window and windshield coverings too. The biggest thing I have found that keeps the heat out (or in) is covering the windows and windshield.
Hi! Thanks for responding. I have a few more questions for you:
1. Since our van doesn’t have windows (it is the same 144 as yours) how many linear feet would we need to insulate with thinsulate?
2. Which side of the van does the scrim face? interior or exterior?
Much appreciated!!
I would highly recommend talking to Hein at Impact3D about how much you need. My guess, since 40 linear feet was near perfect for us, that maybe 45 or 50LF would be the perfect amount for you. But I am just guessing. Hein has been supplying Thinsulate for folk’s vans for some time now, so likely knows exactly how much you need for your windowless van (just like he knew exactly how much we needed for our windowed van). Plus he’s a super nice guy.
We used 3M spray adhesive, as mentioned in the post, sprayed on the van wall and on the white side of the thinsulate. then counted to 10 for the glue to get tacky and then just put the thinsulate up against the side of the van and patted it down. Sticks like a charm. That leaves the black scrim side out. There is actually a video of it here: Thinsulate Installation Video
Hope that helps. Happy building!
Hey- I’ve had a couple people tell me to put reflectyx on first then the thinsulation. Thoughts?
I would recommend putting the soft insulation (Thinsulate or equivalent) on the outside, that is, up against the van skin. I think it’s a better insulator of the metal that way. Also, it works great for sound deadening – which you won’t get from reflectix.
I would also highly recommend you check out the forums on sprinter-source. There has been lots of discussion on this topic. Here are a couple one two
How did you finish the sections where there aren’t existing panels to put back over the insulation?
Brandon – since we have a crew van the ceiling was complete with the factory headliner. We have let that be for now. There are only two half walls in the back that are uncovered in the crew van. We just covered them with 1/8″ plywood, cut to size and fastened with sheet metal screws. Nothing fancy for the time being, very utilitarian. I intend to write that up in a future post.
Thanks for reading!
This is a really helpful post. How did you finish the walls and ceiling where there aren’t any existing panels to put back?