Sprinter Adventure Van Build – Bed Platform
I realized the other day that we didn’t have anything posted on our bed platform and kitchen setup. Likely because at the time we were installing them they were very much a “work in progress”. But now after several thousand miles of testing and refining I figured it was about time I documented the process. I’ll start with the bed platform for this post…
Summary (TL:DR)
We went very simple for our bed platform . That isn’t to say it isn’t highly comfortable and functional, but, like the rest of the van our focus was on utility rather than aesthetics. Keeping up with the “D” for Dynamic in DAPHNE we made sure that everything can still be removed from the van and go full ‘cargo mode’ in just a matter of minutes. The bed platform is simply 2×10 boards bolted with rivnuts (actually plusnuts) to the side of the van just below the rear windows spaces (where the rear windows would be if we had rear windows). We set the height of the bed platform to allow us to still be able to store bikes underneath the bed (on fork mounts, with the front wheel off). To bridge between the 2×10 “side rails” we built 4 (ish) modular panels out of 3/8″ plywood and 2×4’s. The panels are fairly lightweight and easy enough to install and remove. On top of the bed panels we went with very comfortable 6″ memory foam mattress. That’s pretty much it.

Tools
- chop saw (miter saw) and circular saw (table saw could also be helpful for ripping plywood)
- impact wrench for installing plusnuts
- plusnut install tool (I made my own, but you can buy them)
- drill
- drill bits
Materials
- 8′ 2×10 boards – 2
- 8′ 2×4 boards – 9
- 3/8″ plywood
- 1/4-20 plusnuts
- 1/4-20 x 2″ bolts – 10
- washers (I like the look of the big fender washers)
- 1″ wood screws
- 2 hinges
- 2 (or more) small hook and latch kits
- string
- memory foam mattress
Reference
Didn’t have a direct example for our bed design, but below are some posts that got us on the right track.
Procedure
Bed Side Rails
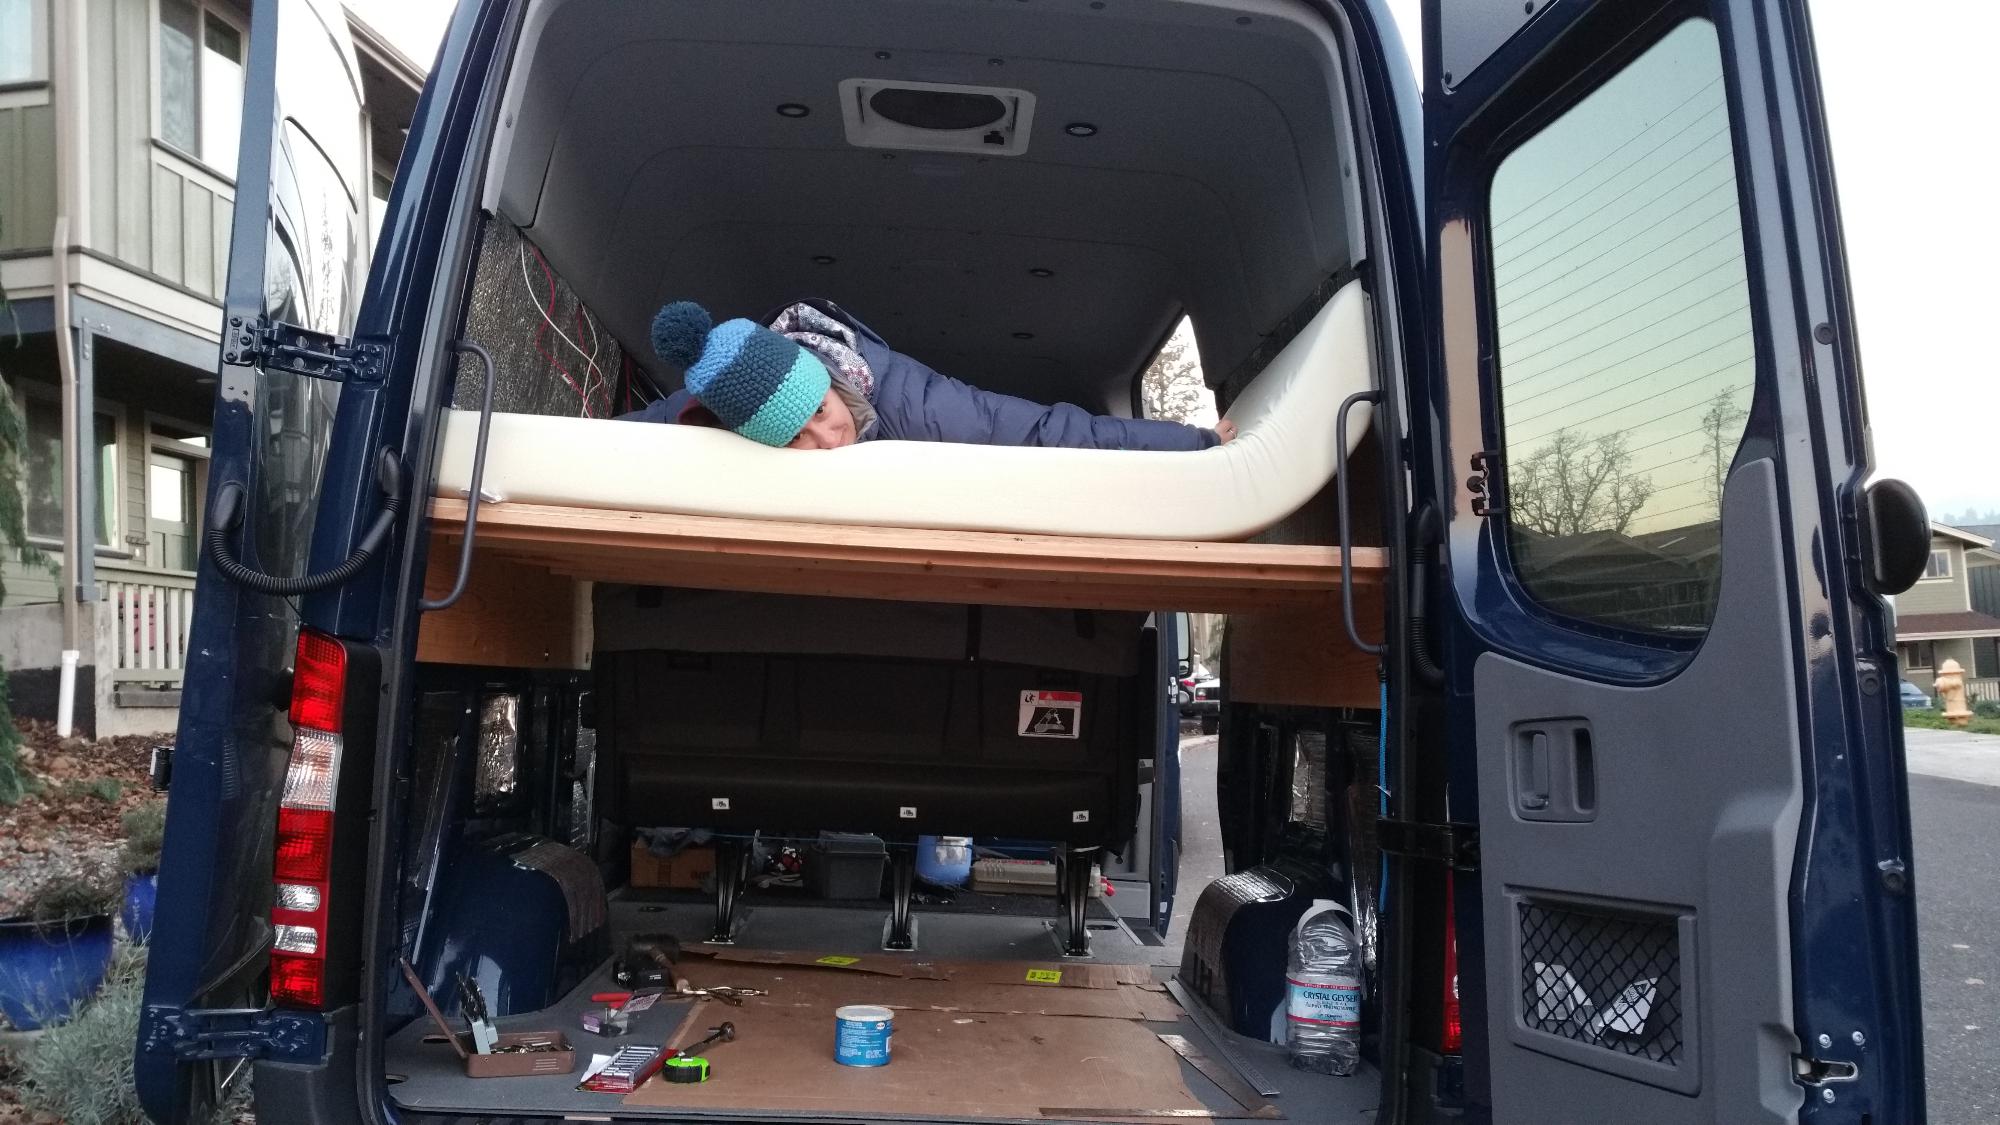
 First to be installed were the side rails. These were constructed from the 2×10’s cut to 65.5″ legnth. We went with 2×10’s because that enabled us to get the bed platform to the height we wanted. Our goal was to still be able to put bikes in a fork-mount rack (vertically, with the front wheel off) under the bed. So measuring the bikes with their wheels off set the top of side rail height at 35.5″ (my size large 29er unsuprisingly governed, hopefully our future bikes aren’t much taller). Our desire for bike storage was also balanced by our desire to not make it super difficult to get into and out of bed and also I really wanted to still be able to sit up in bed without hitting my head on the ceiling. We were only kind of successful with the easy-in-and-out criteria (an extra step up is pretty much required – fortunately we have a rubbermaid storage crate we like to take with us anyway that does the job perfectly) and I am happy to report that there is still 31″ of clear height between the top of the mattress and the van ceiling. Factoring in compression of the mattress, it works for me to sit up in bed without garnering a head injury (I’m 5’10” YMMV).

With the height and length set for our bed side rails we took to drilling in the side of the van and placing the plusnuts. Beneath the window blockouts there is some pretty stout metal framing. That is not to say it couldn’t be reinforced (and lots of people recommend adding metal or wood reinforcing to support the bed – though we did not do it – skip reinforcement at your own risk), but it looked strong enough for our purposes (we aren’t particularly big people). In order to get things to line up properly, we positioned the side rail appropriately in the location we wanted it and while one person held it in place the other person carefully drilled small (1/8″ or so) pilot holes through the side rail and into the van body. This was a good idea in theory, but after drilling out the larger sized holes for our 1/4″ bolts things weren’t lining up right and we ended up having to drill out the holes in the side rails even larger to get the bolts to align properly and minimize the risk (and one of my biggest fears) of cross threading. We originally used rivnuts to place captive nuts in the van frame but had issues and switched to plusnut. See this post on rivnuts vs plusnuts and plusnut installation.

We put in 6 bolts in each side rail. This seamed just right. On the rearward side there are two bolts that are fairly close together, but we were trying to avoid having all the bolts in a single row that might allow them to wiggle around laterally and fall out over time. Given the arrangement of the van body sheet metal, this wasn’t easily done. We got one high bolt in towards the front of the van and had to settle for this small offset bolt at the back. Obviously when we are on the bed the forces on the rails are straight down anyway, but when driving the van rattles around quite a bit – so I think taking steps to keep the side rails from shaking too much laterally was a good call. If we had wanted our bed to be lower, this wouldn’t have been a problem – but since we wanted our bed up in the ‘window area’ we get what we got.
 To make the top of the bed side rail just a little bit wider (and make us more comfortable that there was no way the platform panels were going to fall off) we added a 1″x3″ strip to each side. This probably wasn’t absolutely necessary, but I think it looks good in addition to providing us with an easily replaceable piece of wood to experiment with storage hook placement (which came in handy later).
Bed Platform Panels
 With the side rails in place, the next step was to create the platform itself. Again, like most things in our van, our goal was to make something that could be easily removable – so we weren’t stuck with having the bed in the van at all times – for example if we wanted to haul a motorcycle or a couch (both things we have done). So rather than build one big platform that spanned the area but was 0nly possible to remove by complete deconstruction – we created 4 panels that can be removed fairly easily. The other constraint was the back seat. We wanted to be able to have both the bed and the back seat installed simultaneously and we wanted to be able to remove or install the back seat without having to remove the bed. This limited our bed sizing options.
 We started out simple ,with the 4 panels being identical and rectangular – but as we refined our bed platform approach later (and will probably continue to do so) we modified the two panels at either end to better serve our needs. The basic design of the panels is 3/8″ plywood screwed to 2×4 “cross-rails”. The 2×4 cross-rails were cut to 68″. NOTE: the overall span across the van at the bed platform height is actually an inch or so wider than this, but due to the curvature of the van walls, this was the longest the 2×4’s could be, while still allowing the panels to be lifted up and out so they could be removed (see mini video towards the end).
Here’s the current panel dimensional setup from rearward (Panel 1) to forward (Panel 4):
 Panel 1: This Panel is 11″ x 68″, but has an 6″x 50.5″ extension (plywood only) out to the rear doors. The extension is centered on the panel and provides a small shelf alongisde the mattress to put books or a water bottle or something. What it really does is limit the size of the gap between the doors and the bed to keep it from swallowing anything you accidentally drop down there. We also added little rubber bumpers to the part of this panel that come in contact with the rear wall of the van.
Panels 2 & 3: These panels are simple rectangular sections. They measure 13″ x 68″. As a bonus, either one of these panels also serve as a great ramp for loading up a light dirtbike into the back of the van, when the bed is not in place.


Panel 4: This panel started out like panels 2 and 3, but after a few weeks sleeping in the van we decided that our bed was just too small.. But it didn’t have to be! We came up with the concept of the fold out bed extension. This allowed us to have a big bed at night when we wanted to sleep on it, but could quickly fold it back for extra living space in the van during the day. Having the bed be able to fold back was critical, as we still wanted to be able to put our back seat in, when desired. Since re-positioning the seat to the rearward position, it limited the bed length we could have. As a bonus, the fold up section also serves as an extra restraining device to keep stuff piled on the bed from falling off while underway.
Here’s how it works – The main part of panel 4 is the same as panels 2 and 3, but attached via hinges to the main part of panel 4 is an additional piece of plywood that measures 13″ x 66″. The narrower span of the extension panel is critical for operation, because the van walls curve inward, reducing the amount of horizontal space available as you go up. If the extension was the usual 68″ width, it would not be able to fold up. The bed extension is held in the upright position by hooks and latches on either side. To fold it down, we place an additional 2×4 across the side rails (it “snaps” into place on the rails, to keep it from sliding around when positioned) and then lower the hinged extension onto it.


To keep the installed panels from sliding around we put hook and latch hardware under each panel (actually currently just using this on Panel 4, the rest of the panels stay put). Combined with the weight of the mattress on top of them they don’t tend to move around very much.
Mattress
We opted for a 6″ memory foam mattress. We ordered a full size – but in hindisight (given our bed extension) I would have gotten a queen size so as to have more of that foam available for the extension. While there are thicker and thinner varieties of these, 6″ seemed to be a good balance and to date it has been very comfortable – so I think we made the right decision. I am amazed at how they can get these things so small for shipping – and then you cut them out of the plastic and they expand to be big and comfortable.


Anyway – the dimensions of the mattress were roughly 54″ x 75″ x 6″. To make things fit the way we wanted them too, we “rearranged” the mattress configuration a little bit. To fit the width of the van we cut about 7″ off the end of our mattress, taking it down to 54″ x 68″. We then took the remaining 54″ x 7″ section of foam and stuffed that into a sewn sleeve with a few extra pillows and some more memory foam to create the extension section (mostly just looks like a body pillow) that measures approximately 70″ x 13″. A queen sized fitted top sheet holds everything together and we are able to just fold the extension part up on top of the mattress when not in use and fold it down when we are ready for bed. When all is said and done the full bed (with extension) measures about 68″ x 63″. Its not long enough to sleep stretched out in a straight direction, but given the width (wider than a queen bed in both directions) I have found it easy enough to stretch out at an angle. Taller people might need to modify these dimensions to make them work for them.
That pretty much covers it. More photos and some dimensional drawings below, for reference.


Thanks for this! I just [as in last night] completed a similar platform in my 144 cargo Sprinter. Your measurements were spot on, and saved me a lot of trial and error. One major change I made to the mounting system was to go with bolts instead of plusnuts. I started out with plusnuts, but wasn’t getting warm fuzzies. Six 3/8″ bolts in each side with washers and nylock nuts has me feeling a lot better. I haven’t got any wall paneling in my van yet, so the 68″ platform sections are too narrow to reliably stay in place on their own, as I found out on the test drive. I used the 2×4 offcuts to provide a wider perch for platform sections 2&3, and to center them between the support rails. It’s more of a slide and lift to get them out, but it’s very secure now.
Cheers!
Awesome! Thanks for sharing!!
Hi – nice and simple version of the aluminium panel beds made by Outside vans etc.. I’m not a welder but might just be able to manage making this version. One question really, it’s about the weight of the bed. Is it heavy? How much does one panel weigh approx?
Thanks for posting this.
Good luck.
Good questions. The outside van panels are pretty fancy and fold up. They aren’t particularly light either. This is definitely much simpler and I don’t think the weight is too bad (but I don’t know your unique requirements). I haven’t weighed the panels individually, but if I had to hazard a guess I would say 20 – 25lbs each. Overall I would imagine the bed platform weighs 100 lbs or so. Maybe 20lbs more with the mattress. Most people I know put a few hundred pounds of sandbags in the back of their vans in the winter for better weight distribution / traction. So 100+ pounds of bed in the back seems like more of a good thing (and saves me the sandbags).
Hope this helps!
Fortunately, not all is as it seems, and the bed, with the extension out, is long enough for me to sleep. The platform itself, with the hinged extension out and a pillow stuffed into the bumped out area at the rear door windows is about 70″. The pillow at the rear doors spans the extra space between the platform and the rear door windows as well, putting the overall ‘usable’ length to about 74″. That’s plenty of space for me to sleep lengthwise (parallel with the direction of travel) in the van.
We had originally tried sleeping widthwise in the van (perpendicular to the direction of travel) but as you’ve said – it was awkward. I much prefer this way now. And with the hinged extension the bed doesn’t feel like its taking up too much space when its ‘stowed’.
There is a company that makes “flares” for the van rear side windows, that give you extra space (http://www.flarespace.com/), but we did not go that route.
Hope this helps.
Did you just use hex head bolts 2” for the frame into the side or is that where you used those plus nuts? I don’t know much about them
I used the plus nuts extensively for the bed frame. This is where I found they were really valuable. It is hard to access the back of the vehicles internal framing in order to place regular hex head bolts, so using a plusnut or rivnut is really the only option, in most cases.
I’ll state the obvious: you’re taller than the bed. How is that working out for you? I feel I would get restless turning in different ‘angles’. I might try to go a little higher up and use an extra inch in the window panel on each side. I guess the issue is then we’d never be able to get the bed panels out (or in) “due to the curvature of the van wall”. Do you think we could bring the panels in through the sliding door and slide them down? They’d be 70″, maybe 71″. Any other ideas on getting those extra 2″ ? =) I’m the same height. Another issue is we need 44″ clearance below the bed, yes we’ll be bonking our heads.