Sprinter Adventure Van Build – Fan Install
Probably the one thing every van owner turned DIY conversion specialist can agree on is that putting a big hole in your brand new van is very scary. I spent hours agonizing over the best way to do it. In the end, it was actually quite easy.
Summary (TL:DR): Use the standard sandwich method (from outside to inside)
Lap Sealant — > Aluminum bar –> fan mounting plate/flange –> butyl seal tape –> sprinter van sheet metal –> plywood

Tools:
- Drill & various bits
- Jigsaw
- Caulking gun
- wrenches / ratchet
- screw driver
- patience & fortitude
Materials:
- Maxxfan (we went with the 7500k)
- Dicor Butyl Seal Tape
- Dicor 501LSG Lap Sealant
- 1/2″ (or 3/4″!) plywood
- 1/8″ aluminum bar stock (1″ or so is fine)
- nuts and bolts (and washers)
- Rust-oleum
Reference:
- This post (and a whole lot more like it – like this one)
- This video
Procedure:
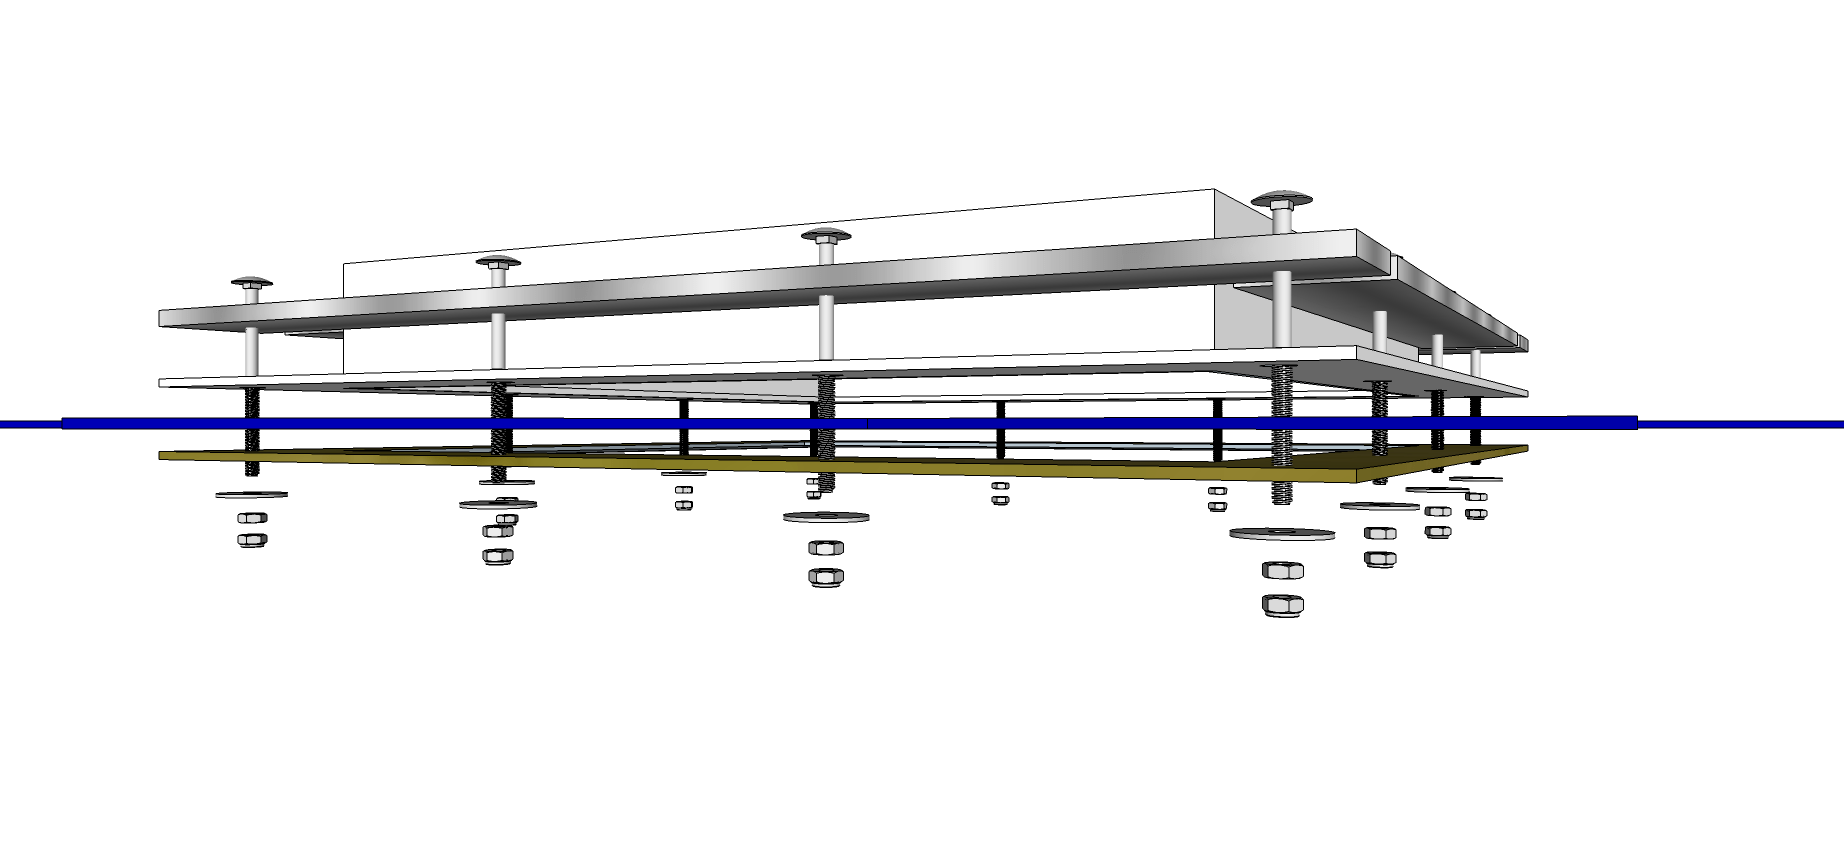
I used what can I think officially be called the “new standard” fan install method pioneered and made popular by ‘Graphite Dave’ on the sprinter forums. Basically it consists of cutting out a plywood frame giving you a bit more ‘meat’ to screw into through the van roof, rather than just the sheet metal. What you end up with is a very stout sandwich that consists of aluminum bar, fan mounting plate/flange, butyl tape, sprinter roof, and plywood (in that order) held together by nuts and bolts. Below are some diagrams I made up (after the fact) showing what I did. For the plywood, Dave recommends using 3/4″ plywood, which I agree with. Unfortunately, I had 1/2″ plywood laying around – so I used that instead. Originally I had planned on doubling it up (I did cut two frames out), but after I saw how stout it was all put together, I decided 1/2″ plywood was enough.


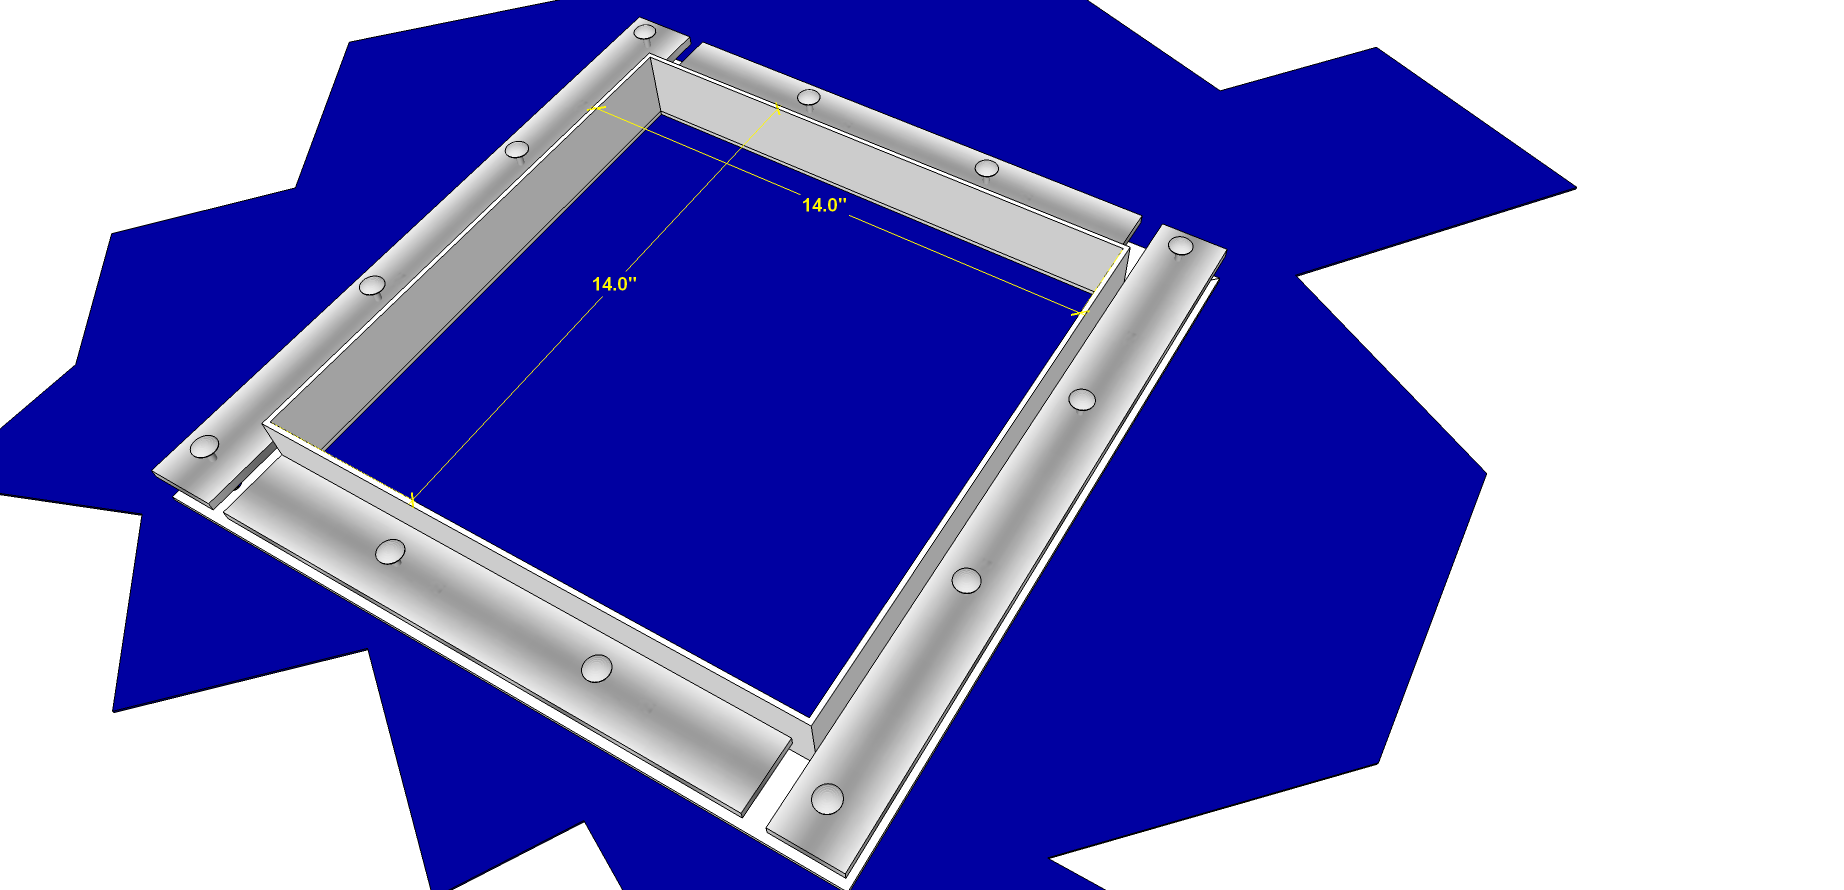
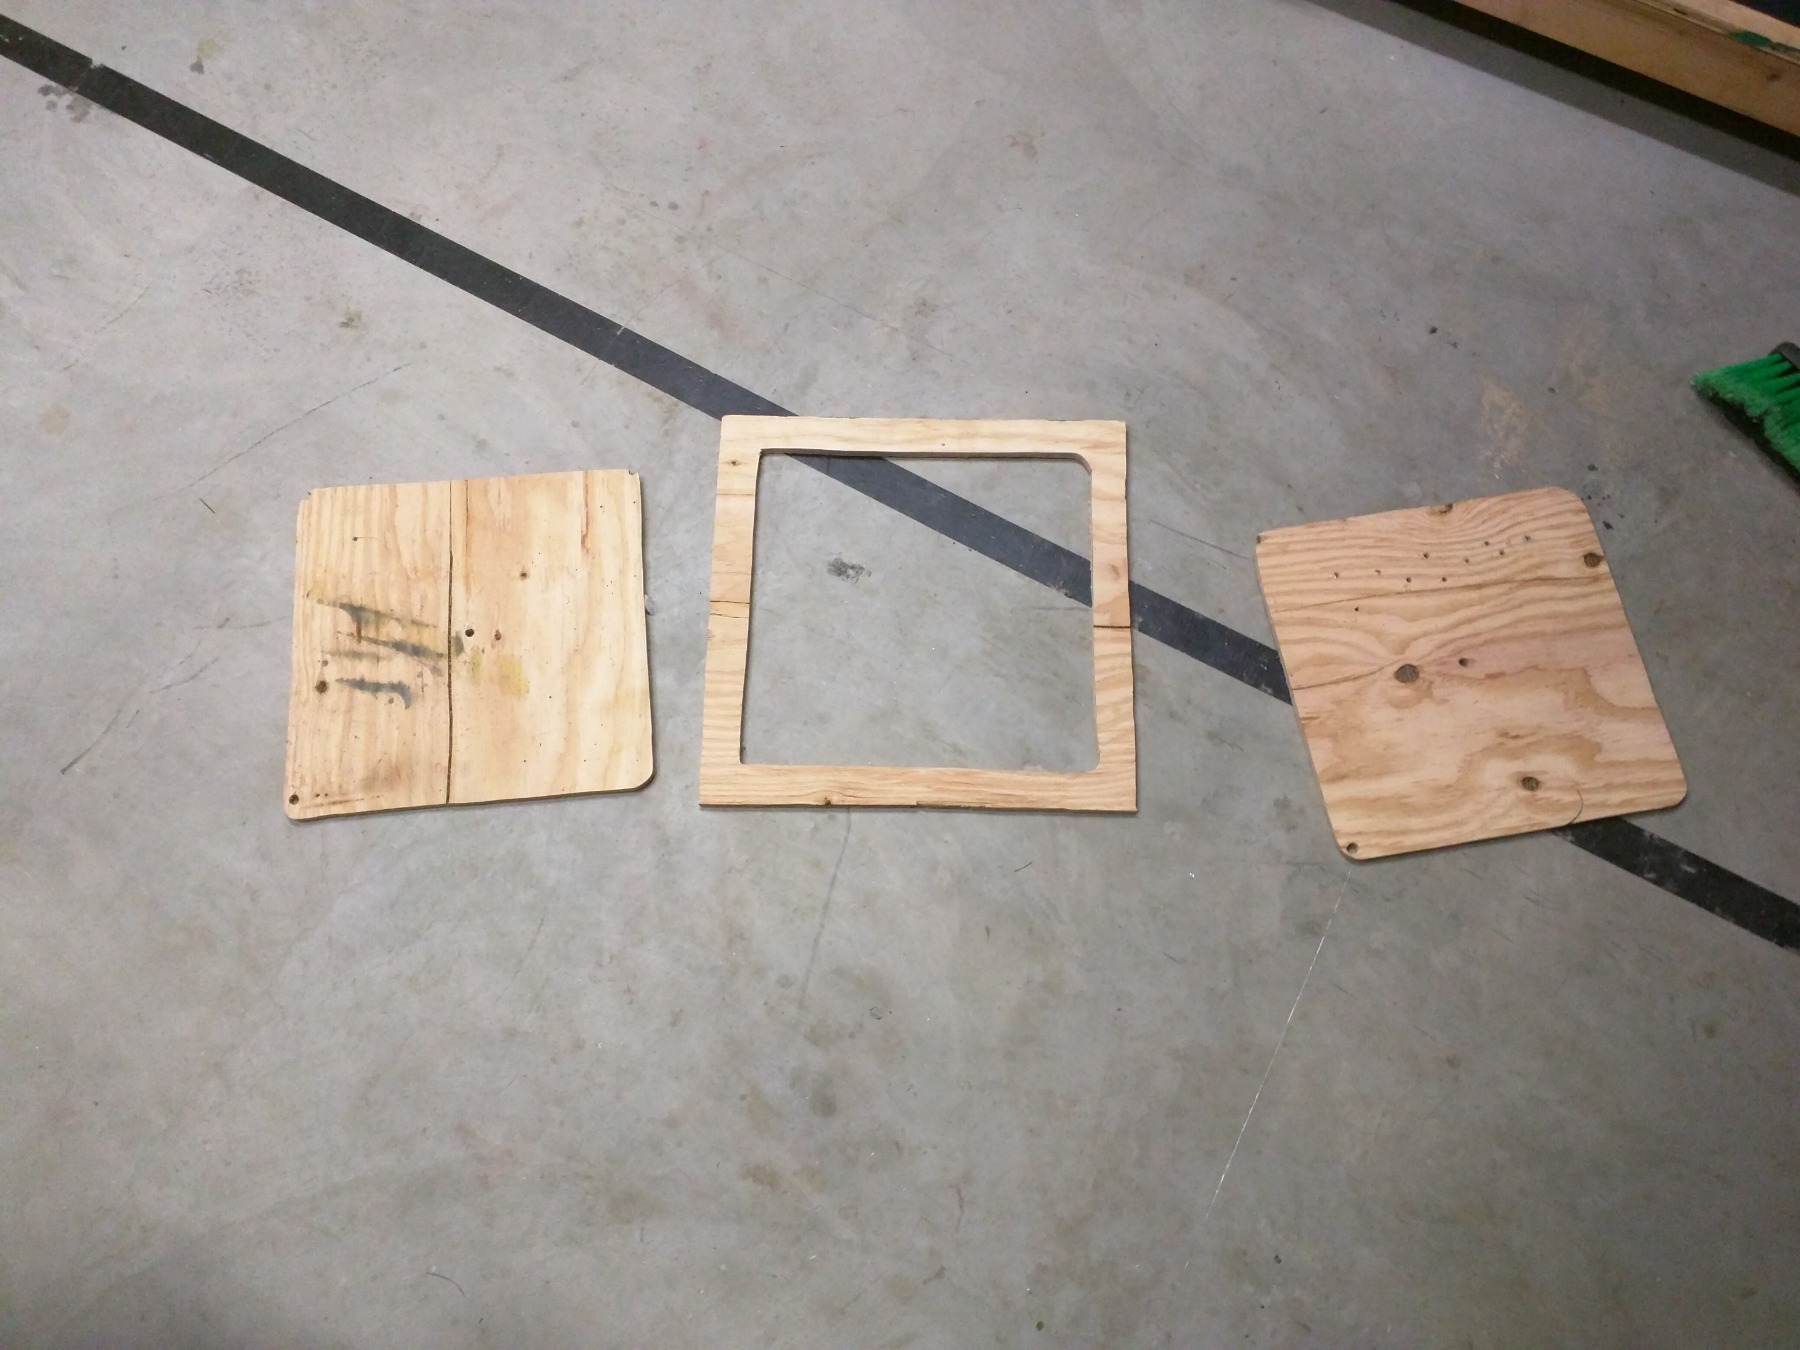
I used a jigsaw to cut out the 16.5″ x 16.5″ outer ring of the plywood and 14″ x 14″ opening in the plywood. The nice thing about doing it this way, is you end up with a 14″ x 14″ square of plywood that you can then use as a template for perfecting the location of the vent in the van, ensuring that the vent is centered, avoids the interior van ribs, and avoids the exterior ridges on the van roof. We decided to place our vent in the back half of the van, above where our bed platform would go. There are lots of good debates online on where the best place to put the vent is. In the end, my wife made the decision and that was that.
There is a good flat spot in the back of the van with short ridges on either side making it easy to locate the center. Unfortunately, the ridges aren’t spaced wide enough to accomdate the full width of the fan mounting flange. As such, I took an angle grinder to the fan moutning flange and took about a 1/4 inch off the two sides of it, where it would have otherwise contacted the roof ridges on the left and right sides and took a tiny bit off in the center on the ‘back’ side of the flange where it came close to that roof ridge. You can kind of see in the photos of the fan mounting flange how the plastic part is cut away and actually is thinner than the aluminum bar (painted blue) above it. This makes it fit nicely in between the ridges on the van. This shouldn’t have any structural impacts (especially with the sandwich described above) and allowed the flange to fit perfectly between the roof ridges.


When it finally came down cutting the hole in the roof I again used the Graphite Dave method and used the previously cut out center piece and bolted it through the roof, using a hole I drilled in the center of my mounting location. Placing a bolt through the plywood square and the van skin and bolting it nice and tight, I had a good jig to saw around. Things got a little messy with the jigsaw when the cut got close to the roof ridges, but overall it was an easy cut.
It sounds easy now, distilling that whole cutting part down to just a couple of sentences, but it was certainly very stressful. Of course I got through it and the hole, after measuring and remeasuring, checking the template, rechecking the fit (from both sides!), and cursing a whole bunch, all turned out okay. After that actually mounting the fan was easy. I made sure to paint the edges of my new cut out with rust inhibiting enamel paint – a small can of rust-oleum and a q-tip seamed perfect for the job (and I used that trick on a number of other areas on the van). Then put down several layers of the butyl tape, stuck the flange to the tape, and drilled through the flange holes, through the tape, and through the van. Got all my sandwich pieces lined up (I had already pre-drilled the aluminum bars and backing plywood so those lined up perfectly of course) and after some fidgeting (and a lot of help) got all 16 bolts lined up, through, and tightened up.
The caulking was extremely messy and involved a lot of cursing. That stuff is very necessary, but very nasty. Gets on everything. But its important to note that the Dicor is self-leveling, so even if it looks really bad when you apply it (which mine did) it appears to kinda ‘fix’ itslef over time. But really, as long as you put plenty of it on there it shouldn’t be a big deal how it looks – the van is so tall, who is going to see it? At least that’s what I told myself. The video recommends also putting a dab of caulking over all the bolts, so I did that as well – seems like a good idea. [update: two months and a whole bunch of good northwest weather later (read: rain) I can safely say I must have done something right, no leaks! All is well]
Once all that was done moutning the actual fan into the hole was easy. Just drop it in and bolt it in. Another van project done!


This is excellent. However the area in the back of the roof that would fit as described with the short roof ridges has a transverse structural frame inside. How did you deal with that?
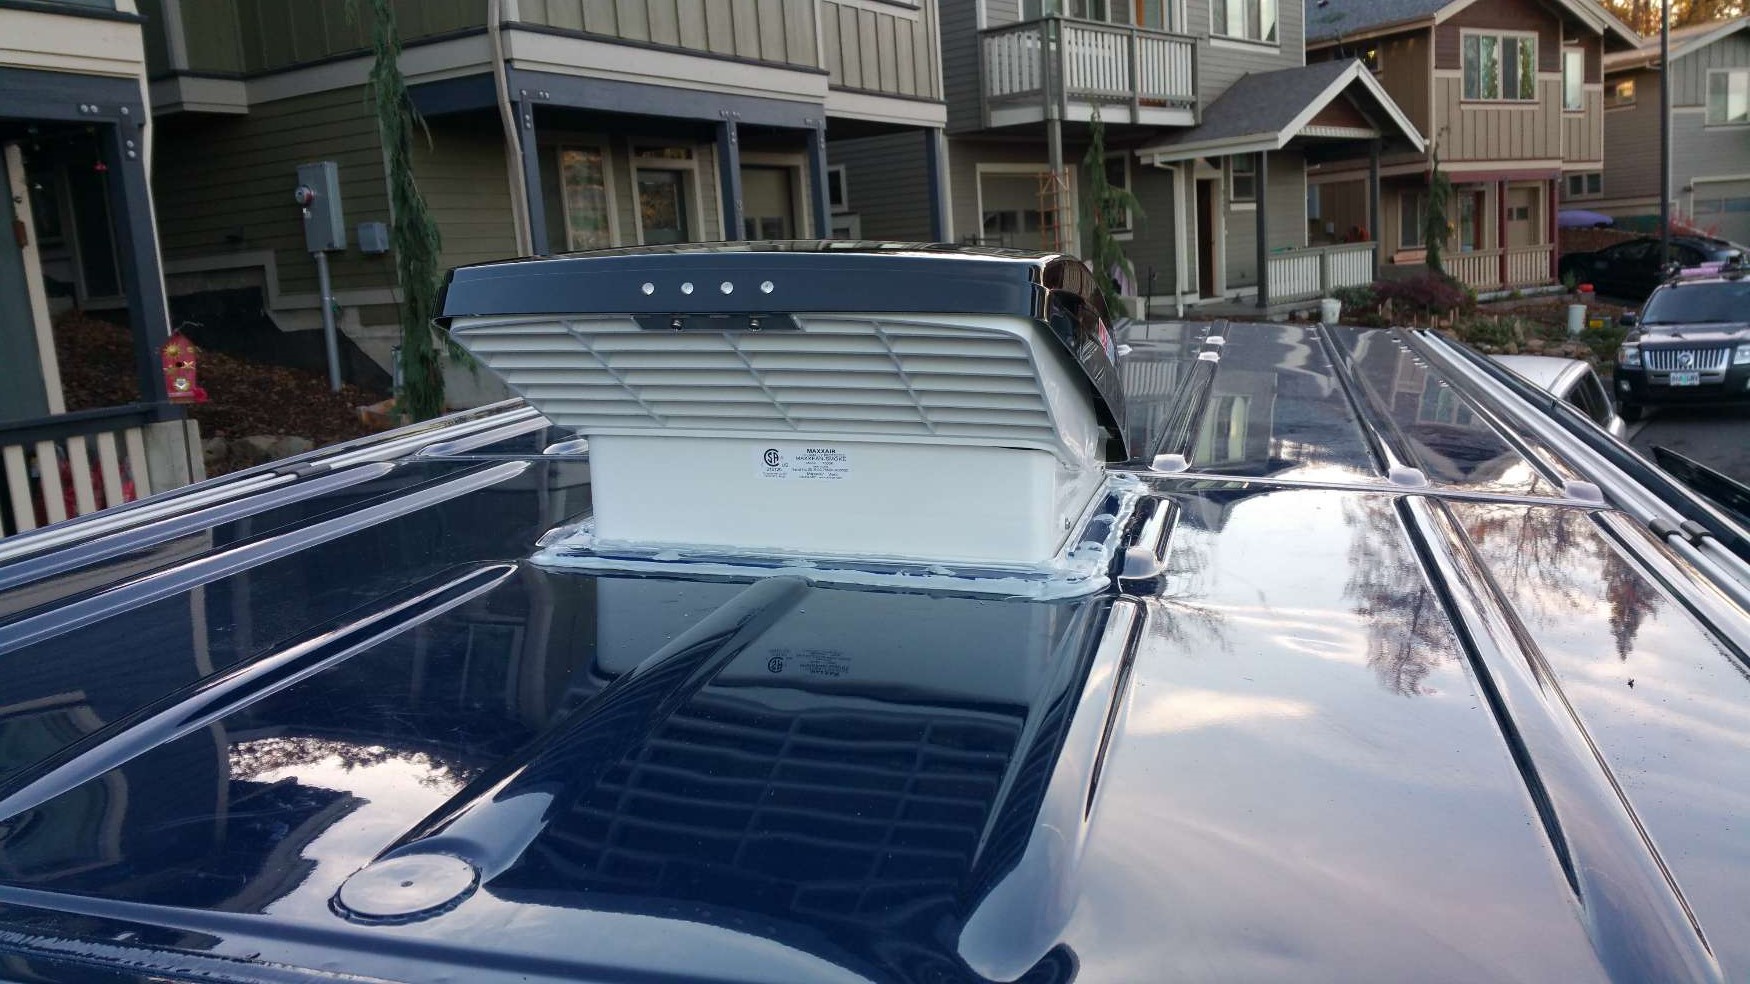
I did not have an issue with the structural ribs in the location where we put our fan. I am trying to think of a better way to describe it. There is a roof seem just in front of this area, and beneath that is the structural rib, its maybe 4″ to 6″ behind the 2nd rib from the back. Perhaps these pictures of the top of the van and the fan inside will help for placing your fan?
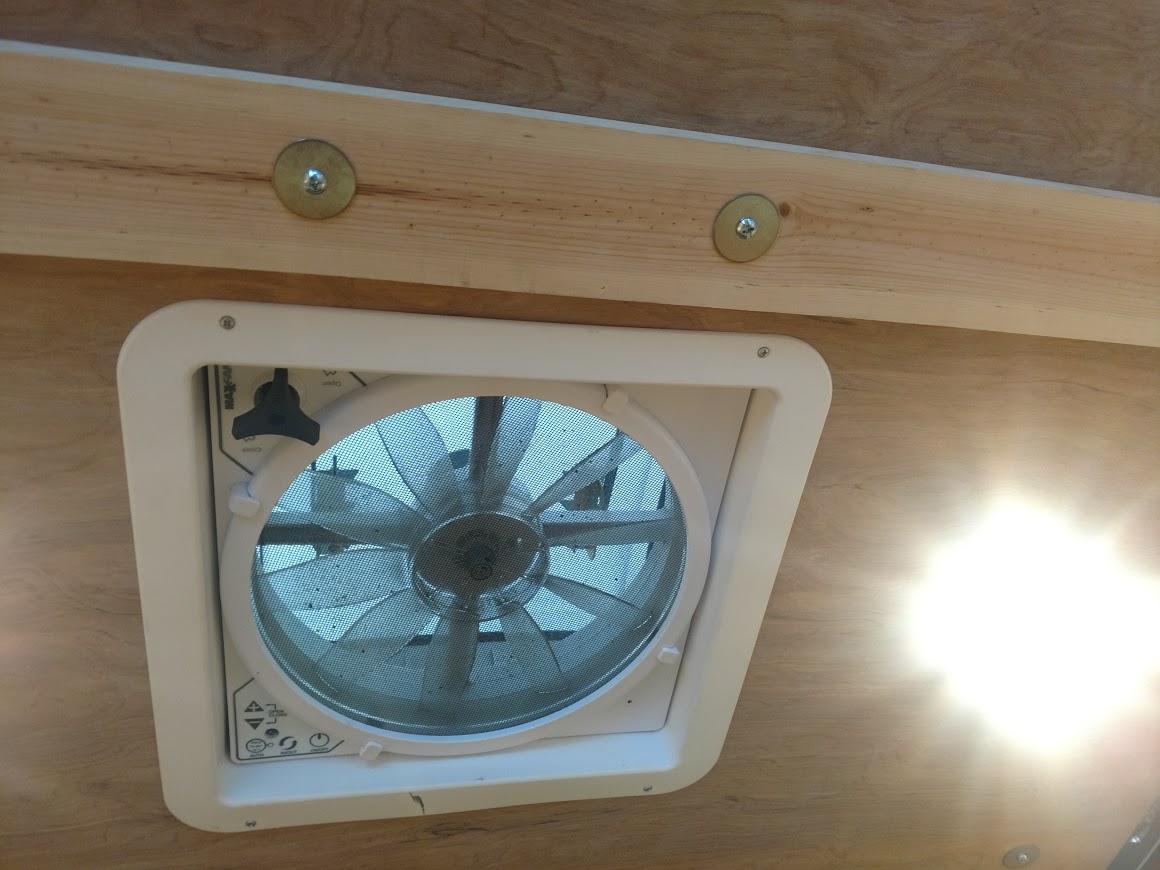
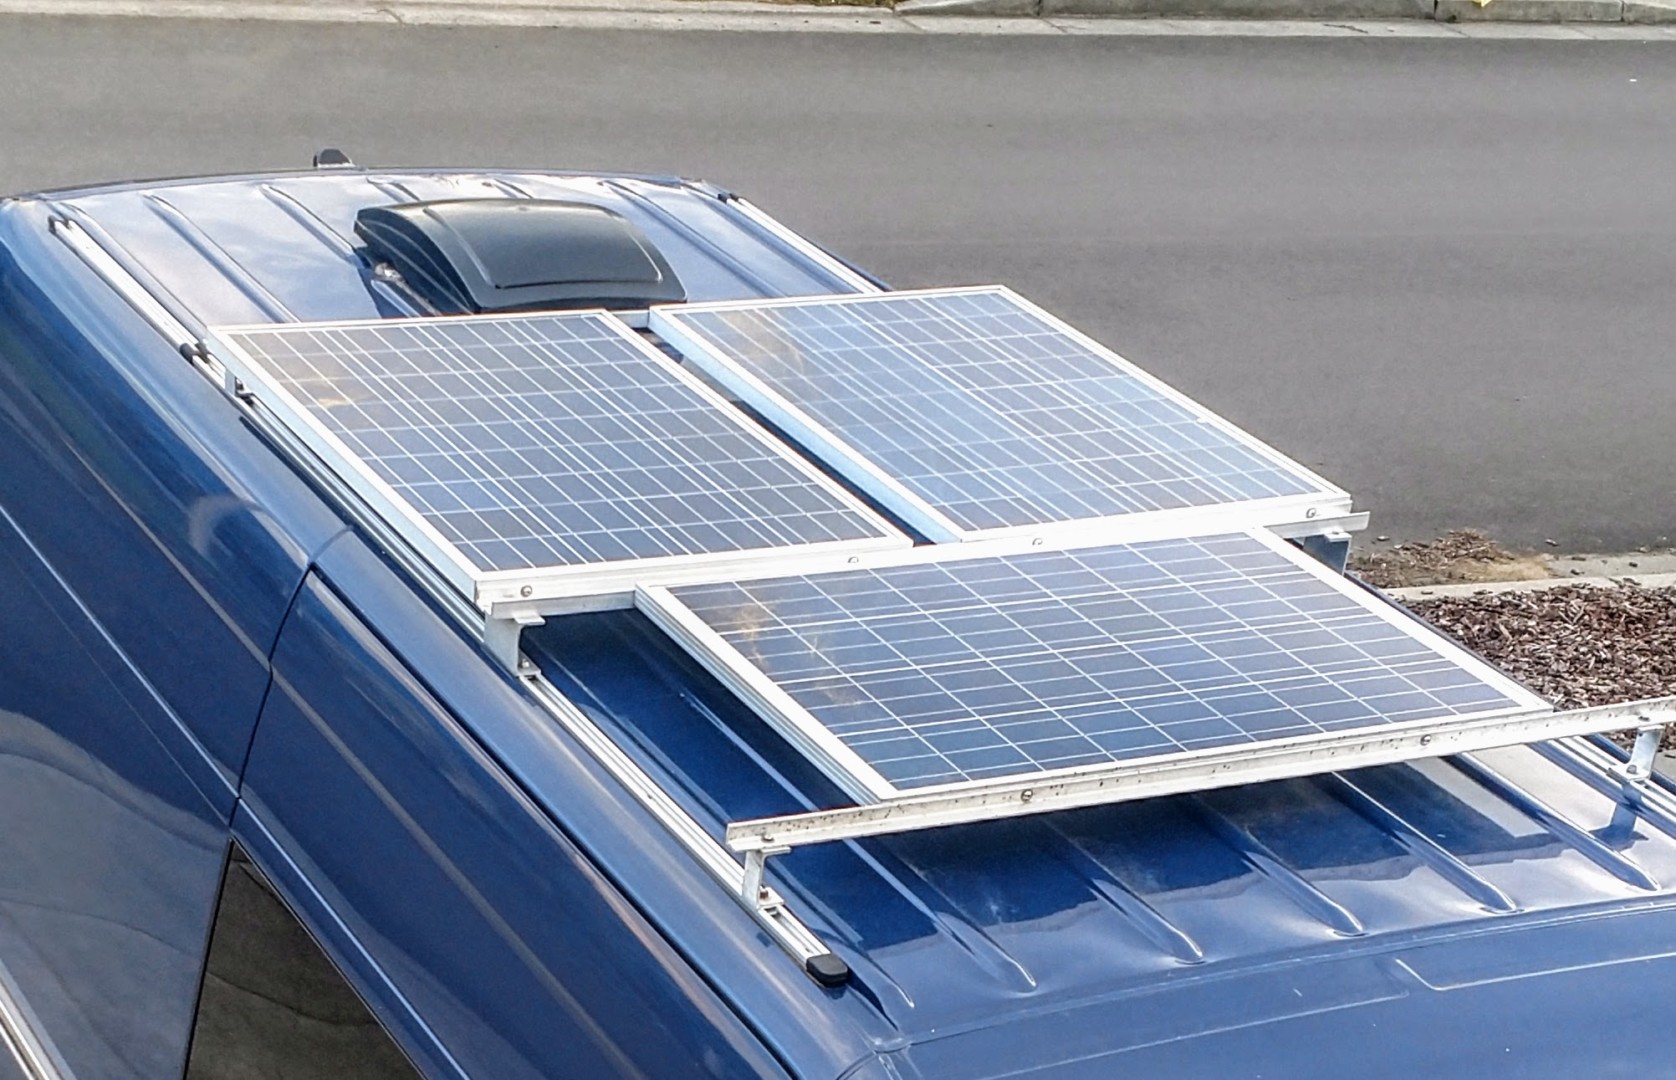
As shown in the first photo, that trim board and bolts are going into the rib that is second from the back of the van. Then in the corner of the photo you can see another bolt which goes into the rib behind the fan. So it goes {back of van} <-space-> rib <-FAN-> rib etc. Does that make better sense?
There are lots of options for placing the fan, and if you do want to place it on the little roof ridges, I have seen quite a few installations that do just that. However, You do have to ‘build up’ the area a bit with the butyl seal tape to get a water tight seal. The location we chose was convenient because it fit between those little roof ridges and was over our bed platform in the back – which is where we wanted the air flow the most. Of course, I would not recommend cutting any structural ribs – this would probably be a bad choice. 🙂
Hope this helps.
Thanks for posting this! Just went through the install following these instructions and love the outcome (I had someone else do the initial fan install because I was terrified to cut the hole in the roof and it turned out they did a terrible job – leaked after two rainstorms). This new setup seems much more bomb proof (fingers crossed). One question that I couldn’t quite get from you pics, did you use the calking on both sides of the aluminum bar stock? Or just on the outside edge? It seems like the inside (closest to the center) would be vulnerable to water seeping in without calking that – even if everything is secured super tight. Would love to hear what you did – seems like I can caulk most of it pretty easily, but the front would be a pretty tight space to squeeze the caulking gun nozzle into.
Thank you!
Brad – I put caulking on both the inside and outside and on top of the bolts to cover every opening. I did this before the fan was placed so I did not have issues. There would have to be a a couple inches of standing water in order for it to jump over the mounting flange, so I did not think to seal the vertical portion of the flange (neck) to the fan itself. Plenty of rain, snow, wind etc. and still no leaks (knock on wood). So I am still happy with the installation. I plan on inspecting and re-upping the dicor sealant if needed next fall.
Okay, great. Thanks for the reply! I went ahead and put the caulking on the inside edge of the aluminum bar stock as well so now it’s just a waiting game to see Mother Nature vs. DIY Vanlifer. I have a feeling I’ll lose somehow, but maybe she’ll be gentle.
Ha, ingore my third question! you cut the “fan mounting frame” not the actual van ridges! A second re-read I easily substituted “moutning flange” for “fan mounting frame”.
Thanks for the write up, I have the same setup, just no handy-man skills or knowledge. As such I have three, I assume very ignorant, questions:
Materials:
“rust-o-lean”
1) I can’t find this anywhere. Can you provide a link?
1/8″ aluminum bar stock
2) Does this come with the fan? If not, do you have a link to the materials, any more info on how to make it?
Tools:
angle grinder
3) Can you flush out this sentence a bit more?:
“took about a 1/4 inch of two sides of it”
You actually cut off a part of the ridge? Do you have a picture? In your pictures I see the 14″ x 14″ hole, but not any holes to the ridge? Did you cut into the ridge after the 14″ x 14″ hole? What about the metal between the ridge you ‘took about a 1/4 inch of’ and the 14″ hole?
Michael – good questions and thanks for pointing out these errors and ambiguities. I will answer your questions and then update the post to hopefully avoid further confusion.
1. My mistake on the spelling. Rust-oleum! Protective Enamel is what I used. Just a small jar was more than enough.
2. The aluminum bar stock does not come with the fan. I used it as reinforcement so I didn’t have to worry about splitting the plastic fan flange. You can order it from Amazon or get it from home depot or similar type of hardware store.
3. Yikes! Do not cut the ridges on the van itself. I trimmed the plastic flange on the FAN mounting kit, to fit between the ridges. I will be sure to clear this up in the main post.
Hope this makes sense. Happy building!
I can’t tell you how grateful I am for this post and so many of your others. Thank you for taking the time to write all this up. Really–it’s invaluable.
Very interesting points you have noted, thank
you for putting up.