V-Strom Chain and Sprocket Replacement
Last week the time had come to replace my chain and sprockets on my 2005 V-Strom (DL-650). I must admit I am pretty hard on the chain; I don’t clean it enough, probably don’t oil it enough, and when I do oil it, I probably spray too much on. So I only got 16,000 miles out of the stock chain – granted about 5,000 of that were from the first owner. Maybe its not all my fault.
In any case, below is documentation of my chain and sprocket replacement project. All in all I believe this was a fairly easy undertaking – and certainly something most handy people could do. that being said, the usual disclaimer applies:
I am not a motorcycle mechanic by trade, far from it. I don’t pretend to be one. I found info on the internet about this stuff and followed instructions, just like you. And now that it has been working for me for for a little while I am passing on the info. If it helps, great! If it screws up your bike, i am sorry – but that is not my fault. Knowledge is power, use it at your own risk!

I relied heavily on the internet to guide me in this process. I recommend the following posts/websites:
- A great post with general tips and tricks for chain and sprocket change by “Greywolf”. As you will see below, I relied on the sage wisdom from Greywold quite a bit:
http://www.stromtrooper.com/642984-post2.html - An anonymous poster gives the breakdown of using a chain breaker/riveter:
http://www.vstrom.info/Smf/index.php/topic,2083.0.html - Jack has very handy information for just the sprocket change – doesnt go into chain breaking/riveting process though:
http://www.jackphelps.com/vstrom/sprocket.htm - And finally – some great pictures of good rivets and bad rivets:
http://www.rkexcelamerica.com/faq.html#flare
So that should get you started for the background of why I did what I did. Now for the step by step guide…
Step 1: Buy a new chain and sprockets and chain breaker tool.
I got my gear from the guys at SV Racing Parts. There prices were good and they had the chain and sprocket kit, which made it easy. The deal at the time was $180 for the kit. Of course, that may change over the years. I also went with the extra screw type master link, even though I didn’t end up using it.
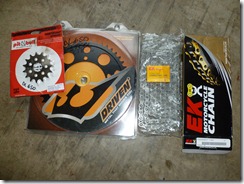
The manual says to use a DID525V8 chain, which is what is included in the kit.

This is what the kit looked like when I got it |
“Pit Posse” Chain breaker and riveting tool. |

I also picked up the Chain breaker and riveting tool from “Pit Posse” on Amazon. This was a gamble, as it is not priced like some of the more ‘trusted’ brands. But it seems like a good, robust tool and worked great for my use.
Step 2: Replace the front sprocket.
 Removing the cover plate over the front sprocket Removing the cover plate over the front sprocket |
 The front sprocket behind the clutch actuator The front sprocket behind the clutch actuator |
|

The front sprocket is tucked in there behind the clutch actuator. Once you remove the plastic cover you will see it. Removing the clutch actuator isn’t that big of a deal, just the two bolts on the top and bottom, as you can see in the picture. However, once you have it taken off, it will likely fall apart., just like mine did. It wasn’t hard to put back together, you just have to line it up correctly on the “grooved clutch spindle” (i am sure there is a better name for that, I just don’t know what it is) and then rotate it back into place.
Once that is done put the bike in gear and crank on that 32mm nut that holds the sprocket on. This can be a pretty big pain, as you have to break it free from the old sprocket as well as that bent washer that holds it in place. I banged on the bent washer for a while with a chisel but I am not sure it helped much. In the end it was just some brute force (read: long breaker bar). I also used the break pedal to help provide some resistance while I torque’d on the thing.
|
|
|
The new sprocket on, without the bolt and washer |


Once that bolt is off, its a fairly straightforward process to to pull the old sprocket off and put the new sprocket on. The front sprocket that I bought could be put on in either direction, but I am not sure if that is true for all front sprockets. I reused the old washer but would recommend getting a new one if the old one is in bad shape. The manual says to torque that sprocket bolt to 105 ft-lbs. Then bend the washer back over a corner of the nut to keep it from rattling loose ever. Some loc-tite might be appropriate as well.
Here are some more photos of the front sprocket and related parts that may be useful…
 |
 |
 |
Greywolf notes the following for replacing the clutch actuator:
The clutch actuator likes to come apart when removed from the bike. Use a tie wrap to keep the two pieces together. That would be the diamond shaped piece in the foreground and the arm with spring behind it. After re-assembling, loosen lock nut #3 and back the adjuster screw #4 off a couple of turns. Then turn the screw in lightly until you feel resistance as it touches the clutch pushrod. Back the off 1/4 turn to assure clearance when the pushrod grows a bit with engine heat. Finally, hold the screw in position and tighten the lock nut.
Step 3: Replace the rear sprocket
To replace the rear sprocket you have to take the back tire off. This is essentially like adjusting the chain tension (loosening the rear through axel) only this time you just take the thing all the way out. Before pulling the axel out, first I recommend loosening the chain adjuster bolts on either side of the rear swingarm, then slip the chain off the rear sprocket. Slide the rear through axel out and the rear wheel should drop out easily.
Replacing the rear sprocket is much easier than replacing the front sprocket (at least it was for me). Simply unfasten the five 10mm bolts around the perimeter of the old sprocket and put the new one on. The torque spec for these bolts is 43.5 ft-lbs, but Greywolf in his post says this was too much and recommends only giving them around 35 ft-lbs. That is what I did.
|
Loosening the rear through axel |
|
Order of parts for the rear axel, could be handy if you get these mixed up. Obviously the wheel goes in the middle there. |


That’s it for sprockets… next on to the chain!
Step 4: Get the old chain off.
 I am sure there are many ways to do this. I took the rear wheel off (to get the old chain nice and loose) and then used my angle grinder with a cutting wheel on it. Cut the thing right of in a few seconds. Of course some folks might be nervous about having all those sparks right next to (on) their bikes… seemed to work fine for me though. I suppose I could have used the chain breaker to break the chain – however, as you will see below, that required some grinding too… the rear wheel was still of for this operation, so the chain was slack sitting on the ground.
Step 5: Make the new chain the right length.
I have heard of a bunch of ways to get the chain the right length. I counted links. The manual says there are 116 links in the chain with the stock gearing, so that’s what I counted, several times – just to be sure. This is apparently not the best way to do it – actually the owner of SV Racing Parts has a great blog post on the stromtrooper forum about the correct way to do it, by actually measuring tension on the bike, but that’s not the way I did it. Its definitely risky and you don’t want to end up short!
Once you have the correct number of links (either measured or counted) its time to break the new chain. Many recommend grinding the rivet head before pushing the pin through with the chain breaker. I found this made it super easy to push the pin through and cut the new chain down to size. Of course, if you screw up on the grinding you could ruin your chain.
Next I put my new chain breaker into my work bench vice, just to hold it steady and loaded up the chain. With the grinding done this part actually went extremely, smoothly. Very easy indeed.
 Chain with rivet ground down to make breaking easier. BE CAREFUL not to damage the chain links when grinding Chain with rivet ground down to make breaking easier. BE CAREFUL not to damage the chain links when grinding |
 Chain and chain breaker loaded on the vice Chain and chain breaker loaded on the vice |
 And just like that, the pin starting to show through on the other side And just like that, the pin starting to show through on the other side |
Step 6: Put the new chain on the bike
For this step I had to put the rear tire back on. This essentially involves reversing the process of Step 3. As Greywolf noted in his post:
When re-installing the rear axle, make sure the keyway slot in the rear brake carrier meshes with the key welded on the swingarm so the carrier can’t turn around the axle. I find it easier to get everything together if the axle is inserted from the right side instead of the left. To keep the rear nut from galling to the axle, I recommend applying anti-seize to the threads and torquing to 58lb-ft instead of 72.5lb-ft to make up for the lubrication provided by the anti seize.
…So keep that in mind.
Thread the chain back around the sprockets. To make it easier on myself and to keep the rear wheel from spinning I put the bike in gear and put a bar across the back wheel. This allowed my to wrap the new chain around the rear sprocket and have that hold it in place while I installed the master link and riveting.
As I said above, I had bought the screw type master link with the kit, but once I bought my chain breaker/riveter I decided to be professional and rivet it. Though I don’t regret that decision, it did ad some minor complication.
 Half of the master-link, without the plate and O rings for the other side Half of the master-link, without the plate and O rings for the other side |
 The chain, wrapped around the rear sprocket with half of the master-link installed The chain, wrapped around the rear sprocket with half of the master-link installed |
 Close up of the chain and master link with O rings installed before the plate is put on Close up of the chain and master link with O rings installed before the plate is put on |
|
|
|
 Finally, riveting the master link. Finally, riveting the master link. |


The photos above essentially tell the story of how to install the rivet master link and do the riveting. Once the first half of the master-link is in place, install the O-rings on the opposite side (O-rings should be on both sides) and the backing link plate. Use the rivet tool with the press plate attachment to press the plates together. BE CAREFUL not to press the plates together too tightly, as this will make it so the chain links will not rotate. I made this mistake the firs time and had to pry the links apart a little with a screw driver to get it right. The tech manual indicates that the overall distance across both chain plates (“joint plates” in the manual) is 18.70 – 18.90 mm, as measured with a caliper.
Once the master link is fully assembled its time to rivet. This was fun but a little bit nerve-wrecking. RK Excel America (the guys who make chains) have some great pictures of what a good rivet looks like and what a bad rivet looks like. Go slowly and everything should turn out fine.
 From the RK Excel America page, “GOOD RIVET” From the RK Excel America page, “GOOD RIVET” |
 From the RK Excel America page, “BAD RIVET |
 My riveting job, blurry photo – but not too shabby My riveting job, blurry photo – but not too shabby |
And that’s how it was done for me. Hope this helps someone with the project. All in all I would say this project was fairly easy. Though it certainly wasn’t fast for me – took the better part of all day to get everything done.
Happy riding.


Great stuff, thank you !
(‘thepaleobiker’ from STROMTROOPER, ADVRIDER,ST-OWNERS,VSRI)
Thanks! Well done!