Luggage Rack for the Kawasaki Ninja 250
")
Beth picked up a little Kawasaki Ninja 250. Since we wanted to do some touring this summer a luggage rack was necessary. The Ninja has some excellent little luggage hooks, and while these are good for hanging bungee netting from, there is only so much stuff you want to pack on the back seat. So a luggage rack needed to be fabricated.
The cost of commercial luggage racks can be quite expensive and honestly I am not even sure if anybody makes a specific setup for the Ninja 250. As usual I headed over to the Ninja 250 riders club website to get some ideas. There were several good ones that used the existing luggage hook bolt holes. I especially like the one that used copper pipe. 🙂
The goal in my design was to be able to utilize Beth’s Ortleib panniers that she already had for bicycle riding. I figured these would be great for motorcycle touring as they are waterproof, pretty tough (for soft bags) and easily removable from the bike.

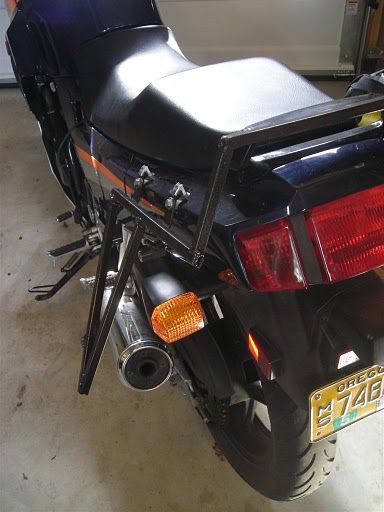
Longer bolts that fit in the existing bolt holes and allowed keeping the original luggage hooks were purchased from a local hardware store. Plastic spacers were used to push the rack away from the body. The spacers were cut down so that the rack wasn’t cantilevered too far away from the bolt hole and thus decreasing the moment arm on the rack.
")
")
I went to the local steel yard and picked up the 1/2″ square tubing and the 1/4″x1″ bar steel for about $5. (50 cents a pound) once I got that back home I cut, drilled and bent the attachment tabs to the new longer body bolts through the existing luggage hooks. The entire way through the project I “field fit” all the pieces on the bike as I went. Actually I don’t think I measured anything – just did it all by sight and relative length.
The basic design attaches the luggage attachment bars to the existing body bolts at the two locations on each side. (4 bolts total) Each side is attached to each other via a bar that runs up and over the tailight. This gives the rack some stiffness. Two triangles drop from each side to push the bags out and away from the turn signals and exhaust pipes.
Unfortunately I did not take many intermediate pictures. The whole fabrication operation didn’t even take very long. After piecing it all together and welding it all together the nearly finished product was ground down to bare, clean metal and then painted with spray paint. I briefly considered some wild colors but in the end chose matte black.
You can see the results. I think it worked out pretty well. The bags stick out a little farther than I would have hoped. I had to make sure to clear the blinkers and the exhaust system and that spacing gives it a bit a wing like look. But when there is a person on the bike it doesnt stick out very far at all.
")
")
")


I have the exact same bike. Very clever! How has it held up? Anything you would do differently?
Unfortunately, I no longer have this bike, so can’t comment on the long term longevity. But a few notes from this and other experiences:
– the unsupported lower section of the racks isn’t great. Would have been better to have another support brace that ran around the back of the bike (behind the rear fender)
– spray paint is great, but doesn’t hold up to frequent outdoor exposure. Powder coating is better.
– Rackless panniers have come a long way. Though more expensive, offerings from companies like Mosko moto have a lot of benefits including being less breakable and more functional. (plus they come with you to your next bike!!)
You are Awesome!!! Such a smart guy making the luggage rack!!!