Lessons Learned: Rivnuts Vs. Plusnuts
Having installed several dozen rivnuts as part of the sprinter van conversion and then have several of those rivnuts fail, I thought it might be a good topic of discussion for the blog, comparing rivnuts versus plusnuts.
TL/DR: I think plusnuts are a superior product and would highly recommend using these in critical situations (especially when pull out is a concern) instead of using ‘classic’ rivnuts. That being said, if rivnuts are chosen (price is a consideration) the right tools and correct installation is imperative. Plusnuts appear to be a little more forigiving and quite a bit more robust. Yes, plusnuts are more expensive, but (my opinion) they are a much better product.
The ‘Classic’ Rivnut

For the original build, I ordered 100 of these 1/4-20 rivnuts for use all over the van, including supporting the headliner and the bed frame. They were advertised with a rivet range of 0.5-3.5mm which seemed appropriate for the sheet metal of the van I was going into. I had never used rivnuts before so was fairly ignorant as to all the details I should have been looking for (still am pretty ignorant on the details for that matter).

Upon receiving my package of rivet nuts I quickly realized that I didn’t have the right tools to install them. Rather than buy the expensive, but highly recommended Astro Rivet Nut Installer, I built my own contraption to install the rivnuts utilizing a

section of pipe that I welded a handle on to, a grade 8 bolt, a bunch of washers and a pneumatic impact wrench (see photos of tool below). The specs indicated that a 23/64-inch drill bit (or 9mm) was recommended for placing the rivnuts. I used a metric step drill bit. At 9mm it was a tight fit, but that helped the rivnuts seat better initially. While my custom tool was effective, installing the rivnuts was difficult and apparently not very effective. Several rivnuts failed to seat properly during the install process and 10,000 miles later, several more popped out. It was difficult to know how tight to get the rivnuts and when they were seated well or overtight. Since I never did get the install tool I am not sure if this tool would have helped this issue (Per the comment below – GET THE RIGHT TOOL! And the right sized drill bit, or suffer the wrong results).

So taking into account my mis-steps, not using the right tools, I shouldn’t be surprised by my lack of good results with the rivnuts. Another problem is that the van sheet metal is pretty flimsy (no wonder a lot of the professional upfitters use all that reinforcement!) – the flange created by the compressed rivnut doesnt get very big so if your hole gets enlarged due to any number of factors (vibration, loading and unloading, etc), it pops right out.

Whatever the cause (some speculation in the comments below, which may be correct) lots of the rivnuts I installed popped out over time. Given that I now had oversized holes in my van (couldn’t just put in another rivnut) and didn’t want to change my 1/4-20 ‘standard’, I took my questions to the internet! My research lead me to plusnuts…
The biggest difference between rivnuts and plusnuts is the flange that is created when the nut is compressed. Whereas the flange on a rivnut is fairly small, but covers the entire circumference of the nut, a pre-bulbed plusnut expands significantly more when compressed, really grabbing onto the backside of the metal you are seating it in, in the shape of a plus.
Pre-Bubled Plusnuts to the rescue!

look at that nice wide
flange holding it in!
After reading up on plusnuts (also known as cross nuts) I went ahead and bought a bag of 100, designed to fit my same 1/4-20 standard (that I have run throughout the van build) with a sh
eet metal thickness range of 0.02- 0.28 inches (0.5 – 7mm). After installing a half-dozen of them, I am a total believer in these plusnuts. They have been a significant improvement to the rivnut. I can think of the following major advantages:
- Plusnuts are more tolerant of oversized (or damaged) holes
- Plusnuts are much more easily installed (you really don’t need an expensive tool for a plusnut)
- Plusnuts exhibit much greater pull-out strength
- Plusnuts have double the thickness range
- I have much higher confidence in their ability to hold (look how big they are compared to the rivnuts!)
I am now going to be meticulously going through our van build and checking each rivnut installation to be sure it is adequate. And if it’s not, replacing it with a plusnut. In this case, I really think a picture is worth a thousand words – so I will let the below pictures speak for themselves. In the photos below I was actually trying to install both a plusnut and a rivnut side by side. But the rivnut failed to seat in the thicker aluminum bar (believe this was 3/16″ or so – which is, in all fairness, larger than the rivnut spec)

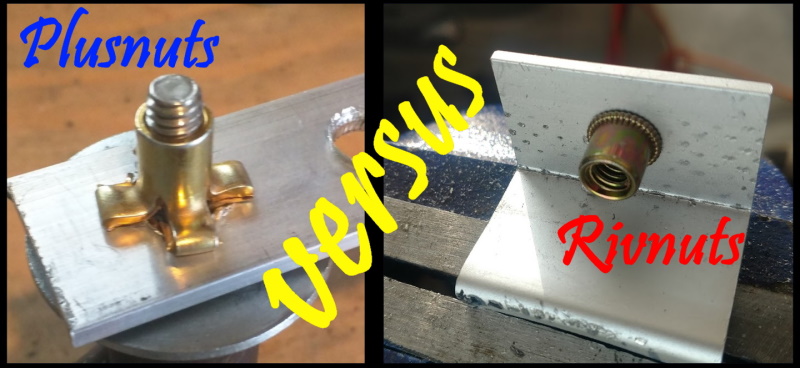
Comparison of the 1/4-20 plusnut (left) and a 1/4-20 rivnut (right) 
Custom rivnut installation tool. Works much better on plusnuts. 
Plusnut partially installed (for illustration purposes) 
Continuation of partial plusnut installation (for illustration purposes) 
Plusnut profile 
Outside face of plusnut 
Inside face of plusnut
UPDATE (April, 2018):
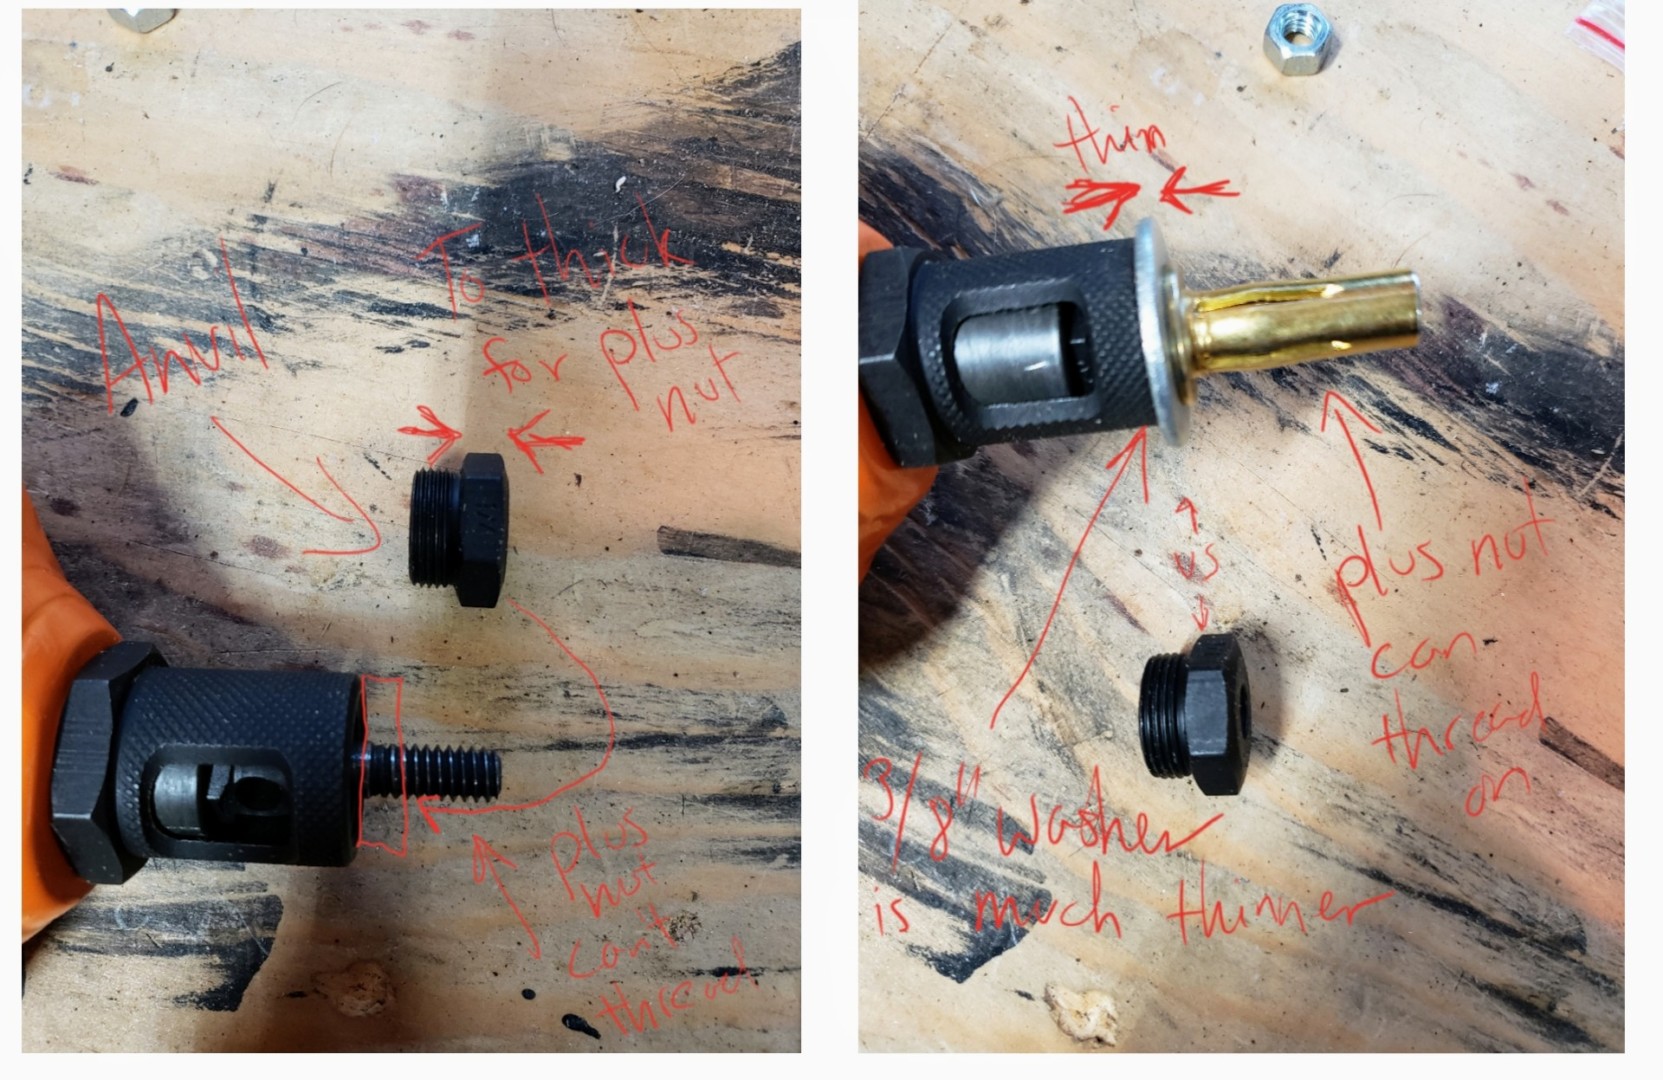
I finally ended up purchasing a rivnut tool. As other’s have said in the comments, getting the tool really does help a lot and makes the whole rivnut experience very very easy. I agree with others – the ease of installation makes the purchase price worth it. I purchased the Tacklife 14″ Hand Rivet Nut Setter Kit, which (at the time of purchase) was a little less expensive than the Astro Pneumatic tool and has a neat pull handle in the center that allows you to quickly thread the tool onto a placed rivnut and remove it once the nut is set. I am very impressed with the Tacklife tool and how quickly and easily it sets solidly anchored rivnuts. However, I am a little disappointed that it doesn’t work out of the box with plusnuts (as I do love plusnuts), but I was able to get it to work by using a large thick washer on the nose tip, instead of the threaded cap. For placing 1/4″ plusnuts, I was able to get it to work using a 3/8″ washer instead of the standard threaded cap on the tip of the tool (3/8″ seems to be the magic size, 1/2″ was a bit too big, but worked okay, 1/4″ washer did not work at all). It requires a few rounds of tightening and actuating the tool, since plus nuts require quite a bit more travel than rivnuts, but seems to do the trick. As far as I can tell, the Astro Pneumatic tool also cannot do plusnuts, without similar modification.

Tacklife Rivnut Tool 


Modifying the Tacklife rivnut tool for plusnuts


Hello great video and info, thanks!
I am looking to install roof rails on my sprinter but I cannot access bolts and nuts from below as the cabinets and roof of the van are already installed (and it will be a nightmare to take these off). I am wondering if I should use rivnuts or plusnuts.
I am mainly concerned about:
– overall the metal sheet is quite thin and plusnuts look they could damage the metal during installation/pulling but at the same time they have more pull strength.
– Ideally I would like to install a roof rack on the rails so I am concern about weight (don’t worry if you are not comfortable answering this question)
– to compensate my above concern I was thinking to use riv or plus nuts together with a strong adhesive (Plexus adhesive, used in naval industry) or tape (VHB 3M tape)
what do you think?
thanks again
Gio
I’m trying to find out the dimensions of the smallest PlusNut. I think it’s an M4 but I need to know the overall length (before tightening). I’ve searched around quite a bit and haven’t found it.
oooh. That’s a good question. And I dont know the answer. I pretty much standardized all my plusnut use around 1/4″. So anything smaller than that and I have no idea.
PlusNut Supplier in the UK
No experience with PlusNuts in fiberglass. Remember fiberglass attachments can be made with fiberglass! West Marine has the fiber and resin, simply embed whatever attachment device (wood or metal?) you wish.
If you want to experiment with PlusNuts on fiberglass, you might experiment on some sacrificial fiberglass from elsewhere, and perhaps reinforce with a suitably sized fender washer on the accessible side to spread the load, although there isn’t much you can do about the cruciform wings digging into the back side of the fiberglass.
Personally, I would feel uncomfortable with it for anything more than the lightest stress, but necessity is the mother of invention. Good luck!
Have you tried to use the plus-nut in a fiberglass exterior such as a trailer or motorhome? I have a bad need for this if it’ll work. I can’t crush the fiberglass. I also have no choice but to use a blind installation.
Thanks,
Unfortunately, I have no experience with fiberglass – but a quick search of the Internet seems to indicate plus nuts would work on fiberglass. Rivnuts are definitely out.
https://youtu.be/qr_tX_YdTsM
You could also consider rubber well nuts.
Plusnuts are designed to work on thicker materials than Rivnuts… in your photo it looked like 1/8″ stock, whereas on sheet metal, more of the body will be able to swell out and hold better…
But no denial that Plusnuts have more holding power.
So, use Plusnuts for large structural items in a van conversion, and Rivnuts are fine for lighter loads…
Would you be comfortable using a M8 plus nut to bolt down a car seat?
That’s definitely not something I’m comfortable answering. But M8 sounds way to small. I believe the backseat escucheons in the cargo van are bolted down with M12 bolts. And those are bolted through to captive nuts on the frame. Something to consider.
Hi do you have any photos how you use the 3/8″ washer mod with plus nuts? I am a bit confused. Granted I am still waiting for the tool to come in and and it’ll make more sense when I see it. Thanks!
The 3/8″ washer goes on the end of the tool, around the mandrel and replaces the anvil.
See photo linked below… (I hope this link works)
https://www.pointsunknown.com/blog/wp-content/uploads/2020/06/inCollage_20200602_1856016352.jpg
Thanks, Austin, I will give it a shot!
Thank You! I have a the Astro tool 1442 designed to be used with Rivet nuts and I am hoping this work around can be applied to the Astro so I can use Plus nuts.
anyone has some ideas where to buy box of variate of plus nuts aka kit? Are these accessible at hardware stores?
You mentioned regarding your Tacklife tool that ” I am a little disappointed that it doesn’t work out of the box with plusnuts (as I do love plusnuts)”
What didn’t work and why? What does a 1/2″ or 3/8″ washer do that the threaded mandrel or 1/4″ washer don’t? It really isn’t clear how you keep the washer in place. I’m going to order the TackLife but wanted to be able to use it right away.
The plus nuts that I have were not able to be threaded on the Tacklife mandrel. The sleeve for the plusnuts is just too long for the threads to catch and that’s why it didn’t work. What the 3/8″ washer does is replace the threaded cap, that serves as the ‘anvil’ which the plus nut pulls against when actuating the tacklife tool.
The tacklife cap is maybe 1/4″ in thickness, whereas a 3/8″ washer is… maybe a 1/16th? The 3/8″ washer opening fits around the mandrel and the washer “flange” presses against the sides of the tacklife tool housing.
Nothing holds the washer on except the plusnut you have threaded on there. So once you have released the plusnut, after placement, the washer is free to come off.
Helpful article, appriciate the time you’ve spent writing this up, and very well written too.
Just put the plusnuts in my Amazon list for the van…. awesome advice and write up.. thanks! Bobby http://www.boutside.org
Thanks! I checked out your blog. Looks like you have gone on some amazing adventures (i’ll admit to being a little jealous).
Thanks! Hoping to make many more! In Africa presently! More on that eventually…
Thank you for this article. You helped me make an informed buying decision. I ordered the Plusnuts, Astro 1442 install tool and a proper 23/64″ drill bit.
I enjoy reading your site. It has been a valuable resource for my own Promaster conversion.
You can purchase 1/4-20 plusnut on ebay at a reasonable price.
A recent post shows the original brand with a trimmed head and matching nut
hold the nut in place with wrench and just drive a bolt in to the Plusnut until it’s tight
EASY and CHEAP TOOL
I am going to just say THANK YOU to the primary Sprinter DIYers for a fabulous site, great possible products suggestions, and THANK YOU to the people like the above person who contributed the additional expertise on this topic, and others elsewhere!!! I’m just beginning the process with a used Cargo van, but I can’t wait to have a DAPHNE of my own!!!!
So glad its been helpful! Thanks for reading!
First, thank you for the time and effort you put towards documenting your build on the web. It’s a great public service towards others following in your footsteps!
For your benefit and for others who may read this.. you really need the correct drill bit for installing rivnuts. 23/64 is 9.1281mm. The metric step drill bit you listed has a 1mm step size so its next largest size is 10mm. That means your holes were around 0.87mm too large.. a difference of close to 10 percent compared to what they would have been with a 23/64 drill bit.
I’ve had zero problems with those same Uxcell 1/4-20 rivnuts, but I used an Astro 1442 and a proper 23/64 drill bit. The Astro is about $60 but makes setting rivnuts fast (10-15 seconds, mostly to unscrew the tool from the rivnut), easy, and even fun.. being cheap I didn’t want to spend the money on the tool but in retrospect it’s worth it if you’re installing a lot of them (more than 15 or so). I’ve already gone through a bag of 100.. My time is worth more than what I’d save by not buying the tool.
I have no experience with plusnuts but a box of 100 seems costly enough that obtaining the correct drill bit and a compound-leverage tool to install rivnuts (such as the Astro*) would be competitive.
(* take the time to adjust the tool properly– which you only have to do once if you’re only using 1/4-20, and lubricate it with a drop of oil before use to reduce effort and wear/breakage risk)
Awesome. Thanks for the comment and feedback. I will update the post accordingly.
Hi there… can you install the plusnut using the Astro tool? I’m just beginning my Sprinter Build and your site is invaluable! Thanks
I do not own the astro tool, so I can’t comment directly on its ability to install plus-nuts. But my hunch is that it works, since it’s the same compression mechanism with rivnuts or plusnuts. Might be a good question for the product listing.
Hi KJ, I’ll echo what Austin said- it’ll probably work, but I can’t say for sure.
I haven’t tried plusnuts, but if you decide to buy the Astro then my financial as well as technical recommendation would be to purchase bags of 100 rivnuts for $7.50 each, rather than bags of 100 plusnuts for $52 each. If you use just two bags, the Astro pays for itself.
Without making any broad claims about how rivnuts and plusnuts compare for pull-out strength, I suspect it’s just not relevant to our vans; the sheet metal would significantly deform before either fastener pulls out. Once expanded in a correctly-sized hole, rivnuts are not going anywhere without a chisel, drill, and some serious effort.
Rivnuts, at least the ones we’re talking about from uxcell, offer superior resistance to spinning inside their installation hole due to their splined edges which will grip the inside of that hole (and even more so if the plusnuts we’re comparing them to are installed in an oversize hole).
Also, there were a few tight spots in my build where I would not have been able to use a plusnut (due to their length) but was just barely able to place a rivnut. Something to consider..
If I were to use plusnuts for something it’d be for a situation where high pull-out resistance is required from a fastener (e.g. hanging something from a ceiling with a single bolt) placed in a softer material (like plastic, aluminum or fiberglass).
Best of luck with your build!
Many many thanks. I’ve decided to go with the Rivnuts and the Astro….. we shall see!
Hi, just curious what screws you used for the 23/64 sized rivnuts; just starting my own build and sorting out these small conversion details. thanks!
Has anyone used stainless rivnuts? Do you think they are necessary?