Installing the JD Jetting EFI Tuner on a Honda CRF 450L
The Honda CRF450L is well known for being a little bit twitchy off the line, when going from off idle into the throttle. After riding a friends bike who had installed the JD Jetting EFI tuner, I became a believer. Sure, I know doing the full vortex ECU replacement, adding aftermarket exhaust, and a number of other modifications will smooth things out and ‘wake up’ the bike even more, but at the expense of fuel economy and my wallet. Since my kind of riding requires some pretty good fuel range, I didn’t want to lose too much in the way of mpg. The JD Jetting tuner is also much more economical, at around $200, versus the Vortex ECU which goes for over $700.
The below are just observations from my experience installing and using the JD Jetting EFI Tuner on my 2019 Honda CRF450L.
TL:DR
Installation of the JD Jetting EFI Tuner “Power Surge 6x” is very straightforward (only takes about 30 minutes) and the difference over stock is definitely noticeable. It took a little bit to dial in my preferred settings, but it was well worth it. And I am pleased with the results. The bike is significantly less jumpy off the line and much easier to ride in tight trails and trees. I didn’t really have much of an issue with surging or stalling to begin with, but the idle is much stronger now and the bike feels ‘happier’ overall.

Parts and Installation
All you need to complete this project is the EFI Tuner from JD Jetting (Power Surge 6x). I purchased mine from Rocky Mountain ATV and MC (this isn’t an advertisement, just a fact). The kit comes with all the necessary cables, connectors, and the piggy-back EFI unit itself.
To install, you first need to remove all the body panels. This is straightforward with a couple of hex (allen) wrenches and box end wrenches. While the instructions said to remove the gas tank, I found that I had enough clearance under my aftermarket IMS 3.0 gallon tank to just loosen it and lift it up. This saved me from having to disconnect the fuel pump hose and wiring (tip: removing the factory ECU from its mounts by pulling it towards the fuel tank makes it much easier to lift up the back of the fuel tank).

Lift the fuel tank up (or remove it) to get access to the fuel injector connector 
To remove the connector, press the tab on the back of the connector to disengage, then pull up 
Insert each end of the provided JD Jetting EFI Tuner pig-tail into the corresponding OEM connector 
Install the ground to a terminal of your choice. JD Jetting recommends this one 
Locate the control module in a safe place. JD jetting recommends here, but I left mine on top of the bike during initial programming and testing.
Once the tank is lifted up, you can look under it to find the fuel injection electrical connector. There is a tab on the back that you press to release it from its connection. The JD Jetting EFI tuner plugs right in to both original connectors – one to the wiring harness, the other into the fuel injection terminal on the injector.
You also need to connect the ground wire on the JD Jetting EFI Tuner. This is recommended to be connected to a mounting point on the left side of the bike. Simply remove the nut, place the pre-wired ground terminal over the bolt, and then re-secure the nut. I didn’t have a torque spec for this – i called it ‘reasonably tight’.
Tuck all the cables in and zip tie them so they are secure and wont get pinched with the lowering of the fuel tank. Route all the cables appropriately. You can mount the tuner wherever you want, but JD jetting recommends putting it under the left side body panel. I did this at first, then realized I wanted to have it out and accessible, at least during initial testing and tuning, so I moved it from there up to my rear rack. I’ll move it back down once I am sufficiently happy with my tune.
Then put everything back together.
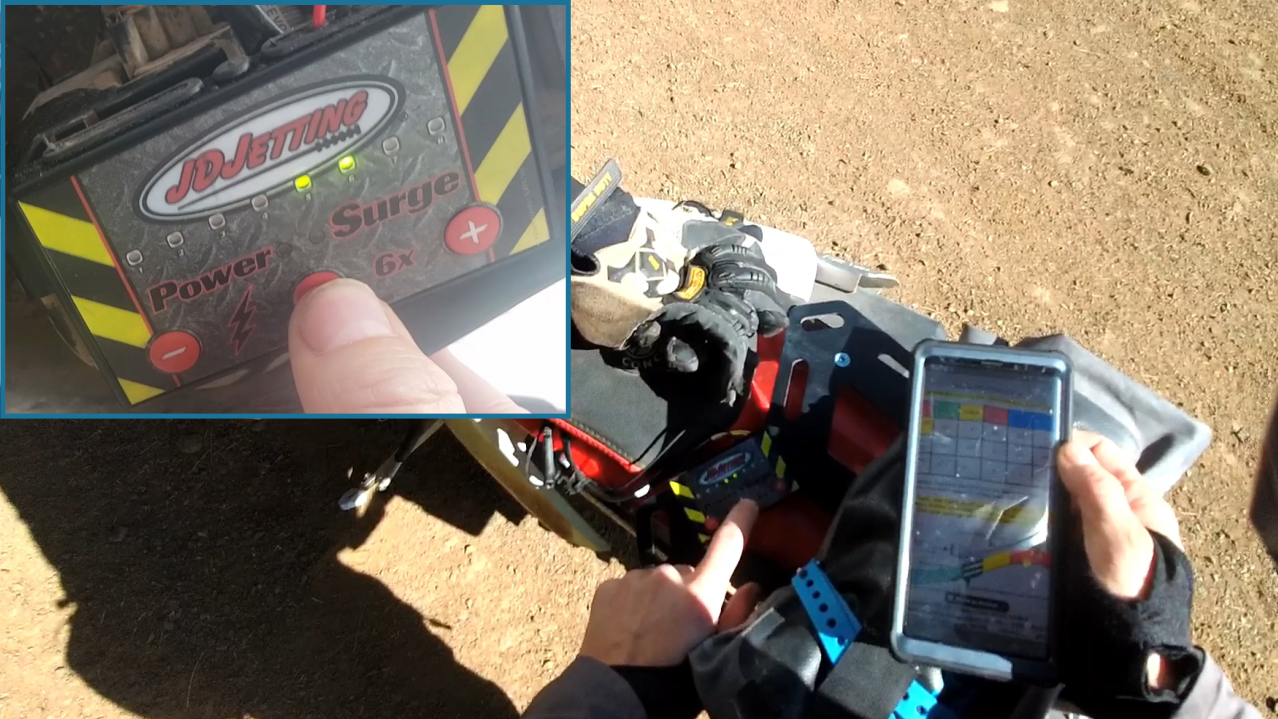
Operation and Testing
Once everything is wired up, test the installation. Fire the bike up. After starting the bike, the lights on the tuner will cycle from left to right a couple times. That means its good!
Programming the tuner was a little intimidating at first, but I was assured from this video by Dirt Bike Test / Jimmy Lewis that you really couldn’t permanently break things with this unit, so that made me feel better. So with that I just started playing around with the settings. Initially I put in the JD jetting recommended settings. These worked alright, but I found that some customization made things even better.


The instructions do an okay job of explaining things, but to really understand how it worked I really had to try it for myself. Each “Mode” on the JD Jetting EFI Tuner corresponds to a different throttle position, that I have generalized from my understanding as follows:
- Press the mode button once: Green
- Lights on the JD Jetting tuner flash green. Where they flash indicates what the setpoint is (numerically). If two lights are illuminated that indicates a half step, like 5.5 in my example above, where the lights of 5 and 6 flash.
- Green is low throttle response. Its how much fuel the tuner adds to stock when you open up the throttle about 0 to 1/4 of the way.
- Press the mode button again: Yellow
- Lights on tuner flash yellow (actually they look orange to me).
- Yellow is the mid throttle response. How much fuel the tuner adds to stock when you have the throttle about 1/2 to 3/4 of the way open
- Press the mode button again: Red
- Lights on tuner flash red.
- Red is the full throttle (‘top end’) response. It’s how much fuel the tuner adds to stock when you have the throttle 3/4 to full open.
- Press the mode button again: Green/Blue
- Lights on the tuner flash green indicating the setting while the blue 8 also flashes.
- Green/blue is adjustment at idle. Increasing this setting increases the fuel being added to idle (no throttle).
- Press the mode button again: Yellow/Blue
- Lights on the tuner flash yellow (orange) to indicate the setting while the blue 8 also flashes.
- Yellow/Blue is the ‘low-mid’ throttle setting. It’s how much fuel the tuner adds when the throttle is between 1/4 and 1/2 of the way open.
- Press the mode button again: Red/Blue
- Lights on the tuner flash red to indicate setting while the blue 8 also flashes.
- Red/blue is called the ‘accelerator pump’. My understanding is that this setting is activated when the throttle is moving. But to be honest, I don’t really know what this does and most suggestions I have seen leave this at stock “3” setting. So thats what I do.
From the descriptions above, its important to note that each mode is not sequential as it relates to opening of the throttle. That is, each mode does not follow the last from idle to full throttle. Summarizing from above, each press of the mode button cycles through each throttle position as follows:
| Throttle Position | Idle | 0 to 1/4 Open | 1/4 to 1/2 Open | 1/2 to 3/4 Open | 3/4 to Full Open | Accelerator |
| Mode | Green/Blue | Green | Yellow/Blue | Yellow | Red | Red/Blue |
| Order in Programming (mode number) | 4 | 1 | 5 | 2 | 3 | 6 |

Per the tuning instructions, a setting of 3 is the same as stock. Reducing the setting below 3 reduces the fuel being sent in that modes throttle range. Increasing the setting above 3 increases the fuel being sent in that modes throttle range. I haven’t heard anybody decreasing fuel (going below 3) and I personally didn’t find any benefits there.
The EFI tuner will automatically return to the beginning of the sequence when no buttons are pressed for 10 seconds. So that means if you wait to long to decide what setting you want for a certain mode, you have to start again – pressing the mode button once for the green setting. There is no ‘save’ button. Any changes are automatically stored – so that means when you are done making changes, just stop touching any buttons (for 10 seconds or more) and you are good to go.
Settings
I’ve written down my current settings that seem to be working best for my bike and my style of riding below. Note that the below table goes in the sequence of each mode button, not in the sequence of the throttle.
| Mode | 1: Green | 2: Yellow (Orange) | 3: Red | 4: Green/Blue | 5: Yellow/Blue | 6: Red/Blue |
| My Current Setting | 4 | 4 | 4 | 4/5 (4.5) | 4/5 (4.5) | 3 |
| Throttle Position | 0 to 1/4 Open | 1/2 to 3/4 Open | 3/4 to Full Open | Idle | 1/4 to 1/2 Open | Accelerator |
The settings above are for my specific CRF450L and these settings are neither a recommendation nor an endorsement. My bike is mostly an all stock bike, but I have made a few modifications including increasing the rear sprocket to 53 teeth and installing the G2 throttle tamer. The rear sprocket gives me a little better low speed control and I’ll admit to not feeling a lot of difference from the G2 throttle tamer.
I scoured the internet for a good while looking at various people’s settings. I’ve compiled a few different maps below, just for reference in the future. More info can be found on the forums here and here.
| Mode | 1: Green | 2: Yellow (Orange) | 3: Red | 4: Green/Blue | 5: Yellow/Blue | 6: Red/Blue |
| Stock Map (No Changes) | 3 | 3 | 3 | 3 | 3 | 3 |
| JD Jetting Recommended with No Mods | 3/4 | 4 | 4/5 | 3/4 | 4 | 3 |
| JD Jetting Recommended with Exhaust / Air Box Mods | 5/6 | 6/7 | 5 | 3/4 | 4/5 | 3 |
| dp19 | 3/4 | 4 | 4/5 | 6 | 3/4 | 3 |
| CRF450L Ohio | 6 | 4/5 | 3 | 6 | 4/5 | 3 |
| Hotshoe 99 | 6 | 6 | 6 | 7 | 5/6 | 5 |
| Throttle Position | 0 to 1/4 Open | 1/2 to 3/4 Open | 3/4 to Full Open | Idle | 1/4 to 1/2 Open | Accelerator |
Conclusions
The JD Jetting EFI Tuner Power Surge 6x definitely works on the Honda CRF450L and definitely makes a difference in how my bike performs.
I imagine I will keep on playing with the settings (its kinda fun) but I do think that pushing the idle (green/blue) up a bit helps a lot, as does the green ‘initial throttle’ response. I have found that changing these settings does definitely change how the bike operates – and for the better. The jerky feeling off idle is nearly completely gone (pushing the settings as high as 6, as some have done, actually took some of the “playfullness” of the bike away – thats why I backed mine down a bit).


