Sprinter Adventure Van Build – Solar Charging
Knowing that our van would be sitting for quite some time while we were camping and adventuring out of it, we knew we would need some type of auxiliary charging system – we couldn’t just rely on the alternator to charge the auxiliary batteries (house) while underway. I’ve heard (though I haven’t run any tests) that it takes several hours of time on the alternator charger to bring just the OEM auxiliary battery back up to full charge – so two batteries would take quite some time. So we decided to install solar panels. It helped that solar power is extremely cool, fairly inexpensive, and I like the added bonus that the batteries are trickle charging all day long.
Summary (TL:DR)
We purchased the 200W packaged system from Windy Nation (on Amazon, as usual). It came with just about everything we needed for installation, with the exception of a viable mounting system (since the mounting points we wanted on the Sprinter are somewhat specialized) and a fuse to protect the charge controller from the panels. This system has been working great!

Tools
- Wire strippers and cutters
- Drill
- Saw with metal blade
- Angle Grinder (for cleaning up burrs on the metal edges)
Materials
- Solar kit from Windy Nation
- Fuse
- Cable Gland
- butyl tape and dicor sealant (same as from the fan install)
- Aluminum 6061-T6 Channel 3″ x 1.5″ x 0.13 Cut to: 12″ – from OnlineMetals.com
- Aluminum 6061-T6 Bare Extruded Angle 1″ x 1″ x 0.1875″ Cut to: 72″ – from OnlineMetals.com
- Double Slider for Roof Rails – From Vantech
Reference
I don’t really have any great references for this, or rather – there are too many to list. There is nothing really special about hooking up the solar to the van that makes it different than any other solar installation anywhere. There is a ton of great reference information all over the internet. For me, the instructions that came with the Windy Nation kit was really all I needed.
Procedure

We chose to install our solar panels on the roof of our van, huddled under a tarp, in a snow storm. I do not recommend this approach. Unfortunately, we don’t have access to a garage tall enough to fit our van inside so this was the only option. In the end, it worked out fine – albeit a bit uncomfortable, cold, and wet most of the time.

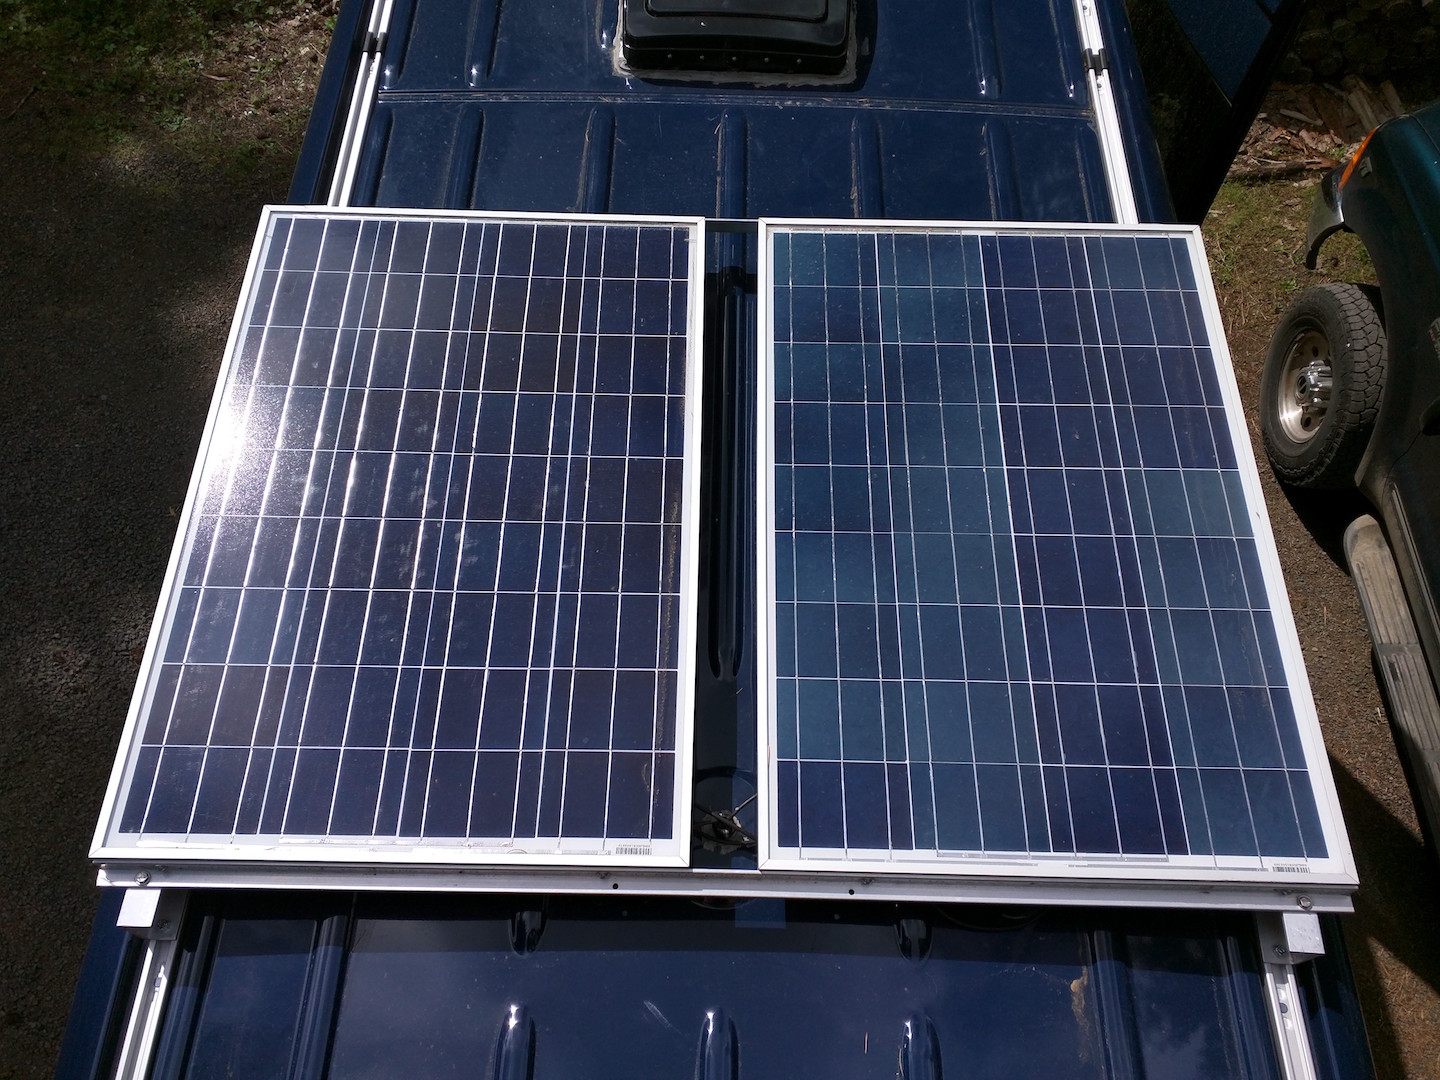
To mount the panels to the roof of the van, we built a “custom” rack system. A much more elegant solution would have been to use Impact3D (Hein’s) mounting brackets and 80/20. These look super cool, but given that we are the DIY type, we decided to make our own. At it’s core, the mounting system utilizes the sliders purchased from Vantech. These fit perfectly into the roof rails that our van came with. If your van didn’t come with roof rails, I guess another method of mounting would have to be found. We purchased 4 of the double sliders, though in retrospect, we could have gotten away with 2 doubles and 2 singles (double/single referring to the number of bolts on each slider). Connected to the sliders, we purchased a short length of 3″ x 1.5″ aluminum C-channel and cut it into even smaller segments (2 about 3″ in length and 2 about 1.5″ in length. 
 This was drilled, as shown, and bolted to the sliders which served to elevate our custom rails of the roof of the van a little bit. We probably could have gone with something a little shorter than 3″ (as in 2″ may have been fine) but I had heard that having a little bit of airflow underneath the solar panels was a good thing to help solar power efficiency, so we purposefully allowed for a bit of an air gap there.

In what was probably the most mentally taxing part of the whole solar panel mounting operation, we decided to first mount the 1″x1″ aluminum angle directly to the solar panel frames. The underside (bottom) of the solar panel frames came pre-drilled for the included mounting brackets in the Windy Nation kit, but we ended up not using these at all. Instead, we carefully (very carefully, so as not to damage the photovoltaic cells or any related wiring) drilled into the side of each 100W solar panel frame. We then attached the 1″x1″ angle to the sides of the solar panel frames via matching holes in the angle. Everything bolted together with lock washers and so that we ended up with the two panels bolted to the rails as a single unit that had to be lifted up to the top of the van. Fortunately, the assembly was not that heavy and this was accomplished easily.

 Finally, the solar panel assembly was bolted to the slider/C-channel assembly and the solar panel mounting was complete. The mounting appears to be very solid and I have no concerns about it’s highway worthiness.
Next onto wiring…
One of the big tricks with the solar panels is getting the wires from the outside of the van to the inside. We stewed on this for a while and ultimately decided to use a cable gland, which I had experience using for watertight connections elsewhere.  This turned out to
  be the perfect material for the job. To install it, we simply drilled a 1/2″ hole pretty much dead center in the roof of our van. After inserting the cable gland we sealed around the edges with dicor sealant and butyl tape. From there we simply routed the cables from the solar panels through the holes in the gland and tightened the rubber gasket around the cables to make it a water tight connection. Ugly, but easy – and who is really looking at the roof of our van anyway? This installation has made it through many rain storms and I have seen no signs of leakage. Though, if I was worried about it, I think adding a little more dicor to the top of the gland would seal up anything else that could possibly leak.

With the Windy Nation kit you are required to assemble the MC4 connectors yourself. They come with a few different pieces and for a second this can be a little daunting – but after reading the instructions and seeing that the pieces really only fit one way, this went pretty quickly. Just be sure to pay attention to the (+)’s and (-)’s and make sure the connectors on each solar panel match (+) and (-) wise to go into the correct (+) and (-) MC4 connectors. One complaint I do have about the Windy Nation kit, is that the wiring it comes with is all black. It appears to be good quality wire, but its hard to know the difference between the positive and negative wires once you have passed them through the gland and are sitting inside the van with no good reference point (yes, I am speaking from experience here). Of course, a multi-meter is pretty handy in this situation to make this determination quickly – especially if you are trying to figure out why the system is not working, once you got it all wired up (still speaking from experience :).

From there it’s just a matter of bringing the wires to the solar charge controller unit, that comes with the Windy Nation kit. The charge controller that comes with the kit is pretty basic. I know you can get a lot more fancy and eek at some more efficiency with a more sophisticated MPPT charge controller, but the PWM controller that comes with the kit is cost effective and appears to be doing a great job recharging the batteries and keeping them charged. I guess I will know better in a year or two if our house batteries lose capacity prematurely – perhaps it was the not-so-fancy charge controllers fault. Or perhaps user error.
We wired our solar charge controller up in the same box as the rest of the electrical gear. This involved running the wires down the driver’s side B-pillar and to the box behind the driver’s seat. This continues to seem like a good idea, as we continue to add more and more stuff to this handy storage spot.
 I have expanded the previous electrical wiring diagram to show the addition of the solar panels. Note there is a separate fuse that connects the positive side of the panels to the charge controller and then the output from the charge controller is run back to the main fuse box (with yet another fuse) to either power whatever is running or charge the batteries (if there is an excess amount of current). This seemed like the most straightforward way to do it, minimizing the number of additional fuse panels and capitalizing on the electrical infrastructure we already had. Of course, like everything, I am sure there are many ways (some of which are probably better) to do this. However, this method has been working just fine for several months – so no worries here.
We have been using the solar panels for several months now. On a recent winter ski trip, we had the van parked for several days, while we did skiing day trips into the backcountry. Overnight temperatures were in the -5 to 10 degrees fahrenheit. We had the espar heater running constantly, the fan running while cooking, and the lights running for a few hours each morning and each night. We were kinda parked in a shady spot and didn’t get full winter sun until around 10am and would lose it around 3pm. Even with all that working against us, we managed to operate with what appeared to be only a 5% daily deficit (based on our mostly inaccurate voltage monitor). That is, we were losing 5% each day in charge that could not be fully recovered by the solar panels. But even with that we could have gone 10 days before the batteries dropped to 50% – which is a long time. So there is some very unscientific anecdotal performance metrics for you.
That pretty much sums up our solar panel installation experience. And I think the finished product looks pretty good and certainly functions very well.


Hi! We actually have the exact same kit that you installed and are going to be putting it all in over the next couple of weeks. Did you ground anything? The Windy Nation manual was great for everything besides that!
We grounded the ground wire from the panels to the appropriate terminal in the charge controller and ground the charge controller to the negative bus on our fuse box (which is grounded to the vehicle chassis). That’s it. Not sure what else one would need to ground. Happy to answer any more questions about our installation as they come up for your build.
Good luck!
Does drilling a hole in the roof of your van or connecting solar to your primary battery void the Extended Limited Warranty? Just wondering whether I should add that to a new van purchase or not if I plan to do a similar modification. Thanks.
I don’t know anything about extended warranties or the legal requirements about what does or does not void a warranty. I would be surprised if drilling a hole in the roof voids the warranty, but would recommend consulting a lawyer or other expert if this concerns you. The tiny hole for the solar panels is the least of my worries – one of the first things I did was cut a12″x12″ hole in the roof for the ventilation fan.
Sorry I couldn’t be more help.