Making the Kawasaki Versys-X 300 Adventure Ready
Many motorcycle industry reviewers have been pretty impressed with the ‘adventure’ capabilities of the little Kawasaki Versys-X 300. And what’s not to like? For half the price of its larger “ADV” siblings, you get a lightweight bike comfortable on the highway and content on gravel backroads alike. But, as others have pointed out, it’s still a street oriented machine.
This is a street bike first with some dirt-road potential… Because of its street-oriented roots, it belongs in the Versys family, even if it is the most dirt-oriented of its siblings.
REVZILLA
But just because Kawasaki has taken ‘street-first’ approach doesn’t mean that with a few tweaks and improvements it can’t become a true adventure machine, capable of chewing up fire roads, BDR type adventure routes, and logging tracks. True – Its probably not going to ever be a trail bike. But then… does it need to be? Isn’t that what trail bikes are for?

TL:DR – Summary and List of Mods

Skipping straight to the good stuff, here is our list of mods for the Versys-x 300. Could we do more? Sure, but this is what we’ve done to make the bike a capable and safe adventure touring machine.
- Protection:
- Givi Engine Guards (TN4121)
- Ricochet Off-Road Skid Plate
- Barkbuster Hand Guards (bike specific – with Storm Plastics)
- Electronics
- Luggage
- Comfort / Practicality
- Oxford Premium Adventure Heated Grips
- Side stand pad enlarger (custom or purchased)
- Center Stand
- MotoWrk Lowering Links
- Shoes (forthcoming)
The Build
Our initial budget was right around $1,000 for this build. With the essentials (not counting some of the ‘Comfort’ items) we were right at that target. We were able to just move the Mosko luggage over from the KLX – otherwise that would have totally shot the budget.


Protection
To protect and armor the bike against damage from unexpected get-offs in the woods, we went with Givi Engine Guards (TN4121), a Ricochet Off-Road Skid Plate, and Barkbuster Hand Guards (bike specific – with Storm Plastics)
The mix of theGivi engine guards and Richochet skid plate seemed to offer the best protection of the engine, exhaust, and side panels. And the Barkbuster hand guards are made specific for the Versys X-300 and are a good investment to protect the hands.
Installation of these items was not particularly easy – and I am not looking forward to having to take them off again in the future (example, despite the Ricochet Skid Plate having a hole to drain the oil – its not really placed very well and oil ends up going everywhere – the skid plate has to come off for an oil change). Here are a few tips and tricks we found, for the install:

bolt required
- When combining the Ricochet skid plate and the Givi engine guards, the engine mounting bolt that come with either kit is not long enough to accommodate both. A M10x170MM bolt is required.
I tried ordering one from Fastenal, but they lost my order. So forget them– I highly recommend BelMetric Automotive and Hardware Specialty Supplies. I ordered the BSH10X170 – Allen Socket Head and matching NN10SS – Nylock Nut (M10x1.5) at the same steel grade (12.9) and half the price of Fastenal. A few fast shipping days later and it was in my hands.


the nut from spinning
- Keeping the nut from the engine mounting bolt from spinning, when installing the Givi engine guards is quite a trick. The metal cylinder that sets the space between the engine and the guards makes it very tricky to hold the nut in place and tigthten the engine mounting bolt. I ended up shoving a screw-driver into the space between the nut and the inside wall of the cylinder, to keep it from spinning. If others have a better idea how to do this, I am all ears (please say so in the comments). Torque spec on the engine mounting bolt is 51 ft-lbs (per MarkinMI on ADVRider – see photo below)

with the Ricochet Off-Road Skid Plate
- The Versys X-300 looked kinda funny with the plastic engine shrouds removed – like there was definitely something missing. But the shrouds don’t fit back on with the Ricochet skid plate. We cut the bottom of the plastic shrouds off so they could be fitted with the skid plate. This looks much better (but will be a pain to remove for maintenance)
- Installation of the Barkbuster hand guards wasn’t bad – but HOLY CRAP – removing the Versys-X stock bar end weights is a huge huge huge pain. All I can say is be patient, use lots of WD-40(sprayed inside the handlebar, once you get it started) and watch this YouTube video.
Some additional notes and installation tips are provided in the annotated photos in the gallery below

Mounting the skid plate – middle 
Mounting the skid plate – rear 
Mounting the skid plate – front 
Torque requirements for the engine mount bolts 
Note for reusing the plastic engine shrouds 
Notes on skid plate installation 
Notes on skid plate installation 
Notes on skid plate installation 
Notes on skid plate installation
Electronics
Accessory power, heated grips, auxiliary lights, etc. – all benefit from a good relay and power distribution system. I am a big fan of the eastern beaver stuff, but decided to try something new for this build.

installed under the seat
For a switched power relay and fused connections I went with the Show Chrome Fuse Block, Relay kit. This appears to be a well put together gizmo with all the right features. I dont have any use for all the turn signal and lighting relays, but the three fused connection points were exactly what I wanted. And if we ever get creative with lighting we can use those other relays.

The trick for any bike is finding a ignition switched signal to tap into. For the Versys X-300 there is an accessory plug under the seat, I couldn’t find a good pin-out/wire color indication so I grabbed my multi-meter and determined my own. Based on my testing I got the following wiring color for the Kawasaki Versys X-300 (your experience my vary):
- Black with Yellow Stripe – Ground
- Brown with White Stripe – +12V switched. This is what I used.
- Blue with Black Stripe – 5V?? switched. not sure.
- White with Blue Stripe – 11V? switched. not sure.
Fortunately, I had the correct connector sitting around (turns out it uses the same types as the Honda Africa Twin – gotta love Japanese bikes). For those that want/need a connector – its a 4-pin HM-090 Sealed Connector (HM090-4 Set) that can be purchased from Cycle Terminal (my recommended source). Wiring the HM-090 connector onto the Show Chrome relay/fuse block wiring makes for a pretty pro looking install.
For placement, I put the relay/fuse block unit under the pillion seat where the tool pouch usually sits. There is a fin of plastic that takes up half of that space, making it not very usable, but a grinder made quick work of that. Used some velcro to stick the unit to the plastic there (so it can be removed if/when desired).
From there, wiring in the accessories is as simple as connecting them up to the fuse block. We hooked up the Oxford Premium Adventure Heated Grips and an USB Accessory Socket. The USB socked fit perfectly into the stock slot on the dash. All we needed to do was remove the fairings/dash. Additional photos and some more notes are provided in the gallery below.

Show Chrome relay and fuse block, with top cover off. Also, location of stock accessory plug shown on the right (under the seat, Versys-X) 
Used a grinder to cut out the plastic rib under the seat. This gave more room to install the fuse block 
connectors for use with the 4-pin HM-090 connector (comes with the kit) 
HM-090 connector, for use with the Versys-X 300 stock accessory wiring port under the seat 
Show Chrome relay and fuse block, with top cover off
Comfort / Practicality
Lastly for this post is a few notes on on some practical features. Given some… height challenges … for the rider of this bike, it was desirable to lower it a little bit. We went with the MotoWrk Lowering Links. These worked out great. Because we lowered the bike, we went with the T-Rex Center Stand, which easily accommodates the lowered bike. The one trick I hadn’t seen before, that was included in the Lowering Link instructions was to use a scissor jack and small chunk of wood to hold the back of the bike up and make small adjustments when removing the old links and placing the new ones. This trick worked great to make a smooth install.

hold the bike swingarm in
place when installing the
lowering link
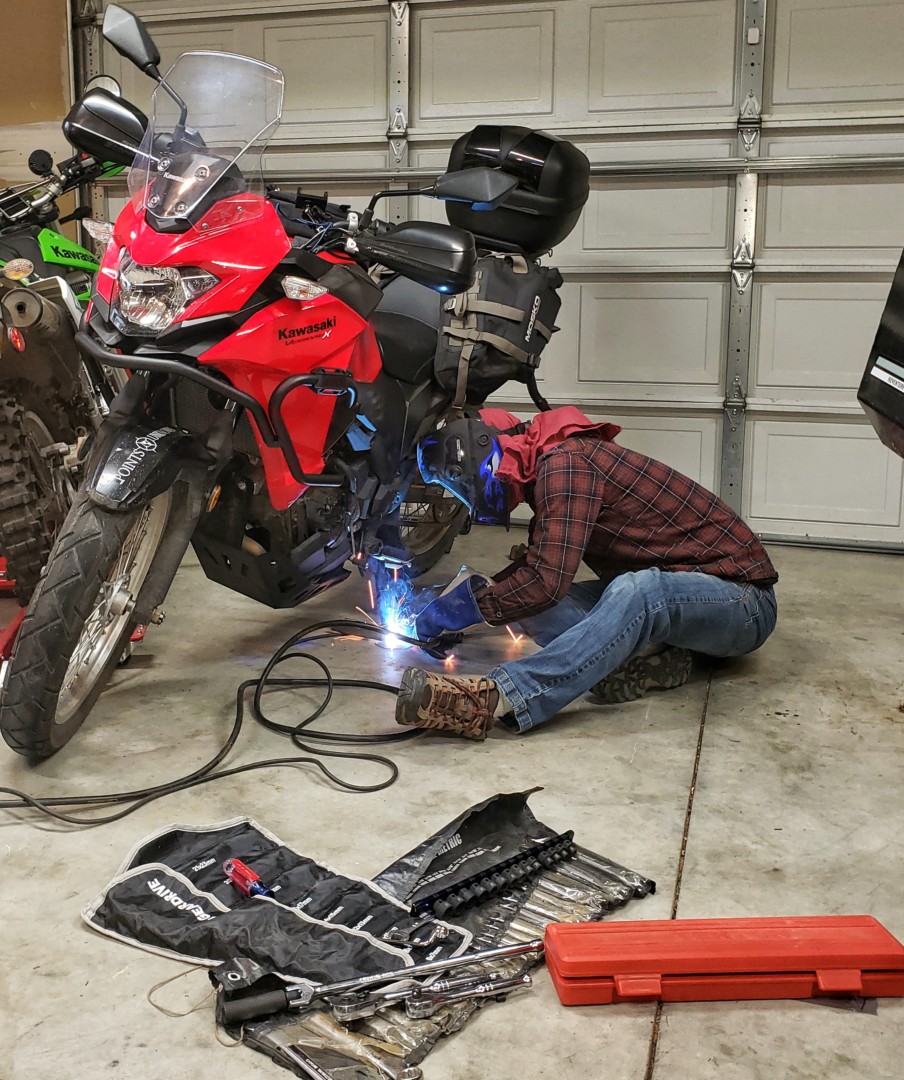
Also, because we lowered the Versys-X 300 AND would be taking it off-road, something had to be done about the side stand. Stock the bike sits pretty upright when placed on the side stand (which I think is awkward) and the tiny kick-stand pad does float well on softer surface (dirt, gravel, etc). A shorter side stand was required. I am sure there are purchasable options that cover both – but this is PointsUnknown, and this was a fun and easy project.
So we removed the stock side stand, cut about 3/4″ off, and welded on a new larger side-stand foot. For the foot, I had some 1/4″ steel plate sitting around. I cut it to match the larger side stand foot I had for the Africa Twin. In order to make sure the angles were right (and the foot sat flat when the bike was on flat ground on the stand) I tack welded the plate to the stand while it was on the bike. Then took the stand back off the bike to do the full welding – to avoid sparks causing any unwanted consequences around the bike. To protect the rattle can paint job and give the stand a little extra grip on the bottom, we epoxy’d some rubber from a bicycle inner tube to the bottom.

Larger side stand foot. 
Rubber base for the side stand foot, epoxy and a bike tire 
painted, lowered side stand with larger foot 
painted, lowered side stand with larger foot 
painted, lowered side stand with larger foot. Rubber for the bottom. 
1/4″ steel to make the side stand foot. 
Unpainted side stand with larger foot 
Unpainted side stand with larger foot 
Tack welding the side stand foot, to get the angle right, before taking it back off the bike for final welding. 
Test fit of the side stand foot. 
larger side stand foot 
cutting down the stand to accomodate the lowered Versys-X 300 
The stock Versys-X 300 side stand
Conclusions
That covers the main upgrades made to the Kawasaki Versys-X 300 to make it more adventure worthy. Now if only we could get out of the Covid-19 epidemic and get out and test them (though it does give me plenty of time to write more blogs)


Not sure what the 5v wire is intended for but perhaps it’s for a USB connection to power electronics.
Thank you for sharing the links to the lowering kit. I’ve done everything you guys did as well, and highly recommend upgrading the seat also. I love my Versys x300, but despise the OEM seat. Upgrade to a Seat Concepts cushion and cover for a decent improvement.