Motorcycle Bike Rack
THE DREAM:
Motorcycles carrying Bicycles
Yes many an avid motorcyclist and bicyclist has had this same idea. Seems two wheels attracts other two wheels. Here are a few examples of how this has been done before:
http://www.advrider.com/forums/showthread.php?t=512119

http://www.advrider.com/forums/showthread.php?t=567943
just to name the top few search results. Clearly there is quite a bit of interest and experience in doing this out there…
and even commercialized in this product: http://2x2cycles.com/
So, with all that in mind, I decided it was time to have a go at my own version of the motorcycle bike carrier / rack. I thought about building one for about 2 years….
The decision to act was finally motivated by my friend Paul who also has a V-Strom and also wanted a bike carrier. Together, we came up with the following requirements:
- Ability to carry 2 bikes
- maintain the use of our side cases
- maintain use of top box a plus
- use traditional yakima/thule bike carriers since thats what we already owned
- cost effective (not cheap – but not using all titanium either)
CONCEPTS AND INITIAL DESIGN PROOF:

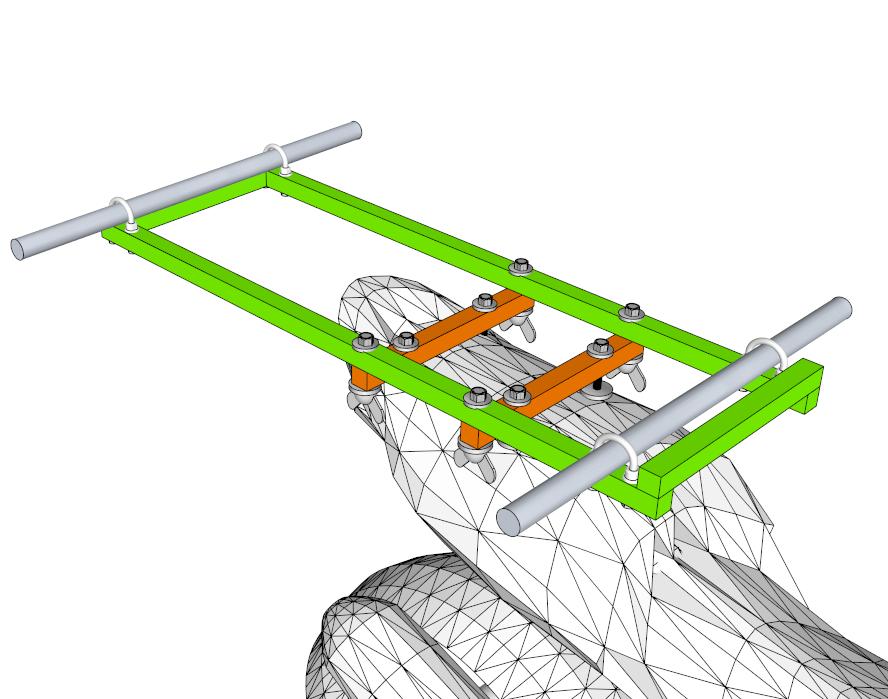
The basic concept was to build a frame that could support standard Yakima roof rack bars on the back of the motorcycle. This would allow us to use standard roof-top bike carriers and wheel carriers and also allow us to attach ski racks (or any other rack they make for that matter) as needed for future moto-adventures. In my typical fashion I worked up some 3D sketches in Sketchup to get the ball rolling.
The rack on my motorcycle was simplified by the use of the Adventure MotoStuff V-Strom Luggage Rack that came with my bike when I bought it. This provided a great mounting point for a bike-rack frame that was somewhat adjustable.

For Paul’s bike (with the desire for him not to have to buy a $70 aluminum plate (not that its not high quality i’m sure, just that it seems a little expensive) we came up with a way to mount to the factory rear rack.
MATERIALS:
Frame:
We chose to build the rack frame out of 16 gauge 1″ square steel tubing. Yes aluminum would have been lighter but I only have a mig welding setup and am not well versed in the art of welding aluminum with a mig (though I have heard you can actually do it). Plus aluminum is expensive.
Fasteners:
1/4″ nuts & bolts were used throughout for consistency. Nylon lock nuts were used for more permanent fastening locations. Wing nuts with lock washers were used to attach the rack frame to the bike to allow for fairly easy attachment and removal.
We attached the round bars with custom made you bolts that we built out of all-thread and heat shrink tubing. This proved much more cost effective at $3 for 3-ft of all-thread vs. $4 for a single you bolt. And it turned out looking very nice as well.
Bars:
While Paul opted for actual Yakima bars (he did get them used, but they were still ~$40), I used 3/4″ schedule 40 galvanized piping for my bars, which I then wrapped in black duct tape. The diameter of my bars is slightly smaller than standard Yakima bars, but they worked out fine with the clamp type bike racks.
Bike racks:
After trying out several versions we found that the Yakima Fork Lift proved to be the best, most stable mount. Other racks that we tried including the copper-head and some old-school Thule rack. Both racks allowed the bike to wiggle quite a bit, which gave some fairly exciting feedback to the rider when you hit a bump. The copper-head was by far the worst affender. Its clamping style didn’t work at all on my narrower bars, but even Paul’s completely standard Yakima bars didnt secure the rack (or the bike) very well.
Additional Considerations:
We added a few straps to the mix to make everything a little tighter. Borrowing from the 2×2 cycles method I highly recommend adding a strap from the handlebar stem to the foot peg. This transfers some of the load onto the center of the bike rather than having it cantilevered off the back end. The front wheel of the bike can be held in place using a standard wheel carrier mount or can be strapped to the frame.
Below are some photos from the build process.
Total Project Time: About 20 hours or so.
[nggallery id=3]


I love this article and blog, i will share it with my friends.