DIY Adventure Van: Modular Kitchen System (v3.0)
The kitchen is a critical part of adventure van building. And while you could just use a portable camping table (yes, we did that early on in our van building/camping careers) it is much nicer to have an organized cooking space. However, like everything else in our camper van, our kitchen also needed to be readily removable – so it could transform into a toy hauler without much fuss. So our kitchens over the years have all been simple modular construction. Version 3 of our sprinter van kitchen is no different, but we’ve improved upon the things that worked and revamped the things that didn’t. Overall Modular Adventure Van Kitchen System v3.0 has been working out well, being both functional and stylish. In this post, we’ll go through the features of our adventure van modular kitchen system and detail how its put together.
TL:DR
We have a sprinter based adventure van named DAPHNE. Inside DAPHNE we’ve built several versions of a modular kitchen system. Version 3 includes a sink, storage drawers, clean water and waste water storage tanks, and a means for storing and deploying a 2 burner camp stove. All while maintaining modularity and quick install/remove capability which our hallmarks of DAPHNE’s buildout. Detailed plans of our adventure camper van kitchen system are available for download (pdf).
Kitchen Features
Key features of our modular van kitchen setup include:

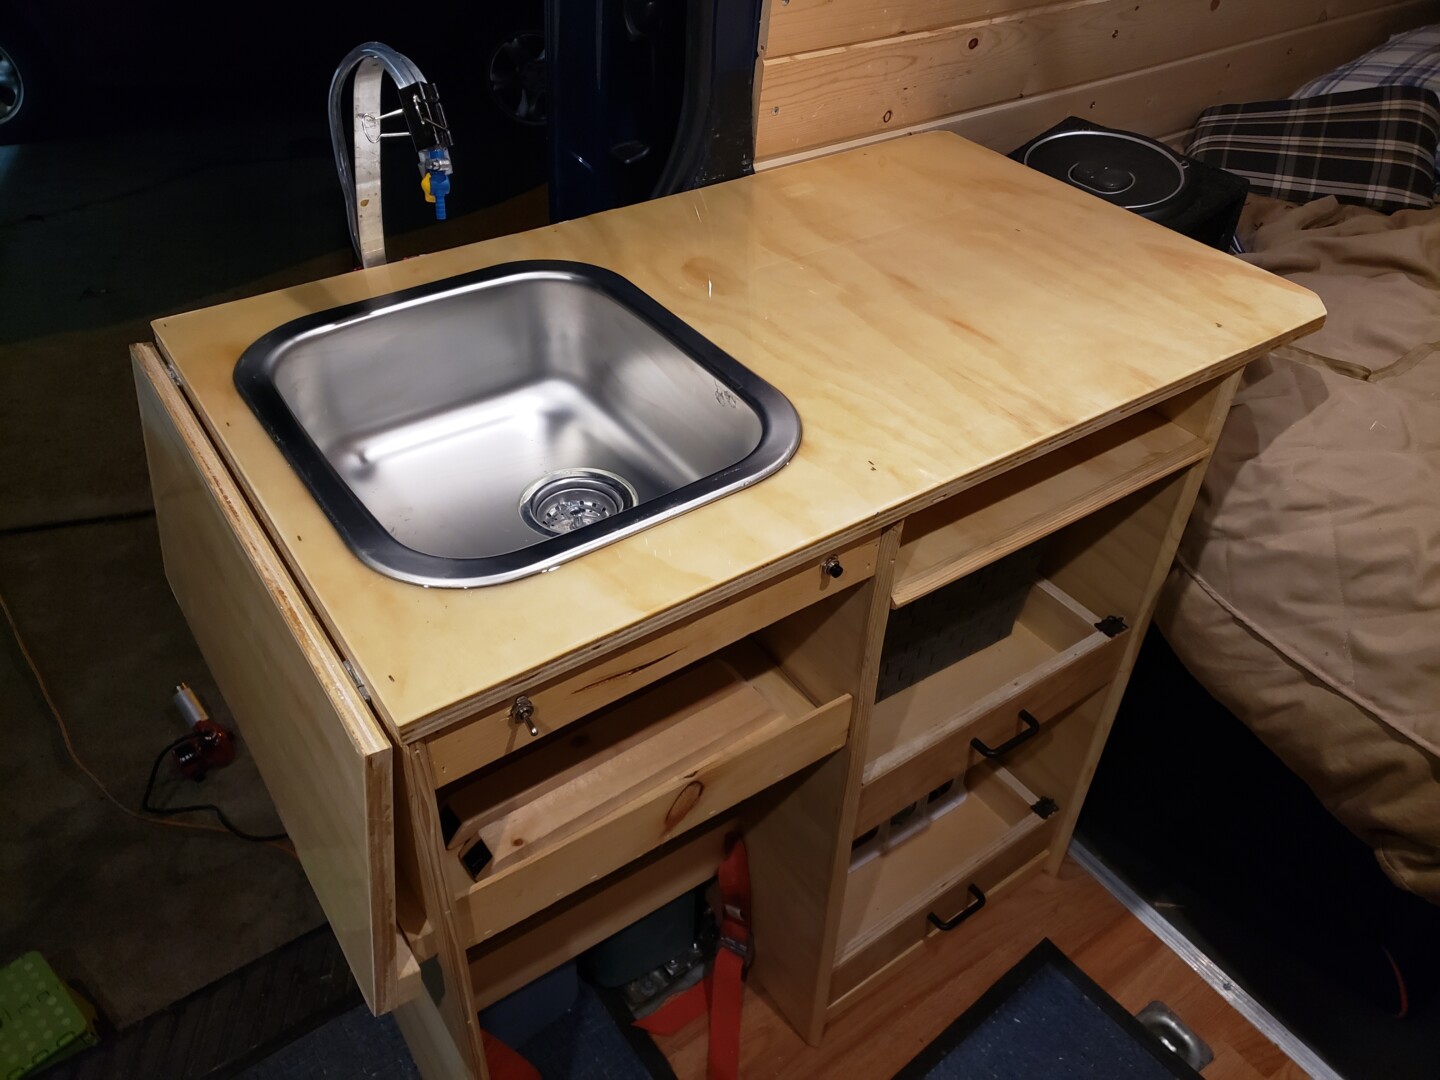
- An actual real sink (from Ikea). Previous van kitchens were done more cheaply using a stainless steel salad bowl. Yeah – this worked and was truly inexpensive, but was functionally not so great. The Ikea Fyndig sink is both cost effective and functional.
- Easy access to the fresh water and wastewater storage tanks from outside the van. This makes it very easy to load in fresh water and empty the wastewater tank, when needed.
- Drawers with real drawer sliders for easy access to storage bins. Latches on the drawers keep them from sliding open while we are driving.
- Dedicated storage space for our 2-burner Coleman camp stove. This gives the stove a secure place to ride while we are underway and frees up counter space when we aren’t cooking.
- A clear epoxy countertop. Shiny, stylish, waterproof/stainproof, and much cooler (my opinion) than the linoleum of previous iterations. Plus its not that expensive and much more lightweight, compared to butcher-block style countertops that are popular with other van builds.
- Wired and ready to go to accommodate a modified version of our ‘Hands Free Water Dispensing System‘, which still utilizes tubing instead of a sink, making it more amenable for detaching and filling larger water bottles and water bladders or hosing off other surfaces.
Kitchen Construction
Similar to modular kitchens past, this kitchen is generally constructed of 3/4″ plywood, 1″x2″ firring strips (for support and trim), and lots of staples. Our kitchen 3.0 construction made use of a lot of the core materials and concepts used in our original designs. So if you want/need more background information, be sure to check out our Sprinter Adventure Van Build – Kitchen. But I recommend this new layout to take advantage of the features and benefits listed above.

Construction is detailed on the design plans, available at this link. Of course dimensions can vary however you like to meet your specific needs. But hopefully this gives you an idea of where to start.
Materials
- 1/2″ to 3/4″ plywood
- 1″x2″ firring strips
- random other trim boards
- metal brackets – for attaching to the van floor
- drawer sliders
- 1″ and 1.5″ staples
- Hook and eye type latches
- Hinges (for the extension)
- Ikeay Fyndig stainless steel sink
- Sink drain assembly
- 2 x sink tail pieces (1.5″)
- Flexible drain coupler
- High gloss epoxy countertop finish
- Food Grade Vinyl Tubing – 10 feet 5/16 ID – 7/16 OD
- Self Priming Diaphragm Pump Spray Motor 12V for Water Dispenser
- 12V Car power (cigarette lighter) plug
- DC Toggle Switch
- Hydration Pack Shut-Off Valve
- Milk crates and storage bins
- 6 gallon water jugs x 2
- Plumbers putty
- probably other materials I am forgetting, but you get the idea
Tools
- Table saw
- Chop saw
- Pneumatic stapler
- Drill
- Jig saw
- Various other typical shop tools (screw drivers, pliers, etc)
- Heat gun (for getting bubbles out of the epoxy finish.

Construction
Constructing the kitchen module was easy, we just followed the plans. Everything can be screwed or stapled together. Here are a few highlights of construction:
Attachment to the Van

To attach the kitchen module to the van itself, we created custom steel brackets that work with the seat escutcheon for the back seat (the metal plates the seat attaches to, when its installed). These brackets clamp around the bars on the escutcheons using 1/4″ bolts and plusnuts. Because the escutcheons are shallow and the plusnuts are inherently deep we had to get a little creative. To make them fit, we actually ended up cutting the plusnut in half, once it was placed. This shortened the overall length of the plusnut and allows it, and the associated bracket, to sit inside, underneath the bars of the escutcheon. This is shown in the photos below and in a little more detail in our video “Adventure Van: Camper to Toy Hauler in 15 Minutes.”
Water for the Kitchen Sink

Another somewhat more complex part of our kitchen setup is the water system. Now, ours is a lot simpler than many other camper van setups, being that it is still modular, removable, and pretty straightforward – but we did put quite a bit of thought into it and a few iterations.
The key items to our water system are:
- Freshwater and wastewater containers (both 6 gallon water jugs, one blue and one that we painted green)
- Self Priming Diaphragm Pump that provides water to our sink via 5/16″ ID Food Grade Vinyl Tubing.
- A ~2′ long piece of 1″x1/8″ aluminum that is bent into the general faucet shape and allows us attach the tubing using 3D printed hose clips
- A means of wiring everything together to allow for latched switching or hands free operation.
One of the many things I like about our kitchen setup related to the water system is the access to the tanks from the outside of the van. This makes it very easy to remove fill and replace the freshwater tank and remove dump and replace the wastewater tank, without having to drag them through the van. Since they are right up against the door, we added the insulated flap (3M thinsulate encapsulated in water-resistant nylon) that has been proven effective down to some very cold temperatures.
There are, of course, many other details and considerations that went into the construction of our version 3 sprinter camper van kitchen module, but this covers the highlights. If you have specific questions, feel free to ask in the comments and we’ll respond straight away.

Drawer holding a basket, for easy removal of dishes 
Our modular kitchen setup 
A cover over the sink provides more counter space when the sink isn’t needed 
Kitchen counter extension is easily deployed 
access to the water tanks from the outisde of the van is a pretty nice feature 
An insulated cover over the water tanks protects them from freezing, even if the van door is open 
a stow spot for the stove underneath the sink 
3D model view from outside the van 
3D model view 
3D model view with stove deployed 
3D model view, with van bed


