Accessorizing the Honda Africa Twin

The Honda Africa Twin is really a great all around platform for motorcycle adventure touring right off the dealership floor. But in order to realize the full potential, it does need a few accessories. And then there are some ‘nice to haves’. Cause lets face it – half the fun is customizing the bike to fit individual wants / needs.
So, without further ado, here are some of my personal “key” accessories to make my 2017 Africa Twin adventure ready…
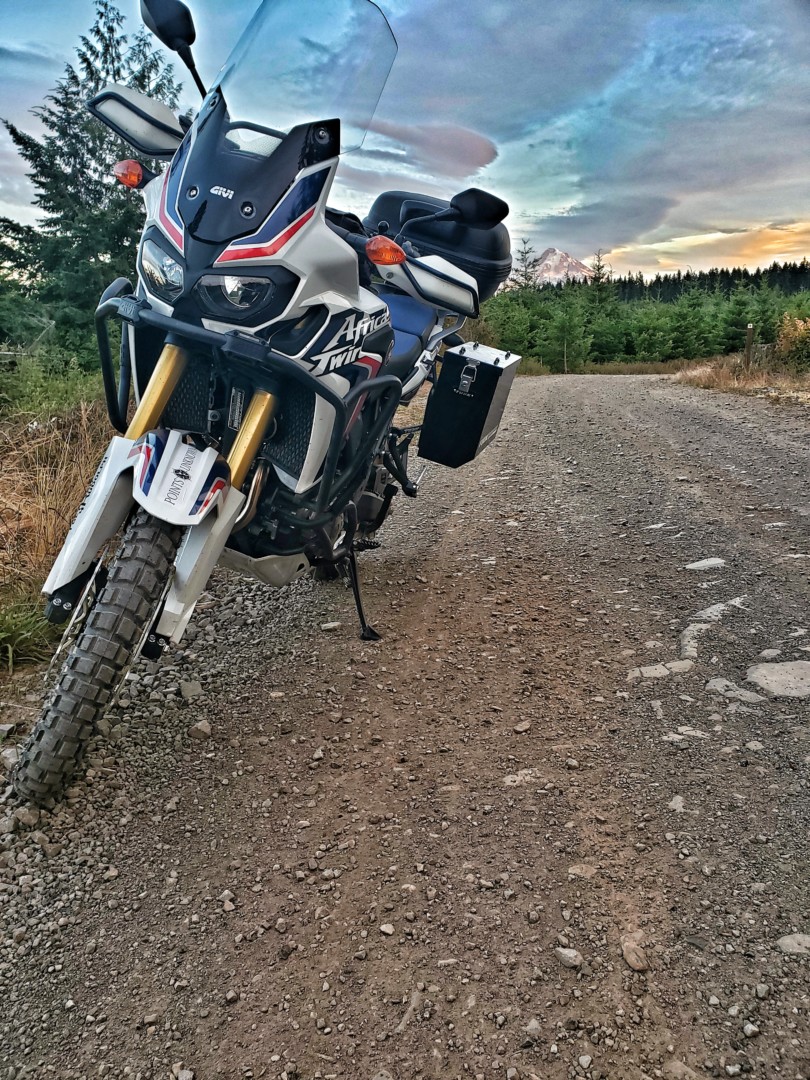
1. Side Racks and Cases / Panniers
There are several side racks and case / pannier systems available for the Africa Twin. High quality products can be had from Happy Trails, Touratech, Givi, and several others (and there are also soft side bags, which many arguments can be made for, but for various reasons I wanted lockable hard cases). I am sure these are all fantastic products (in fact, I had the Happy Trails Panniers on my 2005 Vstrom DL650 – and I loved them!!). Unfortunately, these great products also come with a great big price tag. And I really didn’t want to spend $800 – $1,500 on a rack and pannier system if I didn’t have to (this is Points Unknown after all!). So I did a bunch of research, and concluded (like many before me) that the Tusk Aluminum Panniers with Pannier Racks, from Rocky Mountain ATV was the way to go.

Here is why: #1) Value! At around $400 (at time of writing) for a complete kit there is a LOT of bang for the buck. #2) quality and robustness – I mean, check out this video review where they drag the panniers behind the bike and hit them with a hammer. The kit I received is a high quality product, with thick steel components for the rack, solid aluminum and good welding for the panniers, looks great and fits the Africa Twin well. #3) Great install video from Rocky Mountain ATV. These dudes really do a great job of explaining how to put everything together accurately and efficiently. I am also just generally really impressed with RM’s level of customer service.
The rack and panniers are everything I wanted them to be. Easy to install, look great, and are well built and robust. I got the medium sized boxes, and I am glad I did. I think the large size would have been too big. I feel that I can carry plenty of what I need in the medium size and appreciate that they aren’t as bulky. Also, bonus tip – I discovered that even though the top lids to the cases lock down on both sides, you only ever need to unlock one side to pop the lid. This makes it super easy to get in and out of the boxes when grabbing a snack or a warm layer from inside.
Note: As you can see, I am still using my same Bestem top case. It worked well on the vee and even though it’s a little funny looking works just fine on the Africa Twin.
2. Crash Bars / Engine Guard / Lower and Upper Protection Bars
Another accessory with several great options from the usual players. Touratech, SW-Motech, AltRider, Givi, etc. For engine AND fairing protection I wanted both upper and lower bars. And I am partial to the systems that cross over in the front of the bike, giving the bars additional strength and rigidity.
The Givi bars checked all the boxes for me and came at a price $100 lower than the competition. For my Africa Twin I got both the upper and lower crash bars (TN1144 and TNH144) for right around $400 shipped.


The Givi upper and lower crash bars work great and I can confirm they provide good protection when the bike decides to take a nap in the dirt. The install is definitely doable by an amateur, but it does take quite a bit of doing. I think install for me and my wife was about 3-hours. This does include taking off the exhaust. I was pretty stressed about doing this, but in the end it was actually really easy. Just remember to unplug the O2 sensor first! before unbolting and lowering the exhaust down (lessons learned).
The instructions provided with the Givi crash bars were usable, but not great. In that I mean that it took a little bit of thinking to understand what they were directing you to do. But it all worked out. I definitely recommend an extra set of hands for the install, just to provide some extra push-pull when putting all the pieces together.
Overall I am pleased with the purchase and am happy to recommend these bars to others. They look good, function well, and are budget friendly. As a bonus – they still allow you to take the fairings off without taking the bars off!
Another budget friendly crash bar system that gets pretty good reviews is the HEED Bunker Crash Bars. Folks that have them like them, but there have been some concerns with the quality of the mounting hardware. If I was doing this all over again I might consider them (didn’t know about them at the time of my purchase).
3. 50 / 50 Tires
So many options and opinions on tires. Just look at this thread! I agonized on this decision for quite some time, but in the end I went with the Shinko 804/805.
I wanted a tire around 50/50 (% road / % dirt). Contenders were the Mitas E-07/E-07+, Continental TKC-80, and the Heidenau K60- Scout. Like so many things it came down to perceived value (cost and performance).
The Shinko 804/805 have a good track record of being great in the dirt and gravel, effective on wet dirt and pavement, and tolerable on paved road and freeway. Based on my experience, all these things are true. The improvement over the stock tires in gravel and dirt is nothing short of amazing. Grip on wet dirt and pavement have been great with no unexpected slippage. I notice only a small difference in cornering at speed (though I am not and never have been a super crazy lean angle type of rider). I suspect I get a little more road noise than stock, but nothing particularly significant.


I’ll also put a plug in here for the baja no pinch tool. Its not perfect, but I am pretty sure I wouldn’t have been able to get these tires on by myself without it. 


Cost wise, the Shinko tires were about half the cost of the TKC-80’s and E-07’s (Plus the E-07’s were out of stock, but I might try them next). Reports on the K60’s were that they did not do that great on cold wet pavement conditions, so that’s a red flag in the sunny pacific northwet (I mean northwest).
Although they are rumored to not last more than 5,000 miles or so I don’t mind a few trade offs for better grip. You can’t have good wet pavement performance without some soft compound – I’m told it’s physics – and that’s okay.
4. Tall Windscreen

Holy crap there are a lot of complaints on the internet about the wind buffeting issue for the Africa Twin. Just look at this thread! or this thread!! And though I don’t think it’s a major deal, the buffeting issue was something that I experienced at speeds above 50 MPH or so and didn’t particularly enjoy. So a taller windscreen was desirable. Again I did a ton of research and read reviews on a number of different options. In the end, I selected the Givi Touring Windscreen, specifically for the Africa Twin. Its nearly 6″ taller than the stock windscreen and completely eliminated the buffeting for me.

The Givi Touring Windscreen is perfect for long trips on the highway and provides a good bubble of calm air as well as weather protection. Off the highway, it is a little bit annoying – as its definitely within my field of view when doing more technical terrain. However, I find it’s a good reminder for me to stand up in that situation, so I don’t have to “look through” the windscreen.
My only regret is I wish it was easier to switch windscreens. Maybe someday I’ll look into hardware with knobs that allows me to trade the tall touring windscreen for the short stock screen when I know I am going to be mostly doing lower speed back roads and technical terrain. Something to think about for the future.
5. More and more and more
Yes, there’s even more. But a lot of these items are pretty straightforward and thus didn’t include a lot of research or deliberation:

- Auxiliary Lights and Mounting Hardware. This might be another blog post in itself. But the Auxbeam 4″ LED pod lights are fairly reliable (based on amazon reviews) and you can’t beat the cost. I’ll be writing up a complete blog for these lights soon. But as an aside, I’ve found these switches on amazon, which work perfectly in the stock cut out / space for the Honda square fog light switches and a fraction of the cost (for 5 of them!)


- Throttle Lock – some options here, but I went with the Atlas Throttle Lock (top mount). Yes, its more expensive, but I splurged because I wanted something that was a little more ‘polished’ then just a C-clamp on the handlebar that rests against the break lever. The Atlas is well built, easy to install, and very effective. I used the small friction pad and it works perfectly.
Overall, I am happy with the Atlas Throttle Lock but not super stoked on it. It definitely works, but it rattles at around 3500 RPM, making this annoying noise that I can here when I am not wearing earplugs. And the top mount isn’t very good looking. Sure it is out of the way for my heated grips, but it looks awkward on the handle bars sticking up pretty high next to the control cluster.
- Center stand – I went with Honda’s OEM center stand. Its more cost effective than others and works just fine. Though it is quite a task to get the bike up on the stand.
Battery relay / fuse box – Eastern beaver makes a kit specifically for the Africa Twin. Makes it a no-brainer. I had an Eastern Beaver kit for my BMW 650 back in the day and it was fantastic. Eastern Beaver’s quality electronics are legendary and this kit appears to be no exception. And its nice to know that my auxiliary lights or hand warmers wont inadvertently be left. on. I went with the 3CS kit, since I don’t really need that many electrified accessories.

- Heated Grips – I went with the R&G Racing heated grips based on cost and positive reviews. They are effective. Since I had the eastern beaver relay kit, I didn’t need the fancy battery monitoring / auto turn-off of the more expensive Oxford Grips (though I did have the Oxford’s on the Vee and they were great too).

- Handlebar Handguards – The plastic hand guards on the stock Africa Twin weren’t going to provide much protection. But I did like the look of them and so wasn’t super excited to change them out to something else. Fortunately, several companies make steel reinforcement for the stock handguards that attach at the bar ends and at the handlebar clamps. Some of these can be quite expensive – but for this simple piece of kit I went with knock-offs on ebay. At the time of writing these cost around $40 with shipping, which was too good not to try out. These handguards are well made, heavy duty, and fit great. Looks really good on the bike too. However, the hardware / fasteners for handlebar ends area bit strange as they need a 12mm Allen key – not something most people have in their shop (OEM is 8mm? I had to purchase a 12mm). And I came close to stripping the central clamp bolts when trying to torque to spec. Better hardware would make the product better.


And that covers it. Sure there are always more accessories needs and wants. But that gets you through the basics. Note that all of these items are for the 2017 Honda Africa Twin manual (non-DCT). But for most of these they are compatible with all current Africa Twin models or similar products that fit other models are available within the same product lines. With all these pieces in place, the Honda Africa Twin becomes a very comfortable, very capable adventure touring machine.
Let me know in the comments what your favorite dual sport / adventure motorcycle accessories are!
As an aside, you’ll note that this post is not about a Vstrom. Although I enjoyed riding the 2016 Suzuki Vstrom DL1000, it didn’t feel like the perfect bike for me. So when prices started to drop on old inventory for Honda’s 2017 Africa Twin (CRF1000L), I just couldn’t resist. The Africa Twin just fit my vision of what a big adventure bike should be, large enough to be comfortable for occasional work trips or commuting (long stretches of freeway riding), light and rugged enough to be capable on rough dirt roads (for fun!), and priced not to break the bank (for practicality). And so I bid farewell to the Vee and embraced the Africa Twin. More adventures and write-ups on the “AT” to come!
Disclosure: I was not paid, commissioned, or asked to choose or review any of these products. I selected and purchased these based on my own research and experience.


Very interesting article, must have on motorcycle adventures but very helpful can be a touring motorcycle windscreen as well. Motorcycle windscreen will have a massive influance for comfort, pleasure and what most important for safety of rider. It protect you from strong gust of winds on open fields or from trucks. Especially when you do a long trips it can have a major influance for your comfort and fatigue. Motorcycle windscreens – simple, not expensive but very helpful
https://www.motorcyclescreens.eu/