Sprinter Adventure Van Build – Kitchen
Our adventure van kitchen setup is ever evolving. But, while it is still far from complete, I thought I might as well give it a write-up to at least share what has worked well (and hasn’t) so far. Of course, the van kitchen layout (like most things in the van) is highly dependent on personal preferences and needs. As with most things in our van, we focused on function over form and have so far been very happy with the outcome. Though its likely to continue to undergo changes (hopefully improvements) over the next few years, below is a description of our current kitchen build.
Summary (TL:DR)
Built from a couple sheets of 1/2″ plywood, with some 1″x2″ firring strips as trim, our adventure van kitchen is highly functional if not the most pretty piece of furniture ever created. It features three main storage bays and counter top with sink extension. The large bay holds the dometic cooler fridge on a roller cart for easy access. The two smaller bays hold baskets for dry goods and cleaning supplies – held in place by small bungee cords (we love bungee cords). This sink is constructed from a stainless steel cooking bowl, with a hole cut in the bottom and a standard sink drain installed. We pump (using a small 12V diaphragm pump) out of a blue 6 gallon water tank and store wastewater (gray water) in a green tank. Everything is plumbed together with surgical tubing (clean water side) and standard drain plumbing fittings (gray water side). Like all things in our van it is designed to be easily installed and removed and is held in place with large hook & eye hardware.

Tools
- Table saw
- Chop saw
- Pneumatic stapler
- Drill
- Jig saw
- Various other typical shop tools (screw drivers, pliers, etc)
Materials
- 1/2″ plywood
- 1″x2″ fir strips
- random other trim boards
- metal brackets
- 1″ and 1.5″ staples
- Hook and eye type latches
- Stainless steel mixing bowl
- Sink drain assembly
- 2 x sink tail pieces (1.5″)
- Flexible drain coupler
- Bungee Cords
- Rigid caster wheels
- Food Grade Vinyl Tubing – 10 feet 5/16 ID – 7/16 OD
- Priming Diaphragm Pump Spray Motor 12V for Water Dispenser
- 12V Car power (cigarette lighter) plug
- DC Toggle Switch
- Hydration Pack Shut-Off Valve
- Dometic Portable Electrical Cooler Refrigerator/Freezer – 61 liter
- Milk crates and storage bins
- 6 gallon water jugs x 2
- Plumbers putty
- probably other materials I am forgetting, but you get the idea
I know a lot of the above items seem random. I assure you they all have a useful spot in our kitchen setup. Also, please note, a lot of the items were purchased from a standard hardware store (ACE, actually). Links above provided just for reference to what the item is.
Procedure
The pictures are worth thousands of words, so I’ll let them do most of the talking and try to stick to just a few key explanatory points about the whole assembly and some of the more interesting pieces.
 K
K itchen Module


- The design is pretty simple, just a bunch of plywood panels stapled together. I originally envisioned the layout in SketchUp and so here is a PDF of the original plans: Van Kitchen Layout. As you’ll see this doesn’t include the sink extension, as this came later, but does give you the general idea of the dimensions of things.
- The dimensions for the left, large opening are specific for our cooler/refrigerator. So depending on which one you have, the size of this opening could vary. The goal was to make an area that would envelope the cooler fairly closely (but not too closely to cut off circulation to the compressor vents).

 The cooler sits on a piece of plywood that has the four casters mounted underneath. In this way it can roll in and out of its compartment for easy access to the top opening when getting things out and out of the way storage when not needed. To keep it from rolling around while we are underway, there is a bungee attached to the van wall that we clip around the rolling cart (if you zoom in on the photo, you can see the edge of the bungee clip and a string we use to position it quickly). So far this method has been really effective (as long as we don’t forget to use it – which, of course, has happened).
- The cooler is powered by a 12V/cigarette lighter type plug that we installed way back when we did the electrical. It was handy to have it already be there and ready to power the cooler.
- The other two openings were sized to fit milk crates. Using two little eye hooks, placed a few inches from the top of each of these openings, we stretch a small bungee chord to hold the crates in place while underway. Sure sliding drawers might be cooler, or cabinet doors – but honestly, I am pretty happy with the functionality and simplicity of this system. Plus it keeps the whole assembly nice and light, which is nice for moving it in and out.
 Speaking of moving it, the whole assembly can be removed very easily. While underway it is clipped into the wall in two places. To do this, we replaced two of the 1/4″ bolts, that were fastened into 1/4″ rivnuts to hold the wall up, with large eyelets and attached two hooks/latches to the kitchen unit. It takes a little bit of fussing to get it into place, but once its there its nice and solid. You can see one of the hooks in the photo at right, just beyond the paper towels. The other hook is basically opposite this location and a little lower on the kitchen assembly.
- We put felt padding on the bottom of the kitchen unit and along the back so that it would have a non-scarring surface to slide around on. This works pretty well, but there is still a little bit of rubbing showing on the paint on the wall behind the kitchen. This isn’t a big deal for us really, as someday I would like to completely frame the window in wood, but something to note.
- Originally we just stained and sealed the countertop surface, but I hope to grab a remnant piece of vinyl/laminate countertop (like Formica) to place on the top for a more functional, easy to clean surface in the near future.
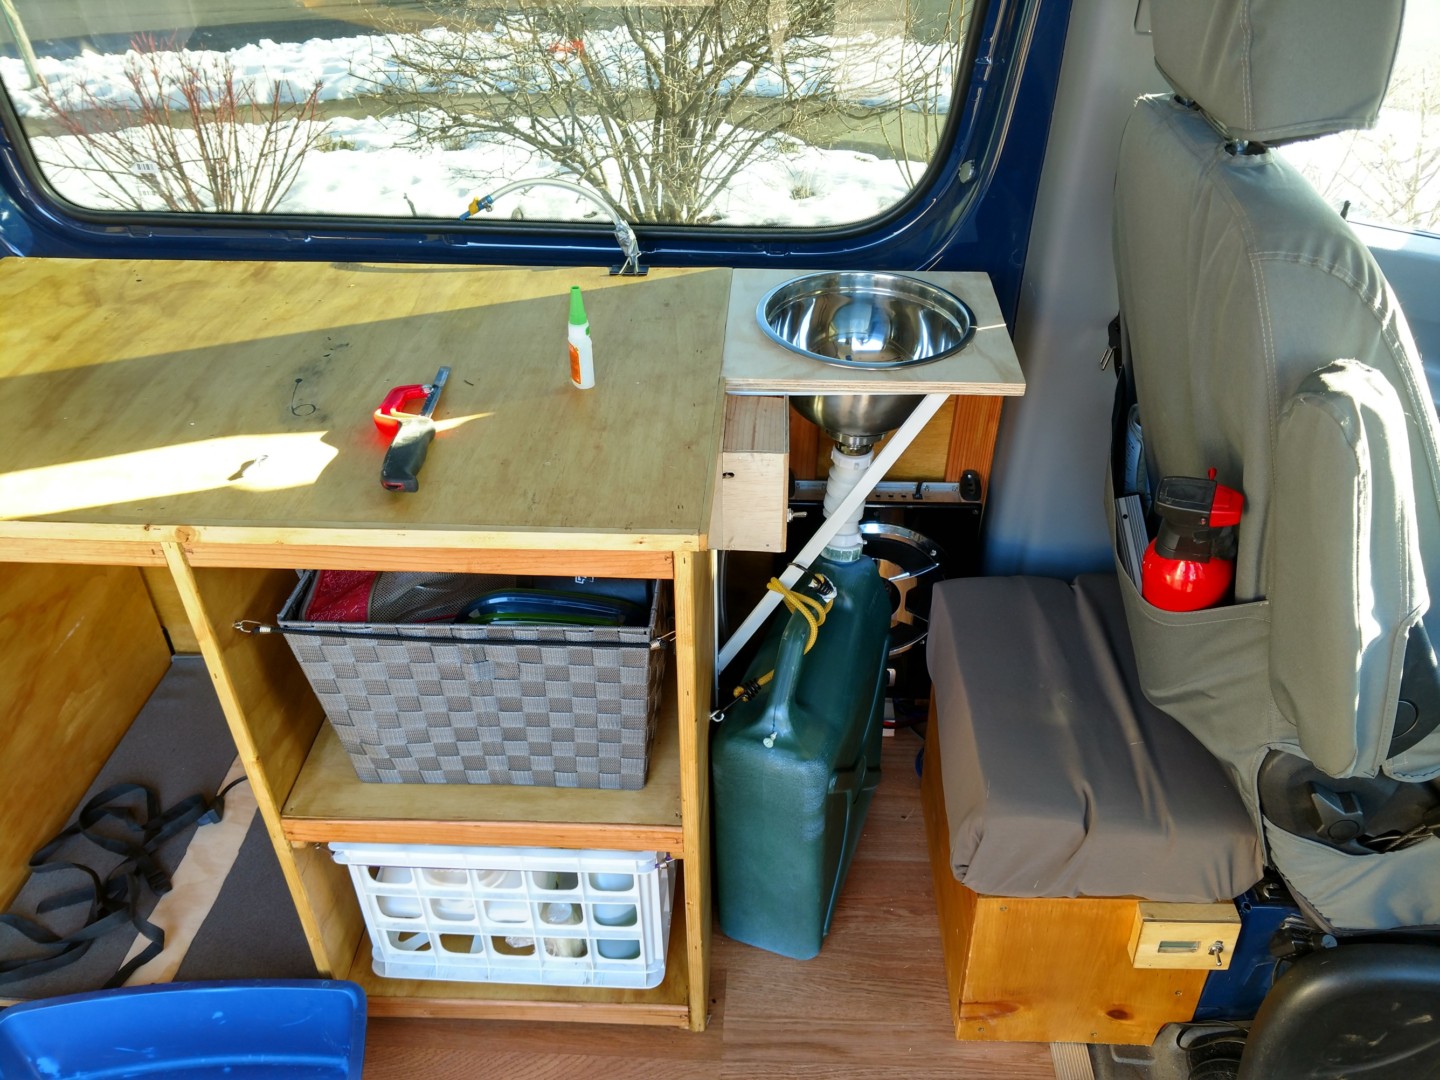
- The extension for the sink was added later (as is obvious from the photos). The countertop space that we had originally, really felt like the minimum viable space, especially when our big green coleman stove is sitting on top of it. So creating some unusable, or at least more complicated, space in the existing countertop didn’t seem like a good idea. Plus the sink piping would have invaded the space below as well – so an extension was needed.
- The extension is cantilevered of the edge of the main kitchen module. A very stout metal bracket keeps it secure and upright.


Water System


The water system is fairly involved, so I figured that should get its own section. Plumbing really is a pretty simple concept, but the implementation of the concepts took a bit of time for us to figure out, so I figured I would document what we did.
First of all – please forgive the messy sink shown in the photos. No we are not slobs, the kitchen has been out of the van for a few weeks (van has been in multi-passenger ski mode with the back seat in) and a few projects have been undertaken in the garage adjacent to the kitchen setup. Yes, we will clean everything before it goes back into use.
Second – on the potable water side keep in mind that this is stuff that is going into your body and use appropriate materials! You should use storage containers, tubing and fittings that are approved for drinking water use.
- We purchased two 6 gallon water jugs. Unfortunately, they were both blue (walmart only carried the blue ones) so we spray painted one green so as to clearly be able to tell the difference between the freshwater and gray water tanks.

Freshwater Pump
- For the freshwater, using the little diaphragm pump, the 12V/cigarette plug and a toggle switch, I built a little pump box to house the pump and mount the switch. The pump box itself was then mounted to the site of the kitchen module.
- Wiring of the pump is really straightforward. There are really just two contacts to wire. You can interrupt either the positive or negative sides with the switch to get it to properly turn on or off (isn’t DC so easy!). You can see the switch in a few of the other photos, below.
- As usual with any electronics, but especially where water is involved, I highly recommend using a fused 12V plug. Just in case anything gets out of hand.
- In order to keep the tubing from falling off the inlet and outlet ports on the pump I used some small hose clamps from the hardware store. They work great.


Freshwater Tank and Tubing
- The freshwater tank is a simple 6 gallon water c ontainer that we picked up in the sporting goods section. 6 gallons seems to be a good size for a few days of camping and exercising, but not so large that it is hard to handle. Much smaller and it wouldn’t be very valuable as an installed solution. Much larger and it would be unwieldy to carry and would need to be a permanently installed item (which is contrary to DAPHNE’s mission). The tank itself sits behind the milk crate compartment (between the van wall and the kitchen module wall) to keep it from sliding around (we also bungee it in, because we love bungees).
- We wanted to be able to have the tank be more or less sealed while underway so as to avoid spills and also to keep dust and other crap from getting into the tank that might contaminate it. To do this, we used a fairly complicated combination of fittings, threaded connections, and a hole drilled through a piece of black plastic. Yeah it works, but I am sure there is a more creative and more sophisticated way to do this.
- The tubing runs from the bottom of the tank (note: still need to figure out a way to ‘weight’ the end of the tubing so it always sinks to the very bottom, instead of twisting around) to the inlet of the pump.
- One thing to note is that our tanks do have little air vent stoppers, opposite the main outlet (not shown in photos). This vent needs to be opened when pumping out of the tank, otherwise it creates a vacuum and water doesn’t come out (and your pump could burn up).
- From the outlet of the pump we have a longer section of tubing that runs up to the sink. We used a binder clip, clipped to the side of the sink extension, and run the tubing through that to hold it in place (see other photos further down). This is handy if you want to fill a water bladder or other item that you don’t want to have sitting on the counter or in the sink. The tubing can be detached from the sink assembly and extended (a few feet) to the item you want to fill.
 Because of the small diameter of the tubing and other physical properties of water we found that the tubing would continue to drip and/or discharge water for quite some time after we shut off the pump. This was annoying leaving wet spots where we didn’t want them (awkward!). To fix this issue we installed a little valve, typically used on hydration packs, on the end of our freshwater tubing. That way, when we are done dispensing water we can close the valve and not have to worry about any errant drippage. Of course, you have to remember to open it each time you want to use it – but this hasn’t really been a problem so far.


Sink and Gray Water Tank
We searched around a long time for a small sink that would work for our van. A big sing would take up way too much space and we figured we could just wash dishes in a wash-tub, for extra space. The key is having a place to dump the water after washing is complete. We didn’t like being the kind of campers that dumped dirty water on the ground next to our van. We found a few suitable sinks, but most of the little bar sinks we found were ridiculously expensive. We had no desire to spend a hundred dollars on a sink for our van (yes, we are cheap like that). So we did what any self-respecting DIY van builder would do: we built our own sink out of a standard stainless steel kitchen bowl (total cost: about $15).
 Using a jigsaw we cut an appropriate sized hole in the bottom of our fancy stainless steel kitchen bowl. Then, using plumbers putty, we seated and sealed our standard sink drain into the bottom of the bowl. Yes there is a little lip around the edge of the sink drain which holds a few ounces of water. This really isn’t a big deal and is easy to mop up with a sponge.
- We then mounted the bowl/sink in an appropriately sized cutout on our sink extension. Ultimately I think I will screw the bowl/sink down into the plywood extension, but I am waiting to do that until we finalize the counter top (as mentioned previously).
 Out of the bottom of the sink I attached a common drain tailpiece. To make the connection to the gray water tank it goes like this drain >> tailpiece >> flexible drain coupler >> tailpiece >> tank lid screw flange. Yes, two tailpieces, one on each side of the flexible drain coupler. We got lucky with our water tanks in that the screw flange for the tank lid was the perfect size to fasten the flange of the standard plumbing tailpiece. (hard to explain, hope this makes sense)
- To keep it from sliding around we have been just bungeeing it to the kitchen module. This hasn’t caused any problems yet, but then we haven’t filled it up very much. Given that most of the water we use we drink, we tend not to produce too much gray water over the course of washing hands and doing dishes, etc.
- Like the freshwater side, it is again important to note that the little vent plug must be open for the sink to drain properly. Also interesting to note is that this system doesn’t have any kind of vapor trap / p-trap like you would see on a typical plumbing system. We figured this was okay, since its just gray water. But keep in mind if you wash some nasty stuff down the drain and leave it for a while, you could get some pretty nasty odors coming back up through the sink : fair warning.


As I am sure you can see, both the freshwater and gray water side are designed to easily be detached and refilled / dumped when needed. Rather than being permanently installed water systems, we can fill up our freshwater from a faucet or yard hydrant and dump our gray water down a domestic sink or toilet. Easy as that.
And that pretty much covers everything we have done to date relating to the kitchen. I’ll update this page if we realize any big mistakes or make any upgrades.


