Sprinter Adventure Van Build – Alarm System
Summary (TL:DR): We installed the Directed 3901T CANBUS OEM Upgrade Automotive Security System. Overall installation was fairly straightforward in the van. Finding the right connectors for the CAN bus connection was difficult (read: never found ’em – created a ‘custom’ solution instead) and doing the initial programming of the 3901T unit was also a little more trouble than I expected (missing a cable) using the xkloader. But overall things came together nicely.
With all the fun toys installed in the van, having an alarm system seemed like a good idea. But we wanted something that would be fairly unobtrusive while camping in the van (ie – didn’t want it to go off when one of the dogs jumped off the bed or wind a big gust of wind came up). As usual, we did a bunch of internet research, made a bunch of purchases, and put everything together over the course of a few hours one weekend. Usual disclaimer: I am not a professional alarm system installer or van upfitter and make no claim to the correctness or accuracy of the information herein or the security this system actually provides. This is just a DIY report of what has worked for me.
Furthermore, the instructions from Directed say the following: This product is intended for installation by a professional installer only! Any attempt to install this product by any person other than a trained professional may result in severe damage to a vehicle’s electrical system and components.

That being said, installation was fairly straightforward for me – so…
Resources:
Tools:
- Typical construction tools: drill, screw drivers, pliers, etc.
- Typical electrical tools: wire strippers, crimpers
- Computer for programming (You need a windows computer running internet explorer to run xpressVIP)
Equipment:
- Directed 3901T CANBUS OEM Upgrade Automotive Security System.
- Programming tool
- zip ties
- electrical tape
- random electrical connectors and wires
The Procedure:
The 3901T is a great little unit, in that it plugs directly into the CANBUS of the Sprinter, so you don’t need to mess around with door sensors, an extra keyfob on your keychain or that kind of thing. You just wire it directly into the Sprinter CANBUS system and away you go. It integrates with the existing Sprinter keyfob, so you don’t really have to change anything about your usual practice of locking the van. Press the lock button on the fob and the alarm arms itself. Press the unlock button and the alarm disarms. That’s nice. It is made by Directed, which my research indicates is the ‘king’ of auto security. All the brands I had ever heard of are all just subsidiaries of Directed. So I guess they know what they are doing.
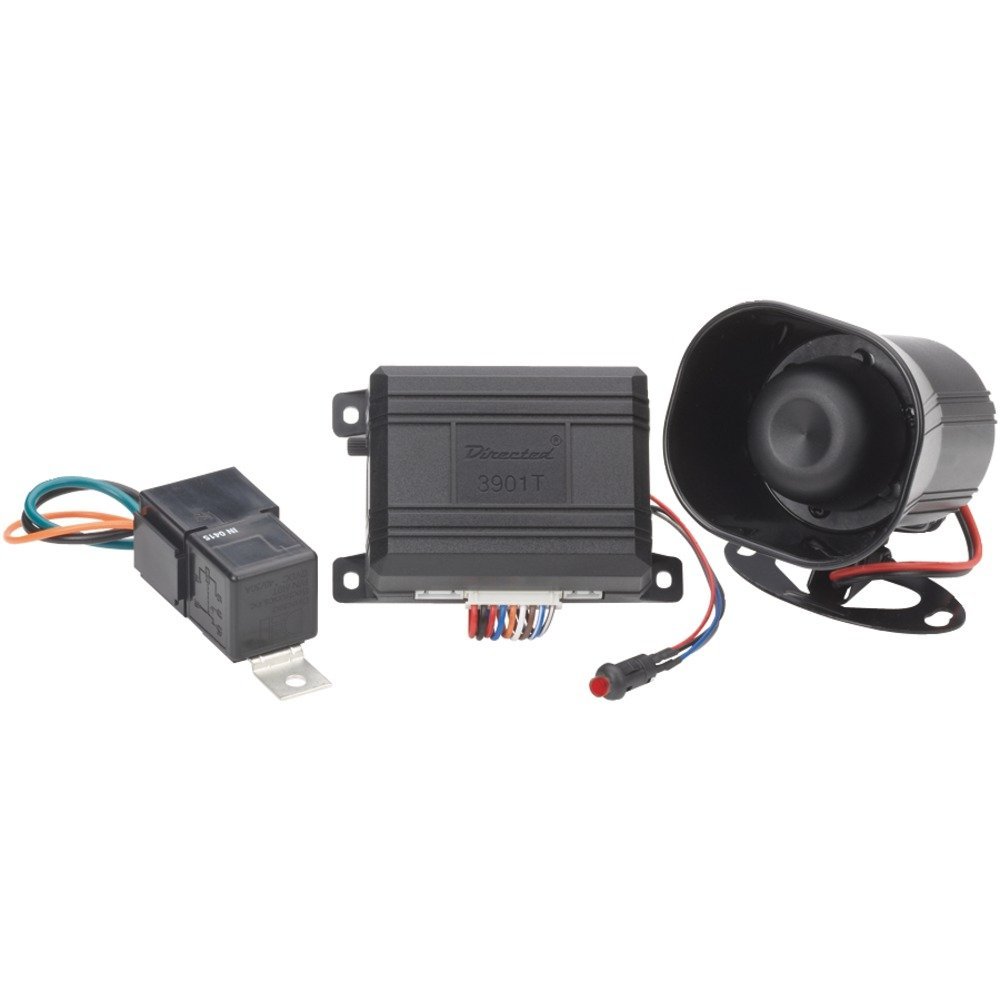
The 3901T comes with the following items:
- Alarm system unit
- Alarm speaker
- starter kill switch relay (not used in our installation)
As far as I know, the Sprinter already has a starter kill switch of sorts, what with the electronic key system and everything, so we decided not to mess with this part. A friend of mine with an older sprinter had the kill switch fail, which in turn kept his van from starting – even with the alarm disabled and everything. So we didn’t want to risk that.
Programming

First we had to program it to communicate with the CANBUS correctly. Despite varying reports of the availability of the firmware, I can confirm that the firmware for this unit for a 2016 Sprinter is available on directed. com via their xpressVIP software. You have to register to gain access to the firmware files. At first it looked like I had to become a dealer and spend a bunch of money to get registered – but that is apparently not the case. There is a link towards the bottom that allows you to register for free. From there I located and downloaded the firmware, installed the internet explorer browser plugin for xpressVIP and was good to go on the software side.
However, there were issues on the hardware side. The XpressKit XKLOADER2 2nd Gen Computer Programming tool that I ordered did not come with any cables. All it came with was the little black box. This is fine for the USB type A to type B cable, as I have tons of those – but what about the special 4-pin connector??? Yeah – I didn’t have one of those laying around (though I did look). What would have been better was to order the kit that included the cables. In case these links to last, at right is a product image showing the ‘complete kit’ I recommend.
See that 4-pin cable with a red plug and a white plug? That’s the cable I needed that my purchase didn’t come with… Guess what, its impossible to program the 3901T without that cable. If you don’t have one of those cables laying around or have the ability to make one – I suggest making sure you get the complete kit.
Because I did not know this going into it, I went with the cheapest option – it did not include the cable and so I had to make one myself out of random computer ribbon cables I had laying around. This was sketchy at best (I had to jiggle the cable around just right to get it to be recognized by the computer and successfully program). But it did work, so I guess I can’t complain too much.
As a side note – I have heard that there are internet companies that will pre-program the 3901T unit for you, upon ordering, before they ship it. That would also be good solution. If you did this and it works, feel free to let everyone else know in the comments.
Ok. So. Get the software, get the hardware, get everything married up with the correct (or improvised cables) and program the 3901T with the correct firmware for your Sprinter using the online xpressVIP software. Great. That’s done.
Speaker
We installed the alarm speaker outside the van in a fairly secure spot where it can’t be reached from the outside. Just bolted it on the metal framing. Easy. Not a problem at all with this part.
Installing the Alarm Unit
The alarm just needs power, ground, CANBUS input (high and low), and connection to the alarm speaker to function. Thats it. There are a whole bunch of wires on the 3901T – I only used those 6 and everything works just fine. I wont go into taking apart the vehicle dash – thats a another post in and of itself (and there are lots of resources on the net for that) – but depending on where you place the control unit, dash deconstruction, at least in part, might be required. You’ll also need an always on power source. There are several available in the van in the dash area – so I’ll leave that to you. Cigarette lighters, the starter battery in the driver feet area, etc. All could be good choices. Just remember to fuse your connections to protect your wiring and electronics. The 12V+ power source and ground go to the RED and BLACK wires (respectively) in the main wiring harness of the 3901T.
Wiring the speaker is pretty straightforward, depending on where that speaker is located. The speaker’s RED wire is connected to the main wiring harnesses BROWN wire. And the speaker’s black wire is connected to vehicle ground (chassis connection or otherwise).

Alright, so with power/ground and speaker +/- out of the way next is the connection to the CANBUS. This is the tricky part. There are CANBUS connections you can tap into at several locations in the van. I would not recommend tapping into any of these. The most straightforward place to get CANBUS connection is to use the CANBUS distribution header located just to the left and down from the steering wheel, below the headlight switch. There is one screw to remove at the bottom of the gray plastic panel and then the rest of the panel just kinda wiggles out.
I think Avanti’s description in his post on sprinter-source describes it the best:
Behind this panel, on the right, you will find a vertically-mounted connector with half a dozen little plugs in it, and space for more. It is hard to see because the connectors are facing away from you. In the center of the strip, you will see a little slot with a plastic tab that holds the connector to its bracket. Press the tab with a small screwdriver and slide the connector upward, and it will pop out so you can see and access the plugs and sockets.

Sorry I don’t have the greatest picture of the CANBUS hub. But once you see it back there (it is kinda hidden behind the corner) you’ll know exactly what it is. Sprinter CANBUS high is brown/red and Sprinter CANBUS low is just brown – so you can see from the factory wires coming into the header/hub which pin is which. Depending on how you are holding it, the orientation might be different.
Finding the right plug to fit into the header was not easy. In fact, I couldn’t find one – and I have a pretty big box of random computer parts. So instead I “made” one (similar to how I wired the programming unit) from a 4-pin plug of similar size, but cutting off the extra two pin slots. This works and is pretty secure, but honestly – it is not my favorite. And I would love to help folks out with an actual part number on what this plug type is.
So. That said – if someone can tell me the correct part number (from digi-key, amazon, wherever) I will send you a $25 Amazon Gift Certificate as a finders fee. Sound good?
Anyway, hack together a plug that will fit into the CANBUS hub. Be careful, I hear you can really mess up your vehicle if you mess up the CANBUS – you’ve been warned. But I succeeded so I imagine others can too, without too much trouble. Determine the high/low orientation of your plug and wire appropriately to the high and low CANBUS input wires on the alarm system. The CAN wiring is a separate harness from the main 3901T wiring harness. On the 3901T’s CAN wiring harness the CAN High wire is either orange/green or brown/red (mine was orange/green, but I am told they can vary). The CAN Low on the 3901T is either orange/brown or brown black (mine was orange brown). From my ‘custom’ connector’s wires (matching the orientation of the other wires in the hub) I connected the CAN High and CAN low outputs to the alarm system’s wiring harness. As you can barely see in my picture, black corresponded to CAN low and yellow corresponded to CAN high – that’s just how my wiring worked out.
Lastly, the valet switch is needed to control some functions of the 3901T alarm. It is both an LED light, indicated the alarm is armed as well as a pushbutton to enable ‘valet mode’ and various other functions of the alarm system. We picked a nice spot on the dash for the button and brought the wires back to the main control unit. The button had its own wiring harness with plenty of cable to run it appropriately. Nothing much else to say about this piece.
Conclusions
And after getting everything wired up and tested we just buttoned everything up and called it good. It’s pretty easy to test the alarm: Just arm the alarm with your usual keyfob (with a correct CANBUS connection the lights on the van will flash and depending on how you have it set the horn my chirp [we turned this chirping off right away – so annoying!].) – then have someone inside the van unlock and open the door from the inside. That will trigger the alarm. To disarm, unlock the van with the keyfob.
There are a bunch of settings and things you can change by using a combination of putting the keys in the ignition and pressing the valet button a certain number of times. Its all spelled out pretty well in the 3901T alarm’s manual.
For us, this installation was pretty straightforward and the project went fairly smoothly (with the exception of finding the right connectors). The connection to the vehicle CANBUS apparently has risks, but we did not encounter any issues in our install.


