Suzuki V-Strom DL650 Oil Change Guide (2004 – 2011)
Below is a brief guide with pictures and instructions on changing the oil for a Suzuki V-Strom DL650. My Wee-strom is a 2005 so thats what the pictures are from, but I dont think it has changed much over the years between 2004 and 2011 (though I think it did change in 2012) so this should be fairly applicable across the board.
Similar to the BMW F650GS Oil change guide, I decided not to reinvent the wheel when it came to the text. I found some good instructions (which I followed the first time I changed the oil on my Wee) on Jenner’s “Deus Ex Machina” site and have essentially just spruced those up and added pictures to help clarify everything. You can see his instructions here: http://jennersplace.blogspot.com/2009/06/suzuki-v-strom-dl650-oil-change.html
Now – let the oil changing begin!

Oil Change – First Disclaimer:
The cardinal rule is: safety first. It’s important to NOT do this job on the side-stand as if the bike fell on you it would make for a very, very bad day. But rather a center-stand or bike lift that stabilizes the bike completely.
Oil Change -Secondary Disclaimer:
I am not a motorcycle mechanic by trade. I dont pretend to be one. I found info on the internet about this stuff and followed instructions, just like you. And now that it has been working for me for the a long time I am passing on the info. If it helps, great! If it screws up your bike, i am sorry – but it’s your own fault.
1. Use reasonably priced good oil and good oil filters.
Jenner Recommends the following
- Shell Rohtella T Syntheic 10w-40w (Blue container)
- Mobil 1 5w – 40w Synthetic
- Puralator Filters or Suzuki stock filters

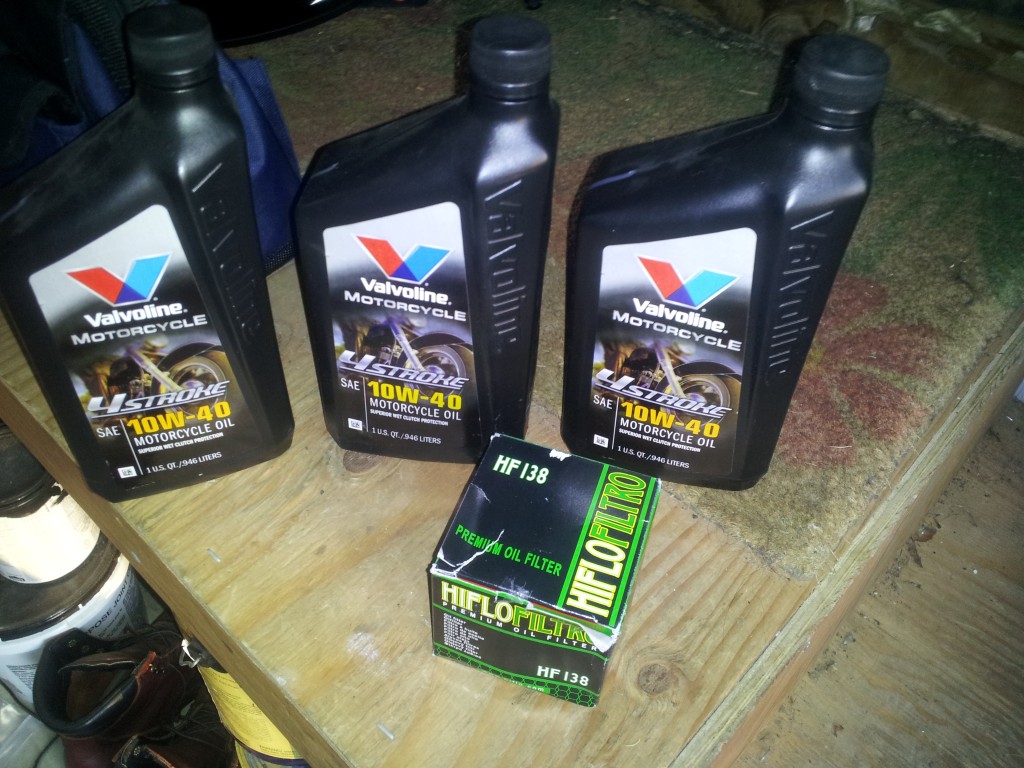
I did quite a bit of research on the synthetic vs. regular oil. What I got out of my research was that you either get a motorcycle specific synthetic oil – which is made for the wet clutch – or you get a motorcycle specific regular oil. Since my bike had lower mileage (around 12,000 miles) for this oil change I went with Valvoline 10W-40 motorcycle oil. Looked good to me, and the price was right. I also went with the HiFlo Oil Filter HF138 which got good reviews on some other sites and fit perfect.
2. Tools You Will Need for an Oil Change
- a small funnel,
- an oil drip pan,
- a fiter socket or other such filter removal tool
- and have a scocket set on-hand.
- A center stand or center risers to pick the bike up and keep it level. BE SURE to use a bungie or other such method to keep the front brake engaged and the bike from sliding off the center stand!!
You’re going to need to pour the oil into something. I purchased a inexpensive oil drip pan at Baxter’s. While Jenner has heard horror stories of the strap style filter remover I have always had good luck with mine, so I continue to use it.
3. Now for the actual work on the motorcycle.

1) Unscrew the oil filter one turn, while the engine is cold, to get it started. No oil will be dripping unless there is a crack in the gasket. Note: this “pre-turn” will make removing the filter later a bit easier. 
2) Turn over the engine and let it warm the oil. Let the engine heat up to the first bar then turn the engine off. 
3) Put the oil pan under the drain bolt and carefully remove both drain bolt and washer. Be careful as the oil will be a bit warm and the washer may stick to the engine. 
5) After 10 minutes I then remove the oil filter letting the majority of the oil drain from the engine. 
6) Put the drain bolt, with washer, back on. 
7b) Put a few daps of fresh oil around the new oil fliter gasket to help it seal. Screw on the new oil filter and tighten it pretty tightly. Remember you’ll need to take it off again (About 12-13 ft/lbs). 
7) Put a few drops of fresh oil around the new oil filter gasket to help it seal. Screw on the new oil filter and tighten it pretty tightly. Remember you’ll need to take it off again (About 12-13 ft/lbs). 
8) Put oil back into the engine and check to make sure it goes to the ‘TOP’ of the window.


| The Oil Change Process in Pictures |
- Unscrew the oil filter one turn, while the engine is cold, to get it started. No oil will be dripping unless there is a crack in the gasket. Note: this “pre-turn” will make removing the filter later a bit easier.
- Turn over the engine and let it warm the oil. Let the engine heat up to the first bar then turn the engine off.
- Put the oil pan under the drain bolt and carefully remove both drain bolt and washer. Be careful as the oil will be a bit warm and the washer may stick to the engine.
- Wait about 10 minutes for warm oil to drain.
- After 10 minutes I then remove the oil filter letting the majority of the oil drain from the engine.
Note: Some people turn the engine over a couple of turns to get ‘all’ the oil out. Not me, I don’t mind a little bit of old oil with the new oil. The risk/reward of turning over the engine without oil in the engine just never made much sense to me so I don’t do it.
- Put the drain bolt, with washer, back on.
- Put a few drops of fresh oil around the new oil filter gasket to help it seal. Screw on the new oil filter and tighten it pretty tightly. Remember you’ll need to take it off again (About 12-13 ft/lbs).
- Put oil back into the engine and check to make sure it goes to the ‘TOP’ of the window.
- Put the cap back on the oil fill port.
- Start the engine and look for leaks – fix as necessary run about 3-5 minutes.
- Let engine cool and oil drain back into reservoir – about 10 minutes
- Add a bit more oil if the engine oil doesn’t return to the center mark. Note: the new filter will absorb some oil.
- Confirm oil level is correct before taking off center stand.
That’s it! You’re Done! Pretty easy really – especially compared to the BMW Oil Change.
Thanks again to Jenner and the Deus Ex Machina website for providing such wonderful initial instructions.

Having a plastic grated cover over your dirty oil container can save you from having to fish out the drain plug 
And the plastic guard is also a nice way to drain the old oil out of the oil filter before discarding 
A funnel is handy for getting the oil in the fill port with out spilling 
Mind the marks on the sight glass. Do not overfill!


Awesome post.
RE. turning the engine over a few times to get more old oil out,I tried it,and now have a well lubricated garage wall 🙁